Health and fitness are increasingly connected with technology in today's digital world. Google Fit API is an excellent platform for developers who want to make health-conscious apps. It's easy to take advantage of health and wellness data from different devices and apps and combine them. But How The Google Fit API works, and how do you use Google Fit API in a Node.js app with the Express framework? In this article, we'll see how to do it step by step, covering setup, authentication, and a few use cases.
What is Google Fit API?
So, what is Google Fit API? It's a set of rules letting your app talk to Google Fit. It provides tools to read, write, and sync health data like steps, heart rate, etc. It's great for building fitness and health-related apps that give you a complete view of your health journey. There are many use cases for using Goole Fit API. For example:
- Fitness Tracking Apps: allow individuals to measure and record their physical activities such as walking, running, or cycling. These apps help users monitor and keep track of their fitness progress and goals.
- Health Monitoring Apps: collect data from devices like heart rate monitors or blood pressure machines. This can be really helpful for people with chronic conditions.
- Nutrition Apps: collect data on dietary habits, calorie intake, and hydration levels. Combining this data with exercise metrics can create a well-rounded health profile.
Google Fit Components
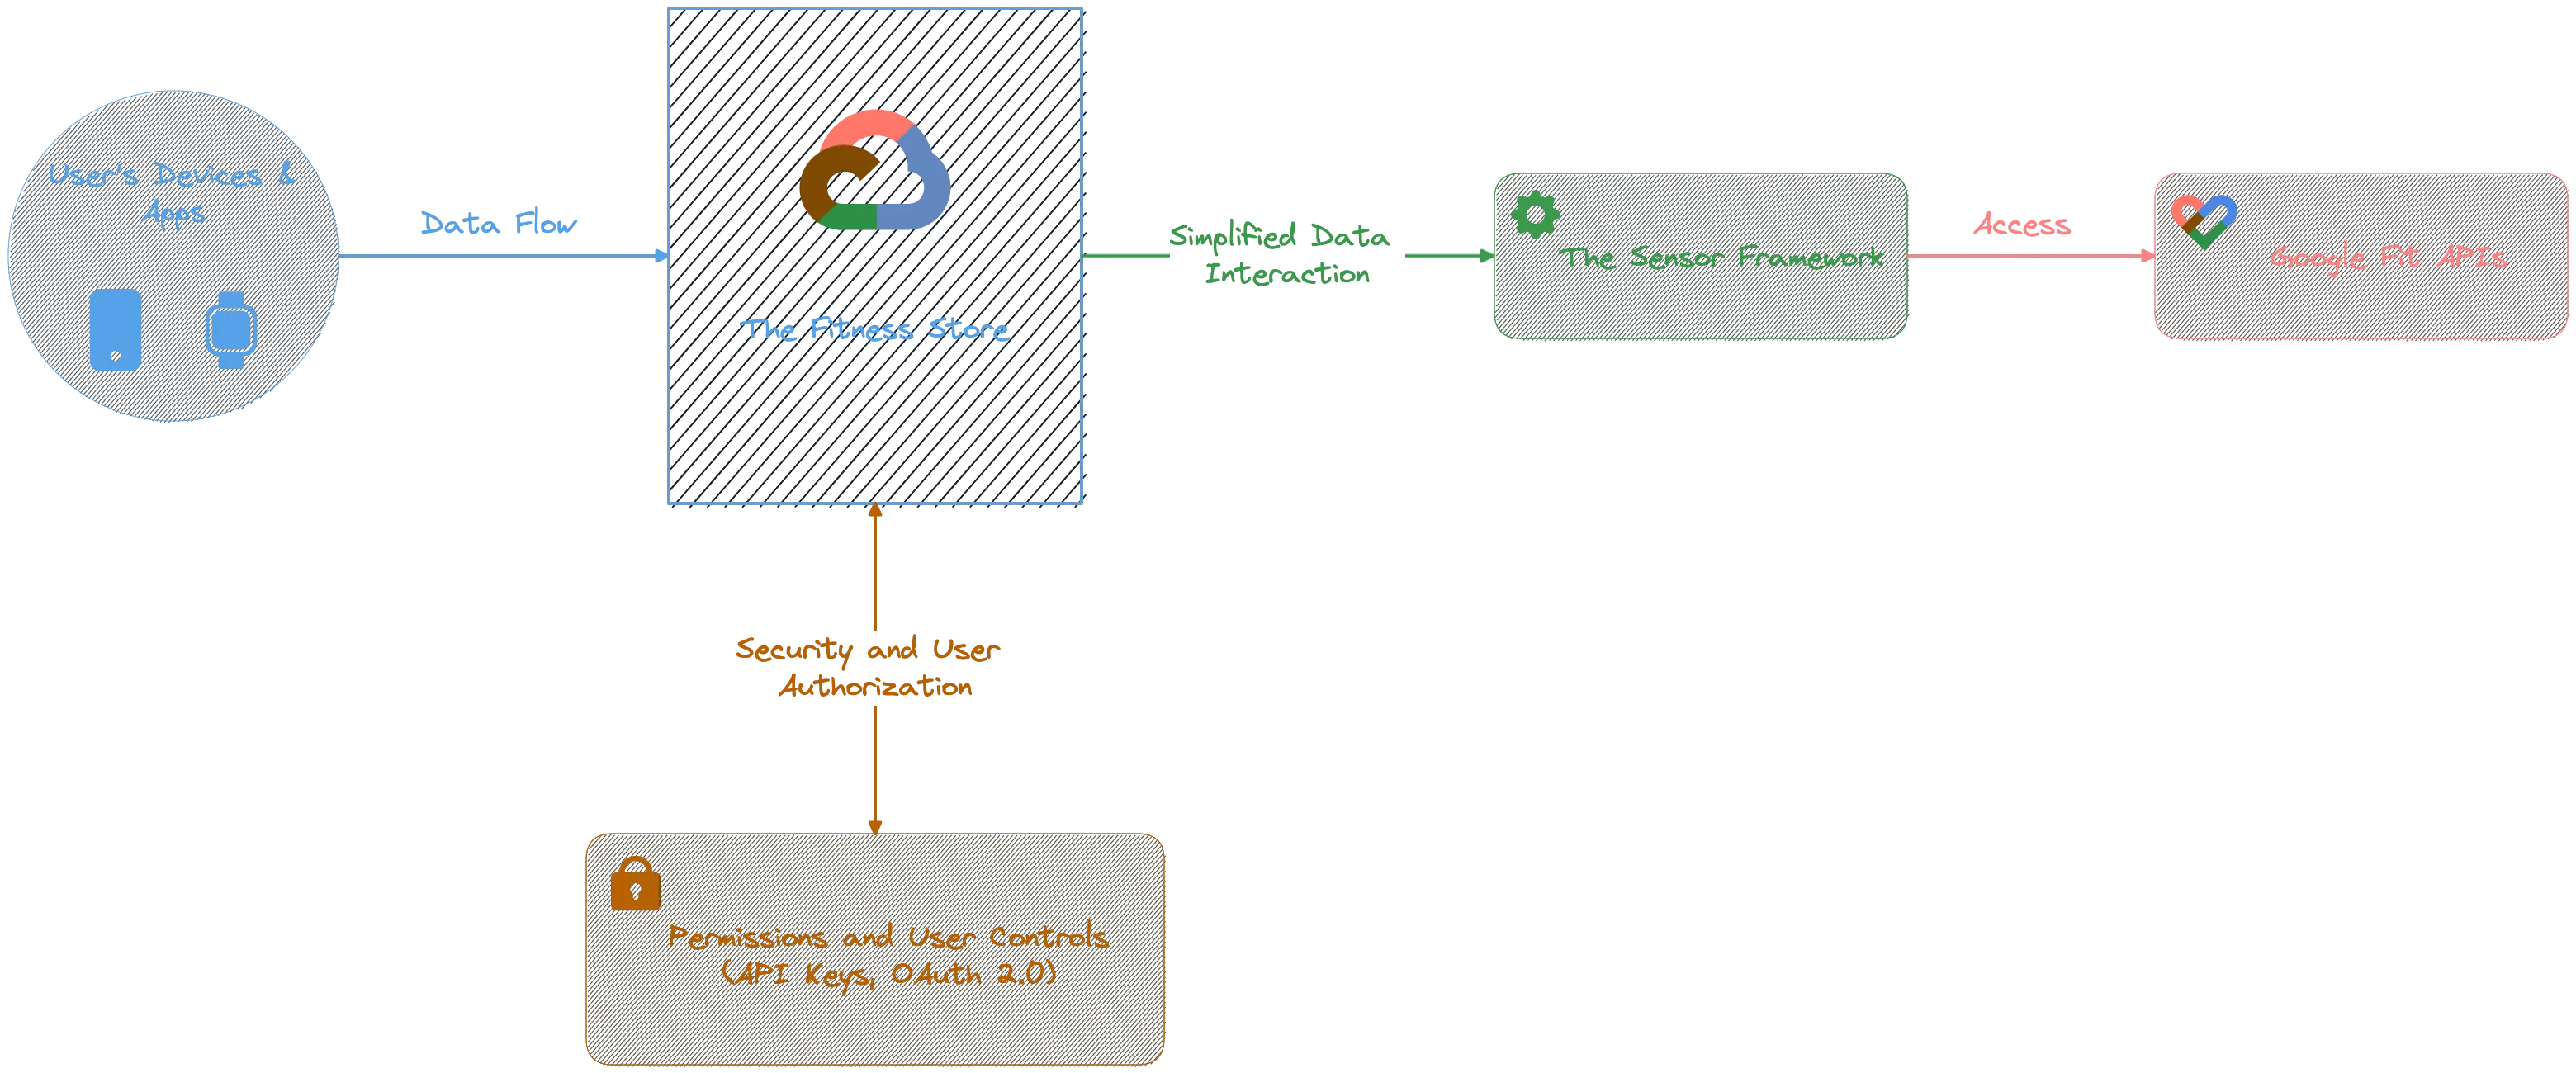
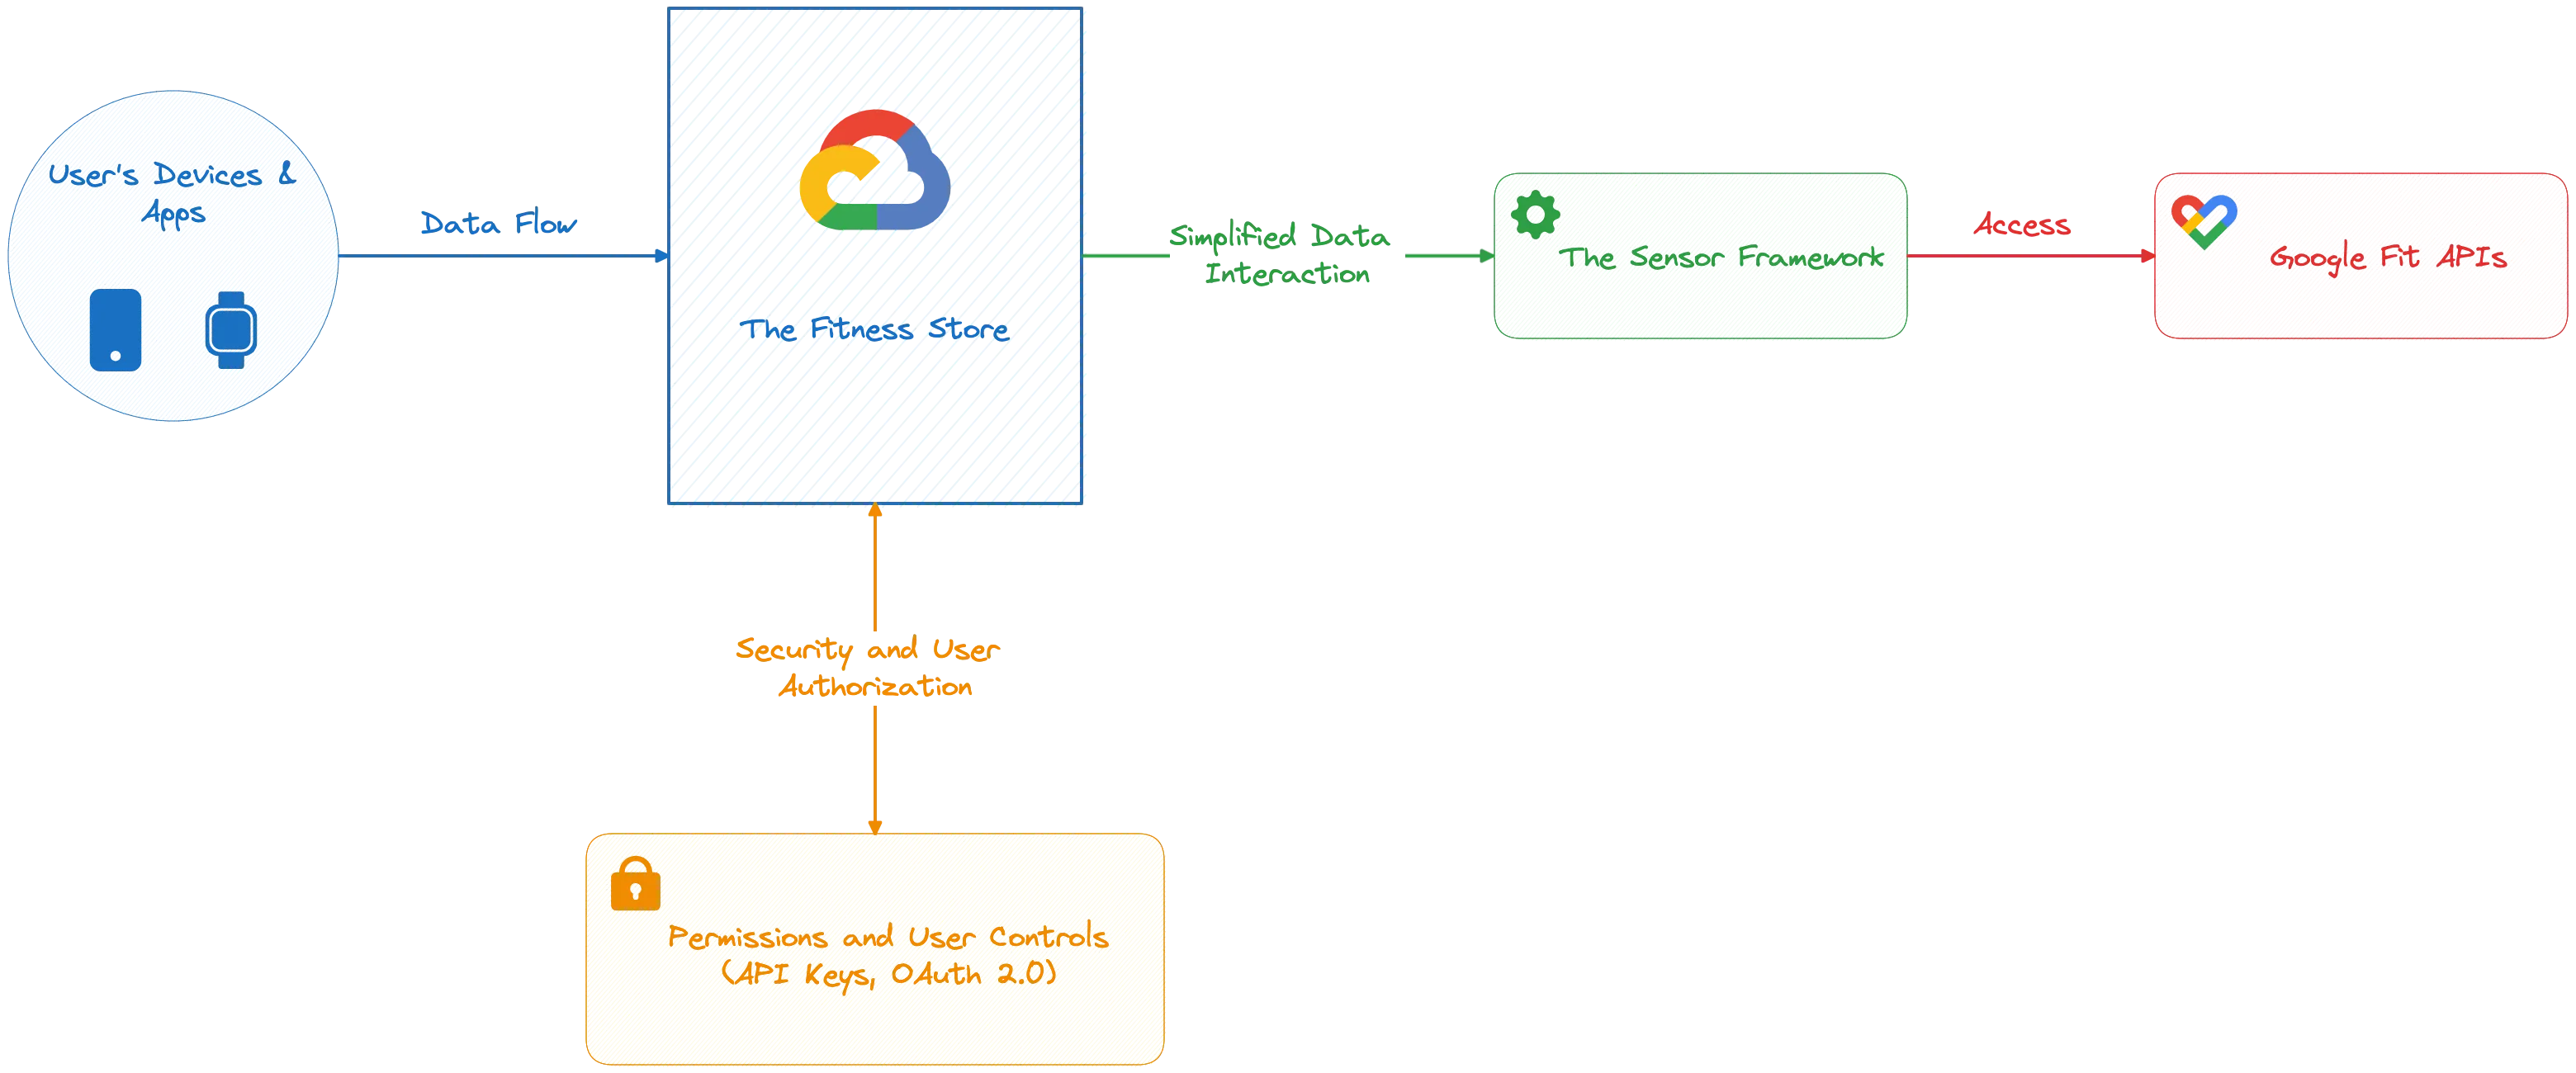
It's essential to know the different parts of Google Fit to use it well. Google Fit is like a one-stop shop for keeping track of your health and wellness. It has a lot of different parts that work together to help you keep on top of things. Let's take a closer look at what's inside.
The Fitness Store
The Fitness Store is the core repository in Google Fit, where all user health and wellness data gets stored. It is a centralized cloud-based service that receives data from various sources—wearables like fitness trackers, smartwatches, or other fitness apps.
For developers, the Fitness Store serves as a secure and comprehensive database. You can read from or write to this store when creating health and wellness applications. This enables your Node.js application to tap into various health metrics, from step counts to heart rates.
The sensor Framework
Google Fit offers a sensor framework to facilitate easy interaction with the fitness store. This framework provides high-level representations or abstractions that allow you to work with the data stored in the fitness store. Developers can smoothly fetch, manipulate, or update health data by employing these abstractions via Google Fit APIs.
Google Fit offers various types of sensors for diverse data categories, such as:
- Physical activity (steps, running, cycling)
- Biometric data (heart rate, blood pressure)
- Nutrition and hydration
- Sleep and stress metrics
Each category can have one or more associated sensors, allowing your application to interact with various data points.
Permissions and User Controls
User consent is a cornerstone of Google Fit. You must secure their explicit permission to access an individual's health and wellness data. Google Fit accomplishes this through a defined set of authorization scopes. These scopes delineate the extent of data your application can access, ensuring a transparent and secure user experience.
Google APIs commonly use OAuth 2.0 for authentication and authorization. The process begins with your application directing the user to Google's OAuth consent screen. Here, the user can review which data types the application requests access to and decide whether to grant those permissions.
During the OAuth 2.0 setup, you must specify the scopes your application requires. Scopes define the extent of access that your application will have. For instance, Google Fit API has different scopes for reading fitness activities, sleep data, or nutrition information. Choose scopes carefully based on your application's needs.
Read more about Google Authorization using OAuth 2.0.
Google Fit APIs
Last but not least are the Google Fit APIs, available for Android and REST APIs. These APIs serve as the communication bridge between your application and the Google Fit ecosystem. They allow for the creation of cross-platform applications, supporting various devices and platforms, including Android, iOS, and web apps.
After a comprehensive exploration of the Google Fit components, it's crucial to understand how these elements integrate within the broader Google ecosystem.
Google API Console
Google API Console is your personal control room for managing Google Cloud APIs. It's a dashboard where you can create new projects, activate APIs, track usage, and set up credentials. It's the place to go if you want to interact with all of Google's awesome services.
Create a New Project
A project is a unit in Google Cloud for organizing resources, managing IAM, and using APIs. It keeps resources and configurations separate, preventing actions in one project from affecting another. Each project has a unique ID and name linked to a billing account. The Google Cloud Console provides a consolidated view of a project's resources, expenses, and performance metrics for easy administration and oversight.
To create a new project, navigate to the Google Cloud Console; you'll see a project dropdown at the top of the page. Click on it and select "New Project" from the dialog box.
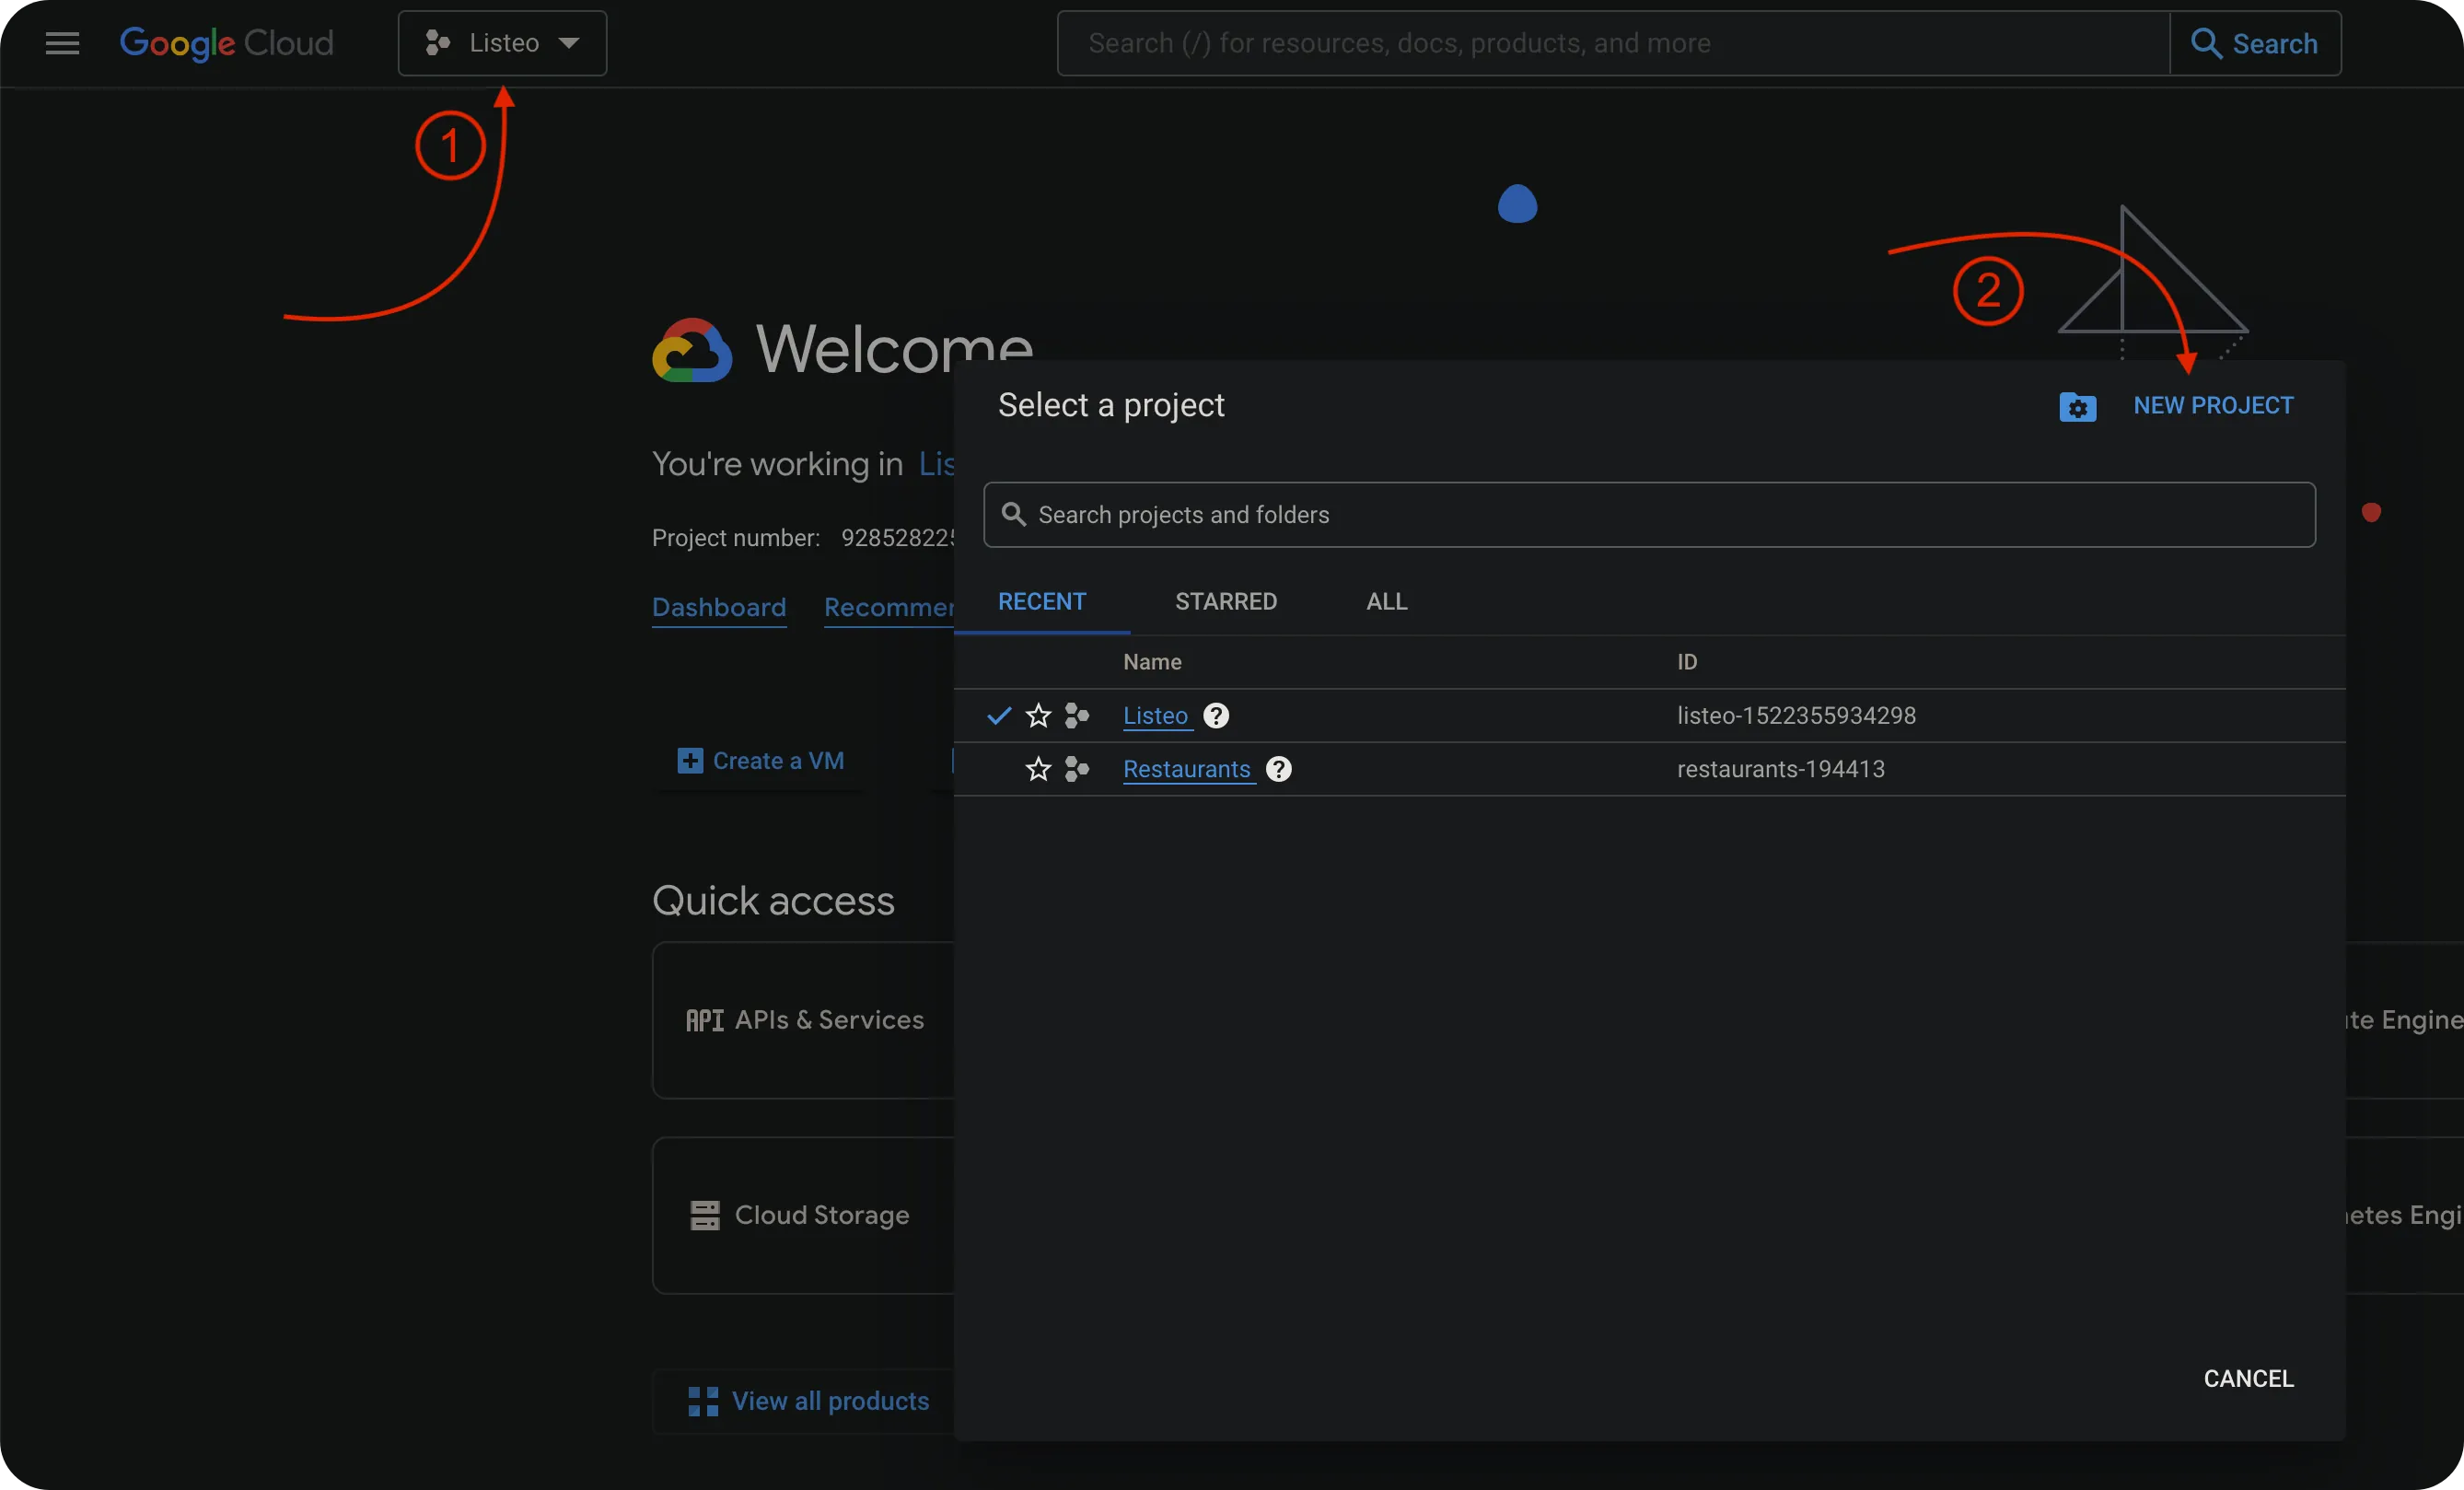
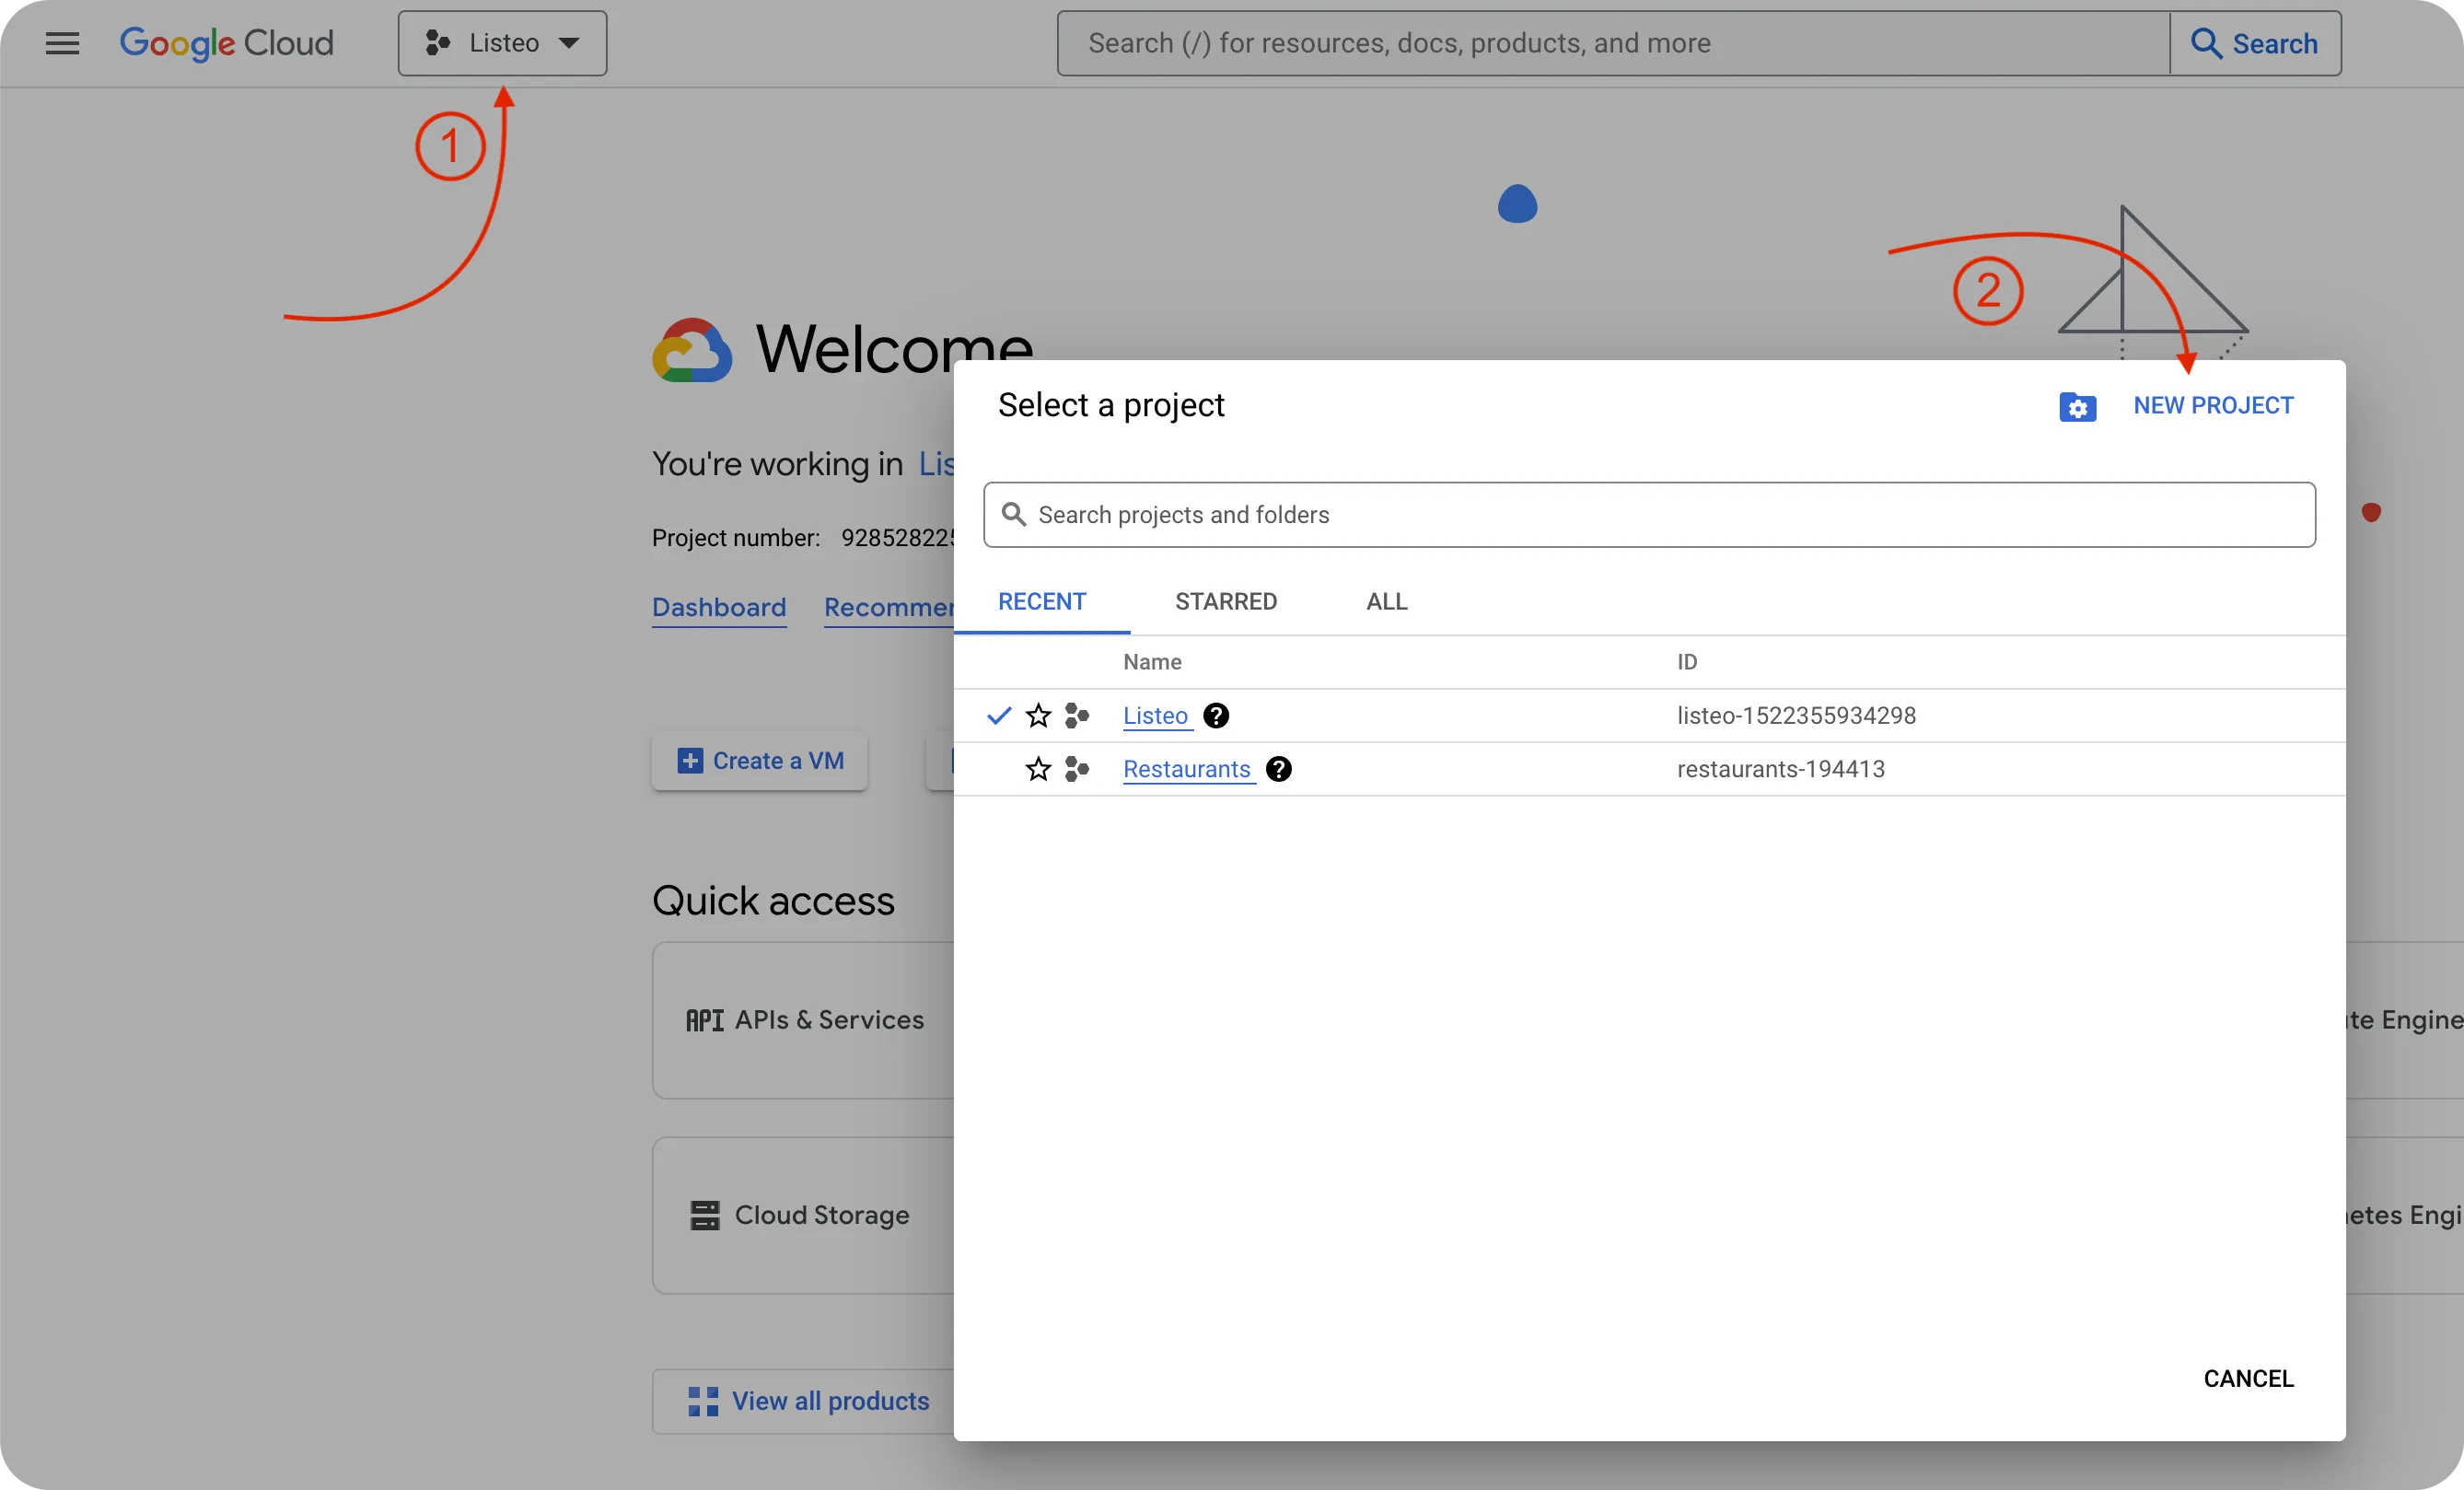
Fill in the project details, ensuring you provide a descriptive name, such as "Fitness APP - Nodejs", to capture its intent. Additionally, you can specify its organizational location by selecting the appropriate parent folder or organization, though this step is optional.
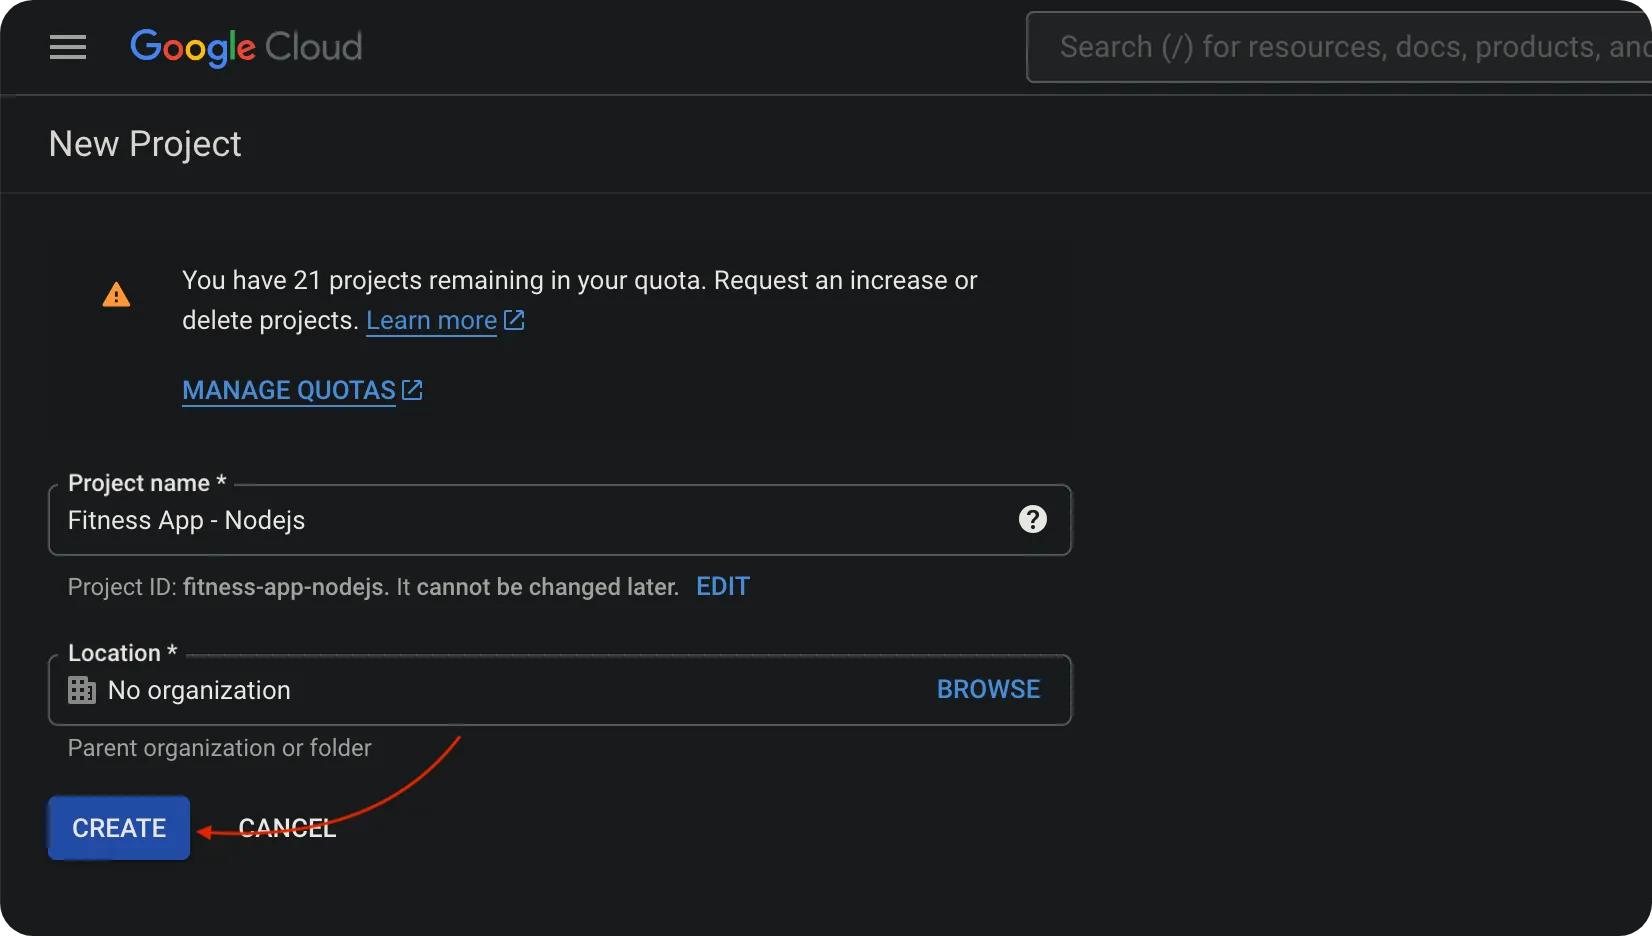
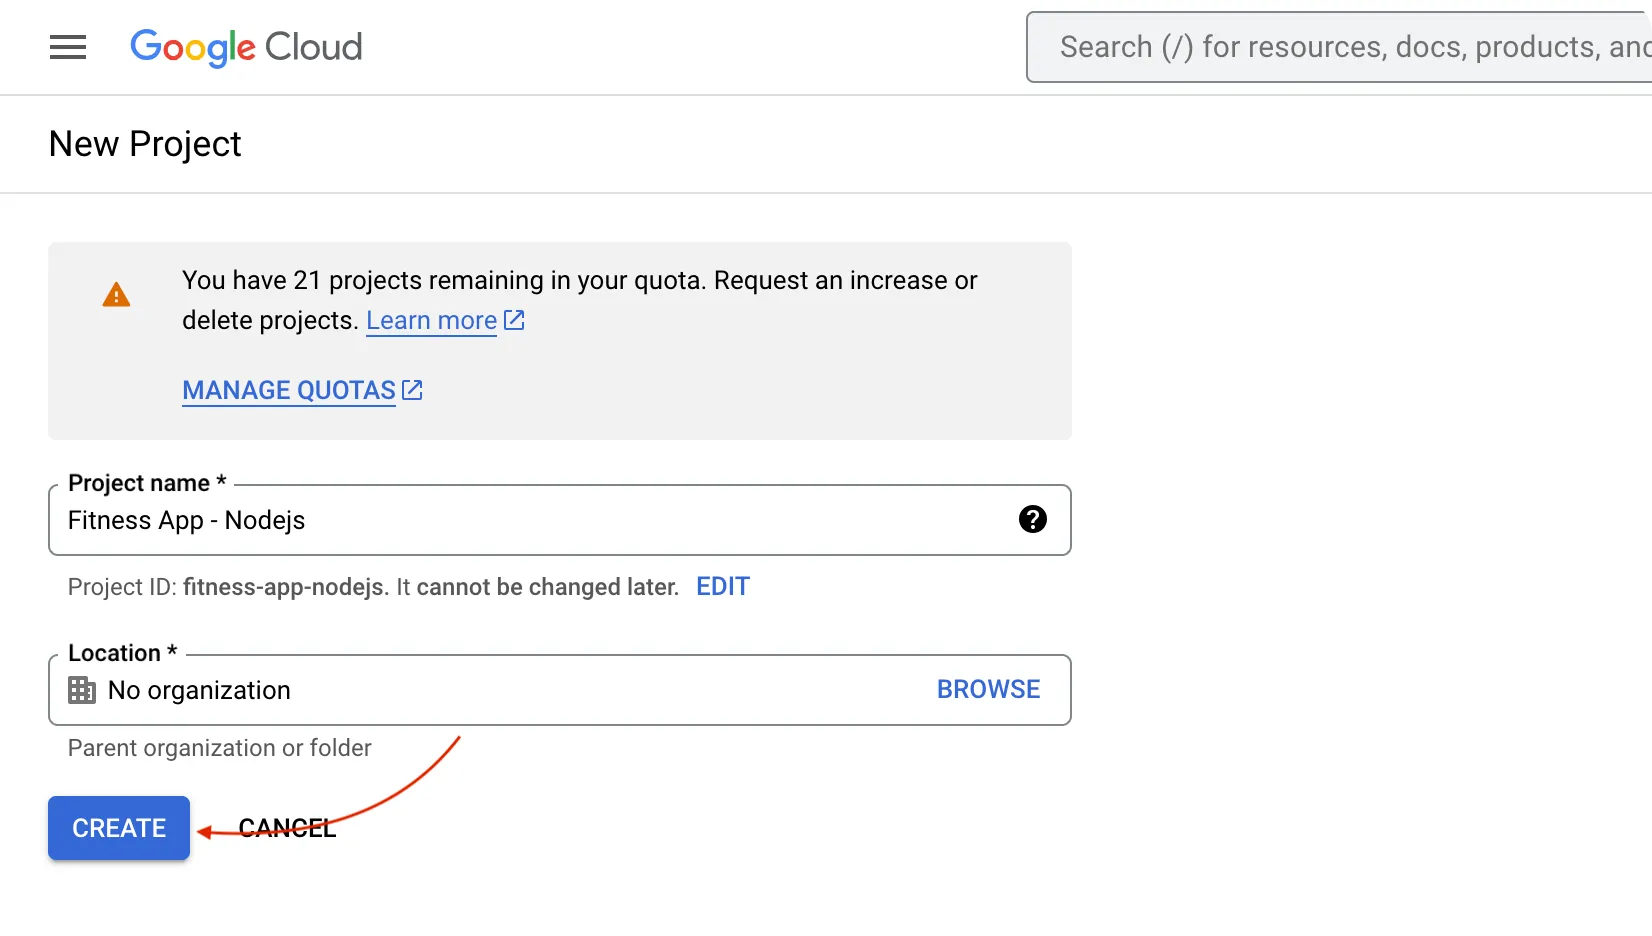
Google Cloud will now initialize your project. This might take a few moments.
Enable Fitness API
Activating an API allows your project to tap into specific features. For the Google Fit API, this translates to harnessing its diverse fitness data functionalities. When this API is enabled, your project can interact with its features, invoking its methods and extracting relevant data.
To enable the fit API, head to the Google Cloud Marketplace and input "Fitness API" in the search bar. Once located, click on enable. Or you can directly navigate to this link, which will directly take you to the enabling flow.
Ensure your desired project is selected in the console. Validate your selection by pressing "Next"; Then click on "Enable".
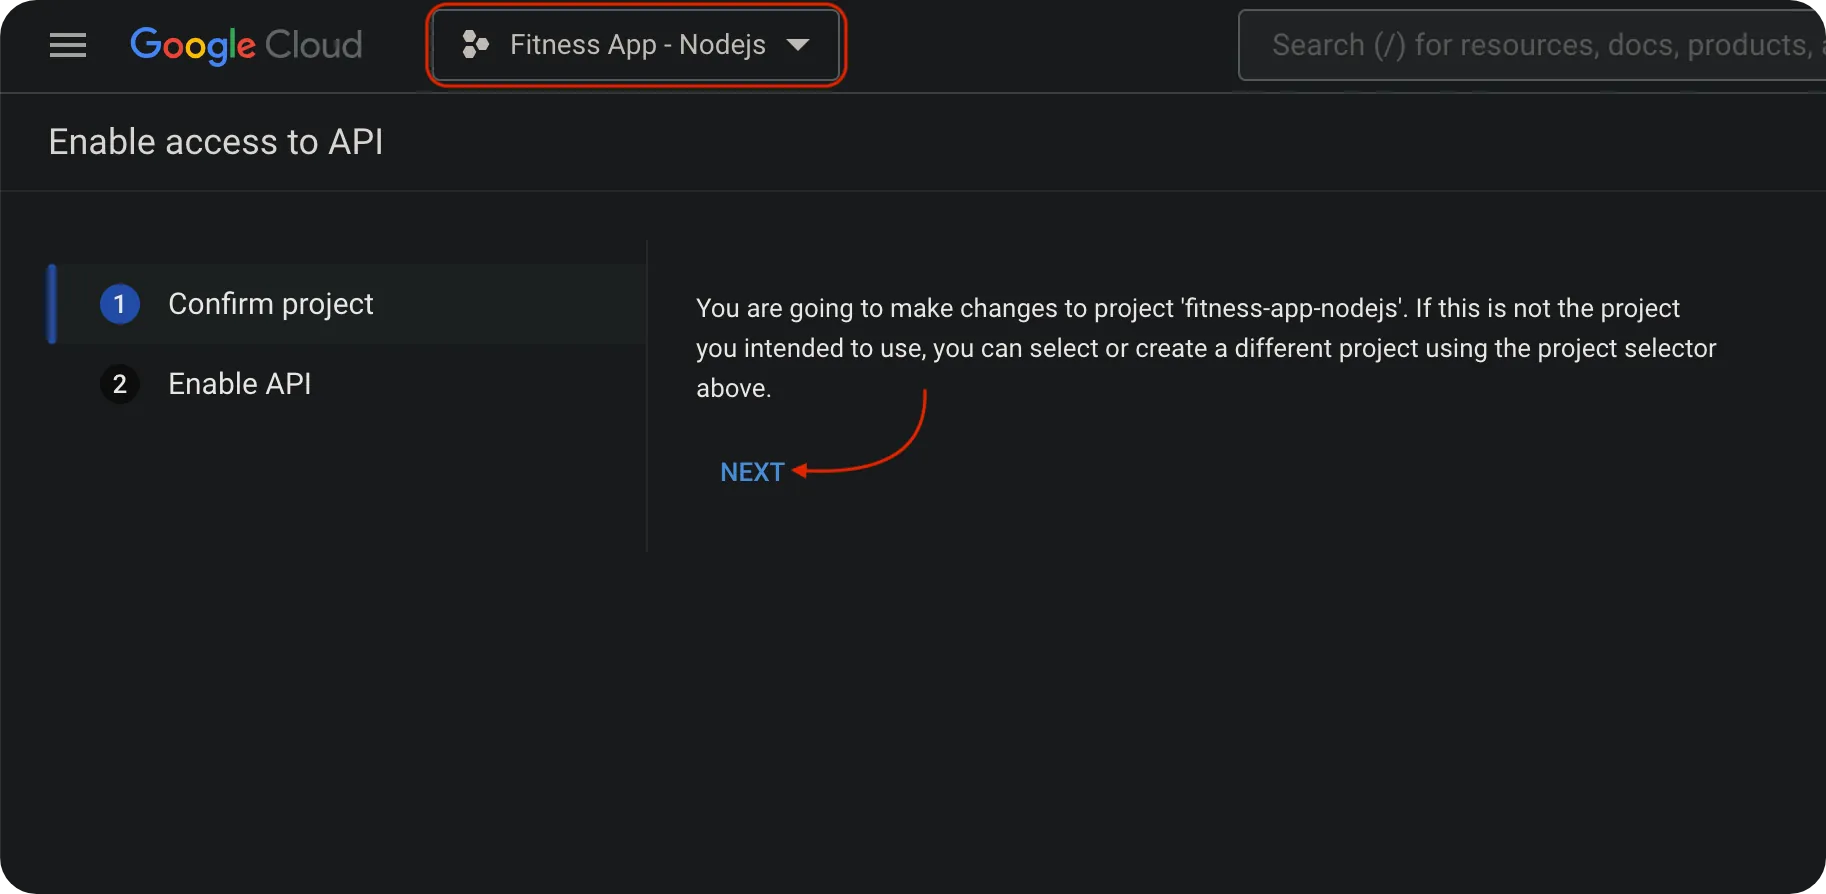

Upon successful activation, the "Enable" option becomes inactive, signaling that your project now has access to the Google Fit API.
Configure the OAuth Consent Screen
After enabling the Google Fit API for your project, configuring the OAuth Consent Screen is the next step. This screen is a permissions gateway, mediating access between your app and the user's health data. It's a critical element of the OAuth 2.0 framework, which lets users grant third-party apps access to their data without disclosing their passwords.
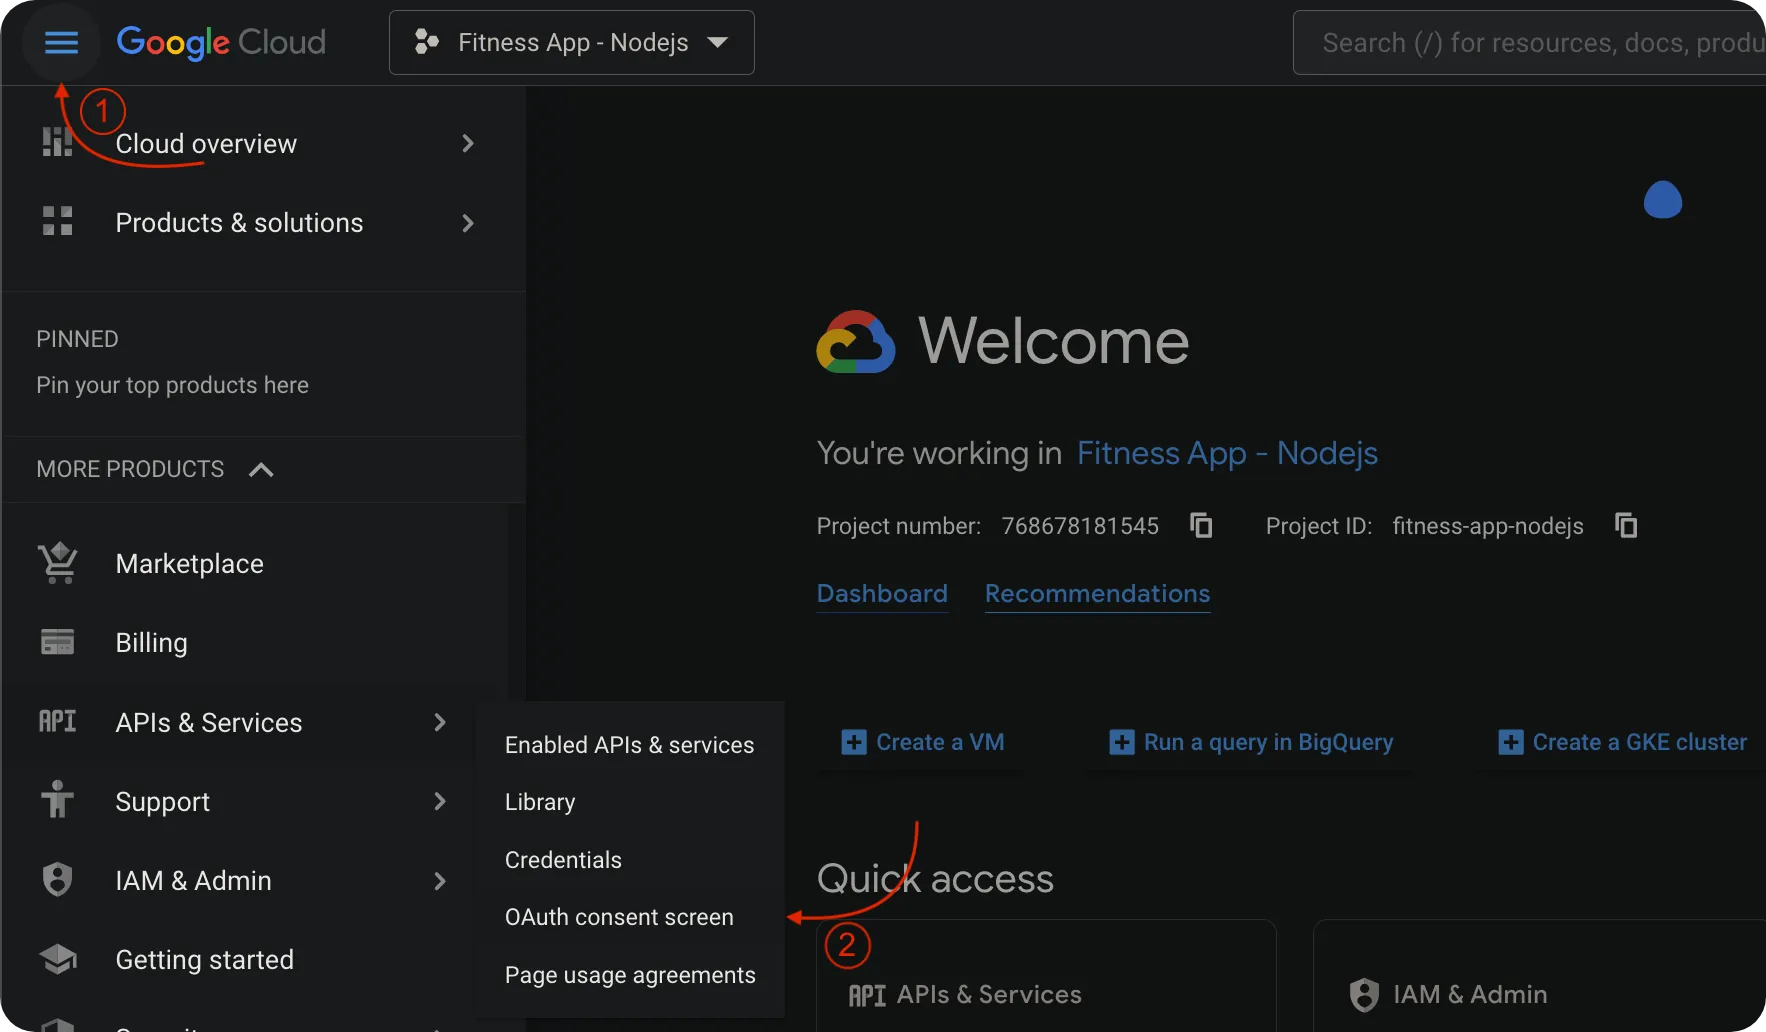
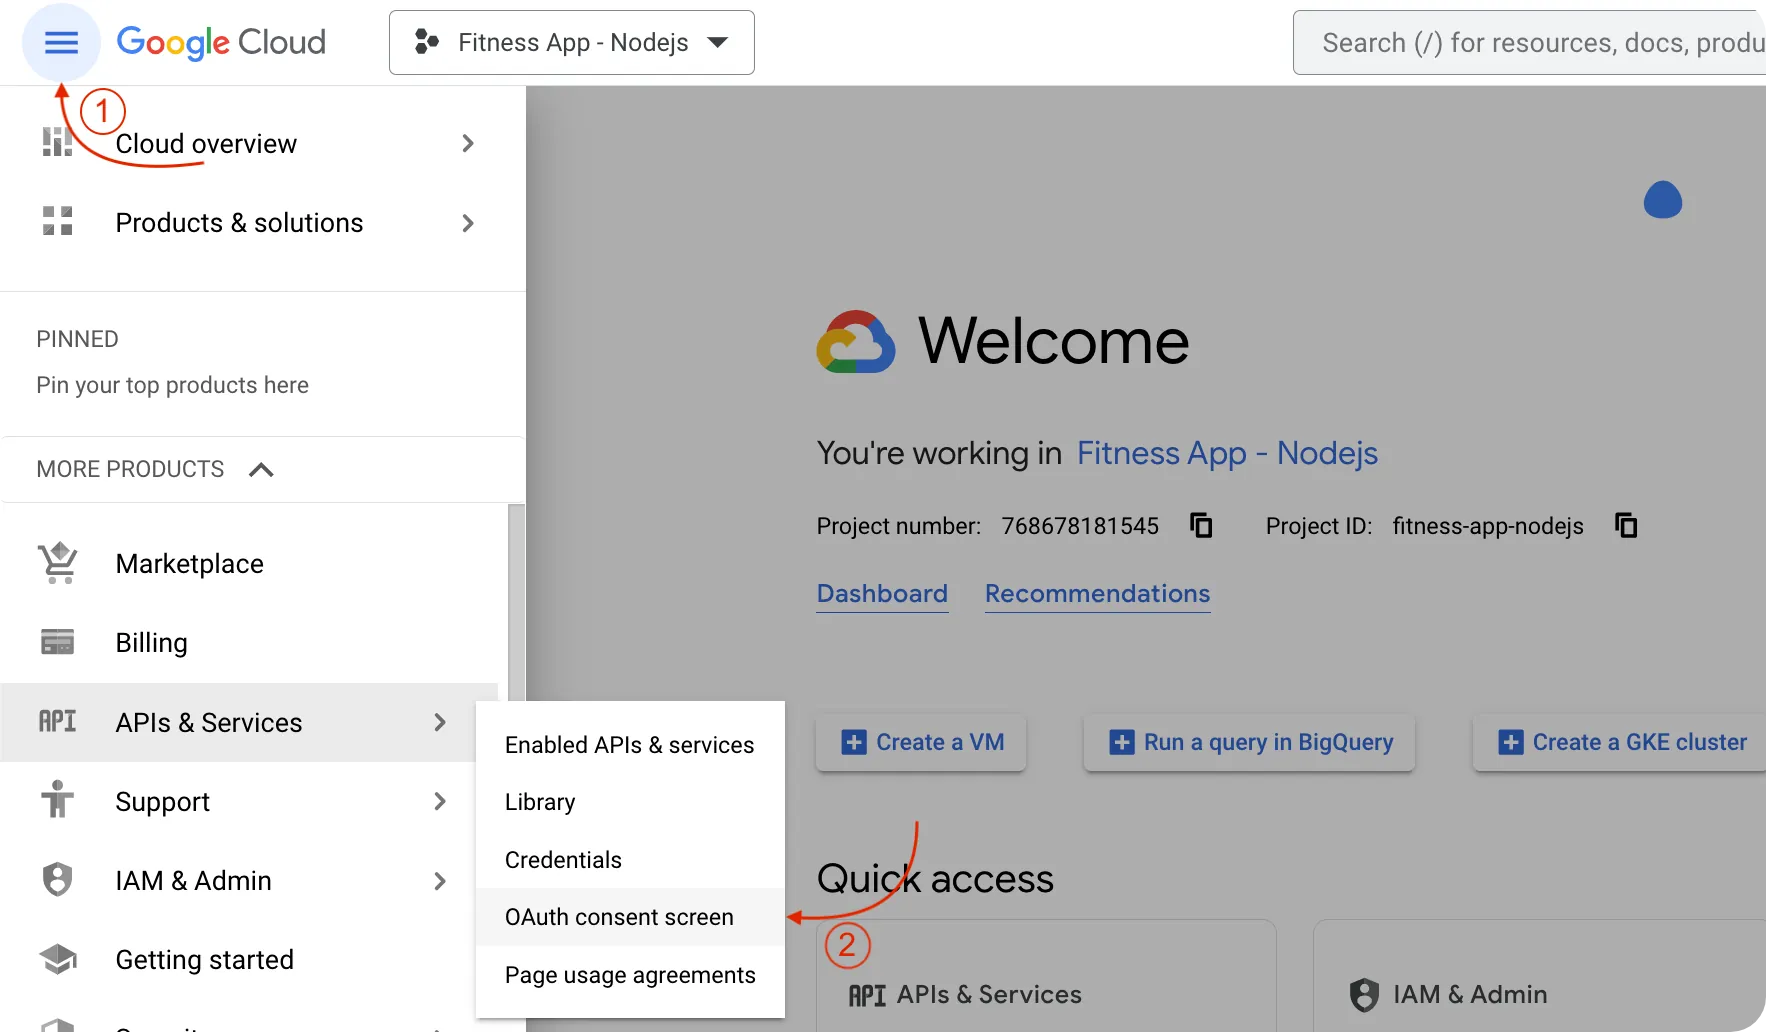
To configure the OAuth consent screen, Click on the menu icon at the top left of your Google API Console. Then, navigate to "APIs & Services" and select "OAuth Consent Screen".
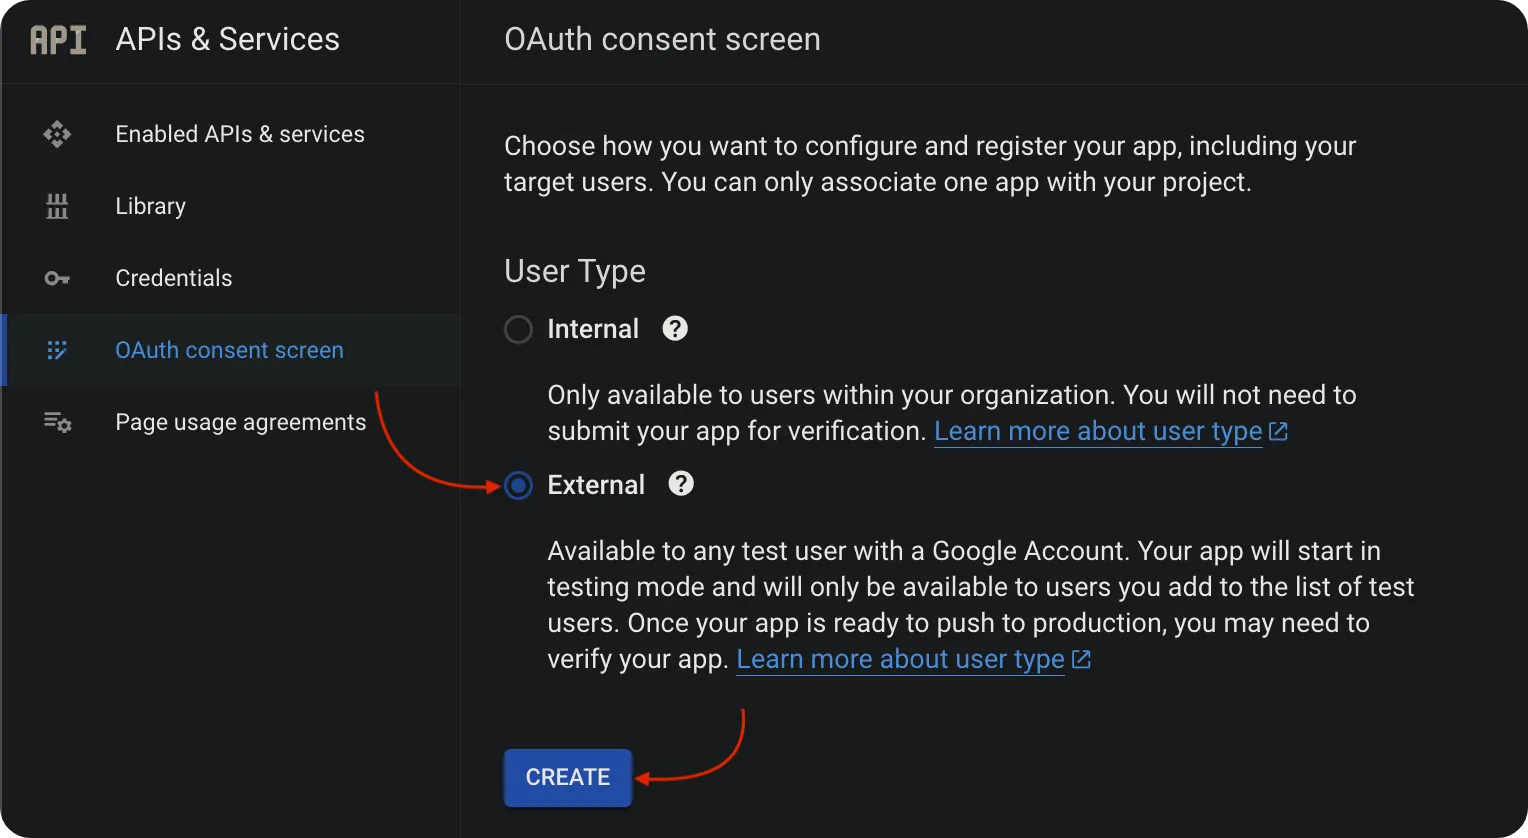
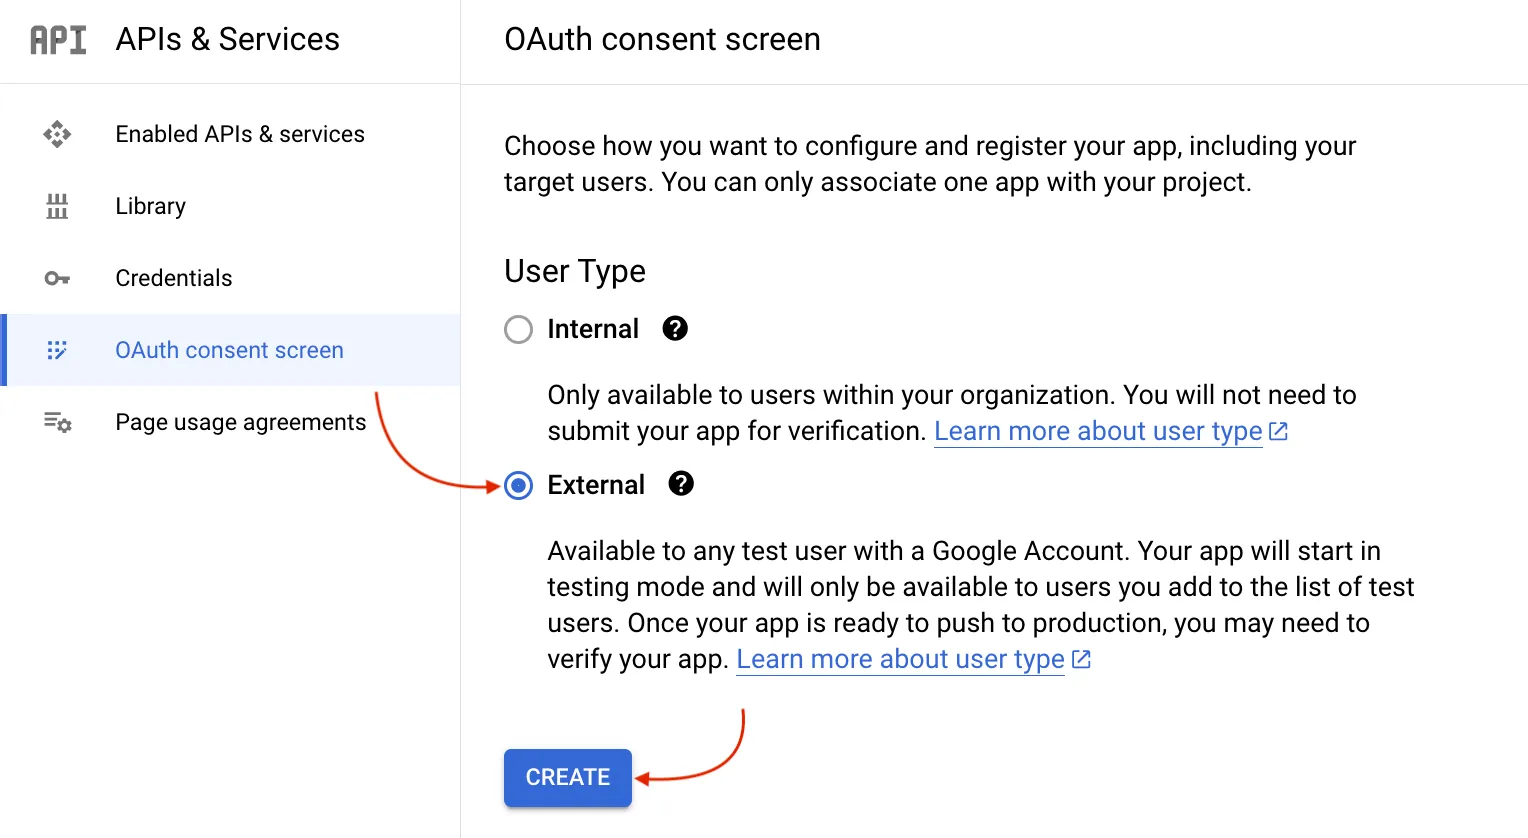
You'll be prompted to choose between two user types:
- External: For applications that intend to access users' data outside your organization.
- Internal: Restricted to users within your Google Workspace domain. Make a selection based on your application's target audience. I will opt for "External" for this tutorial since we're still in testing mode.
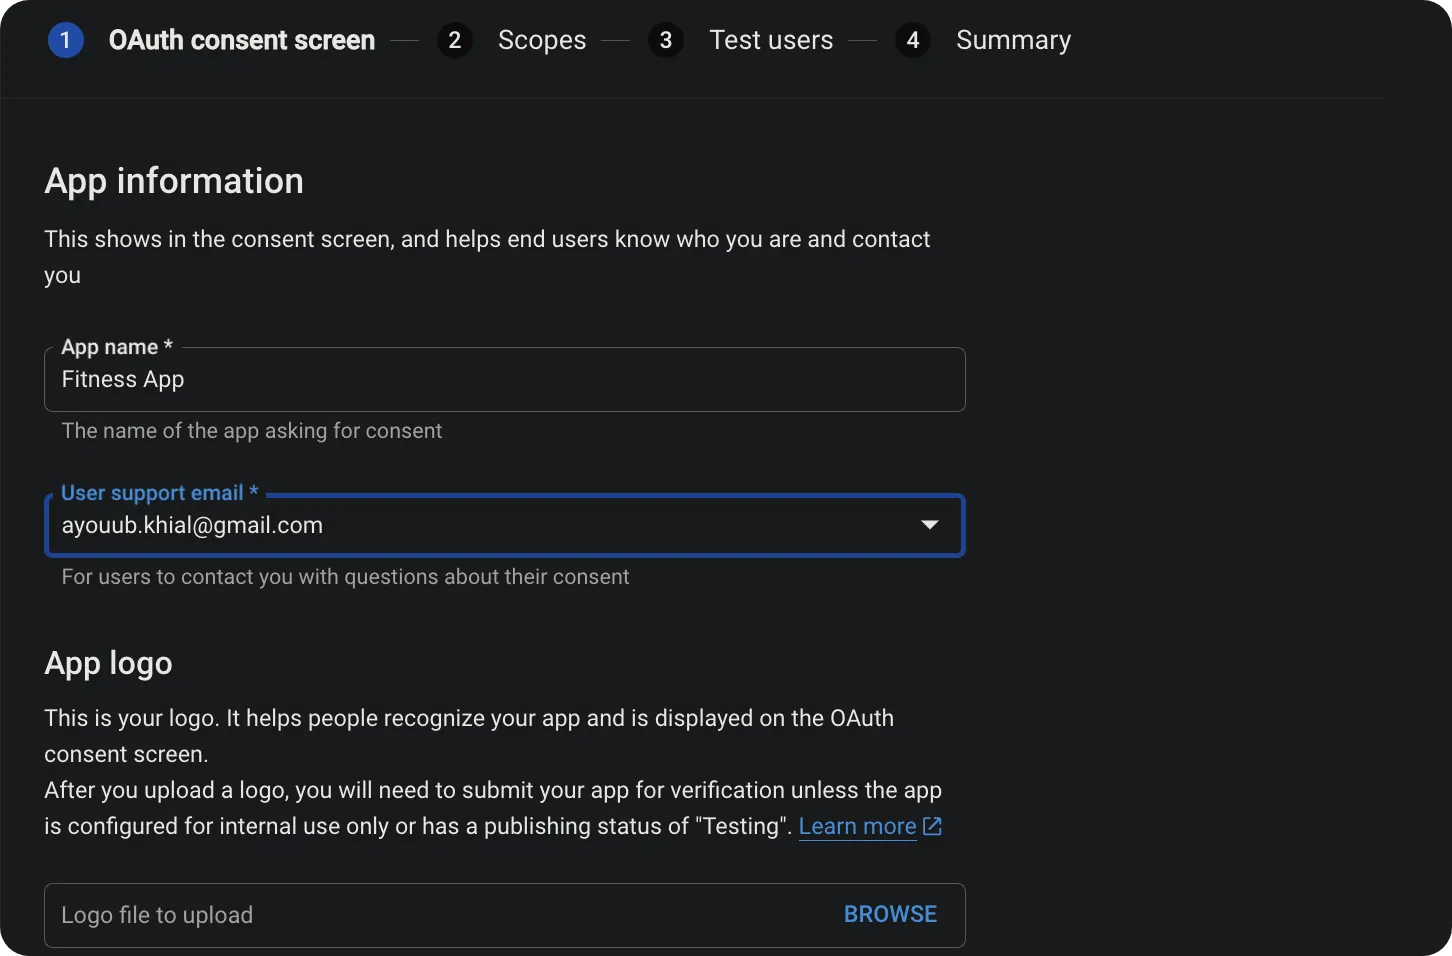
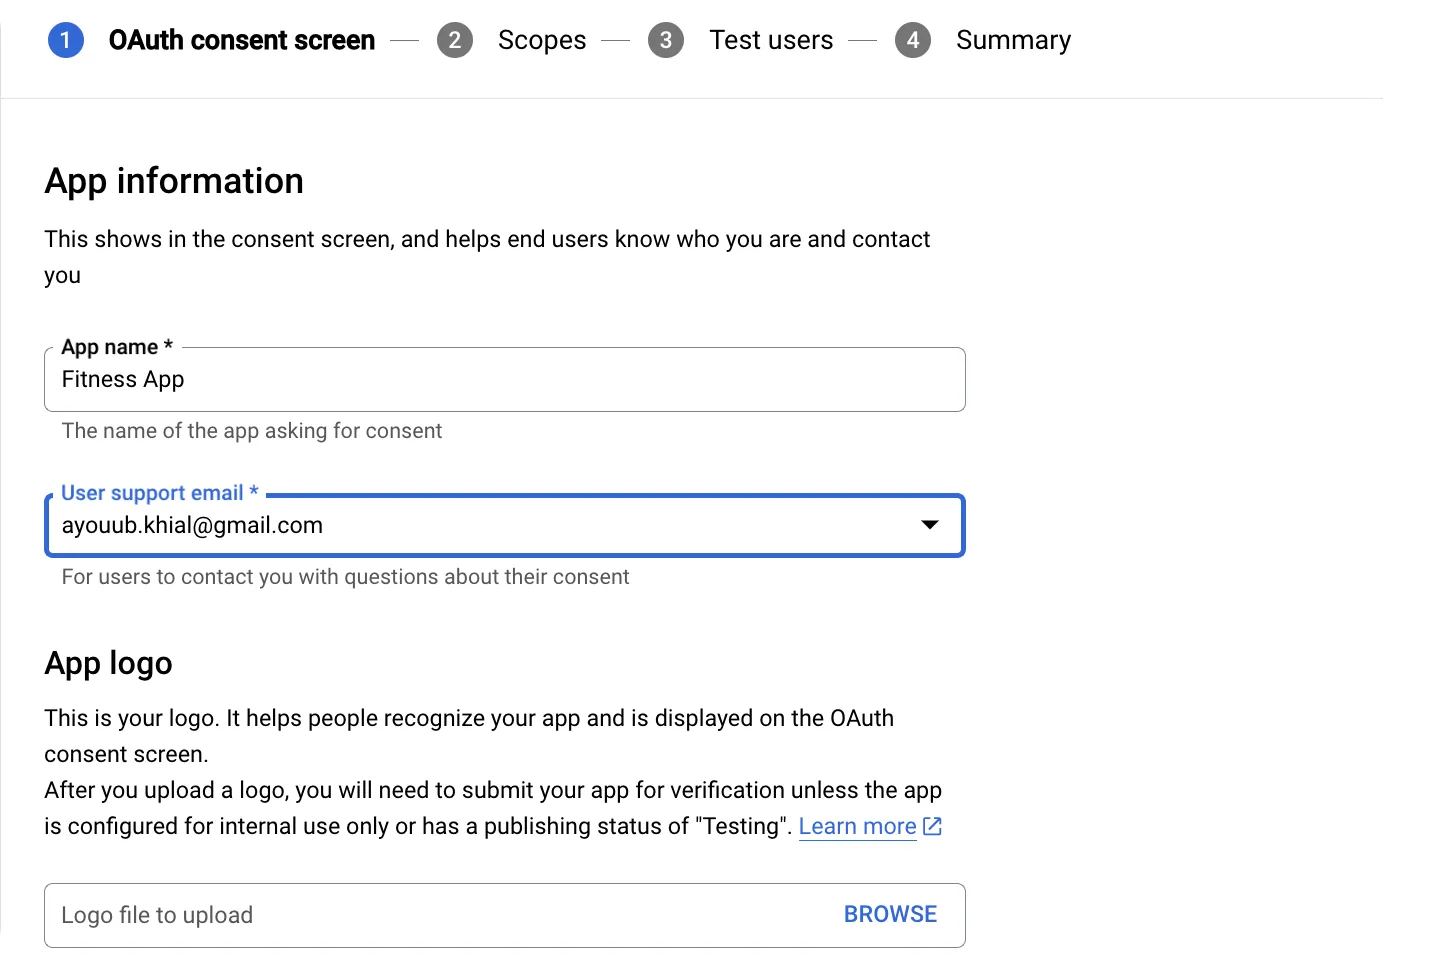
Next, Fill Out the App Information:
- App Name: The name will be displayed to users during authorization.
- User Support Email: An email address where users can get support or ask questions about the app.
- App Logo (optional): You can upload a logo that users will see on the consent screen.
You can also add URLs under "App Domain" to your app's main pages, like privacy policy or terms of service; while this is optional, "Authorized Domains" are mandatory. However, we can set them later through credentials settings.
Finally, make sure to provide at least one contact email. You can include more if you wish.
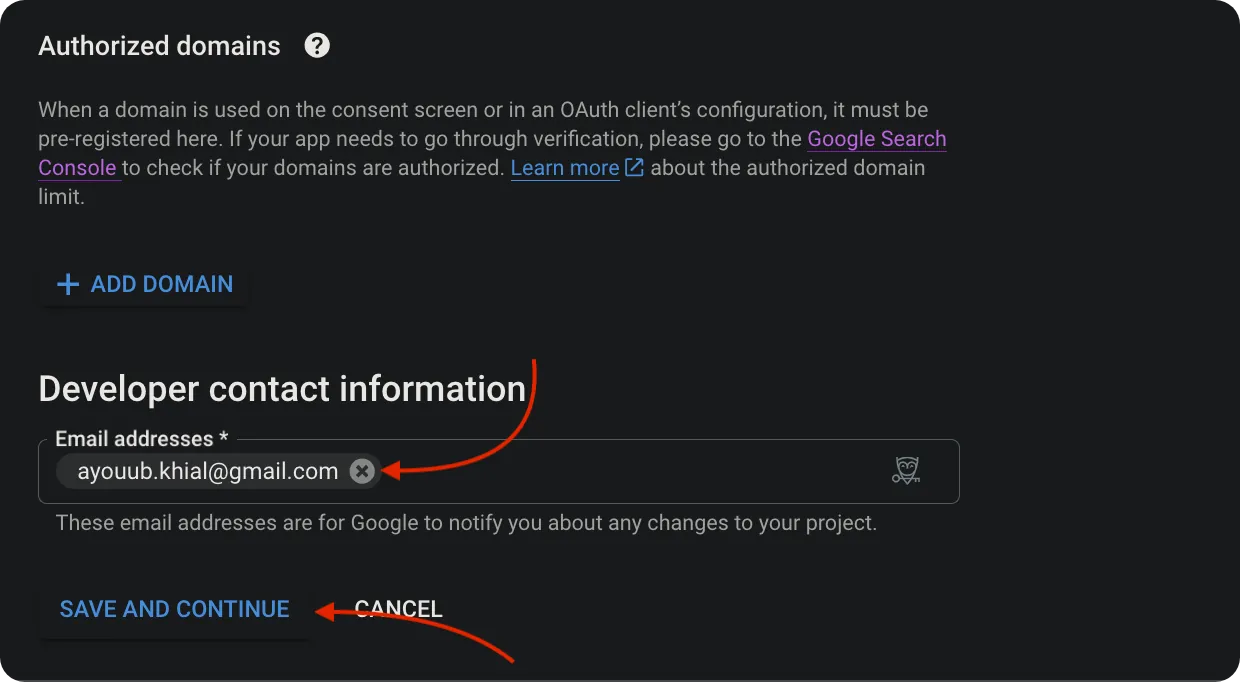
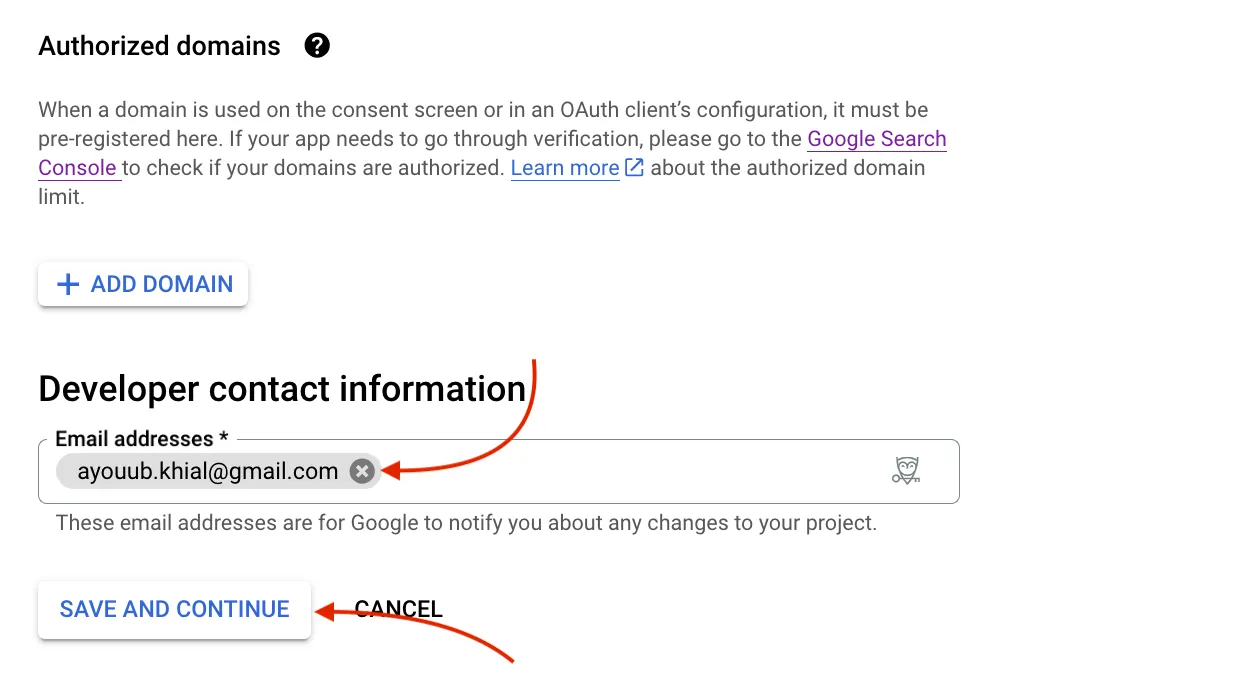
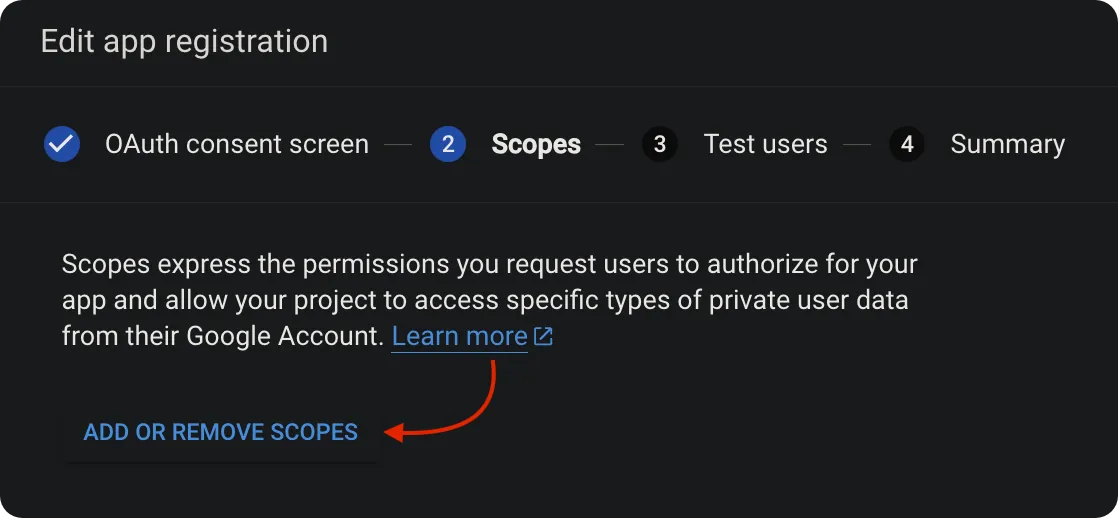
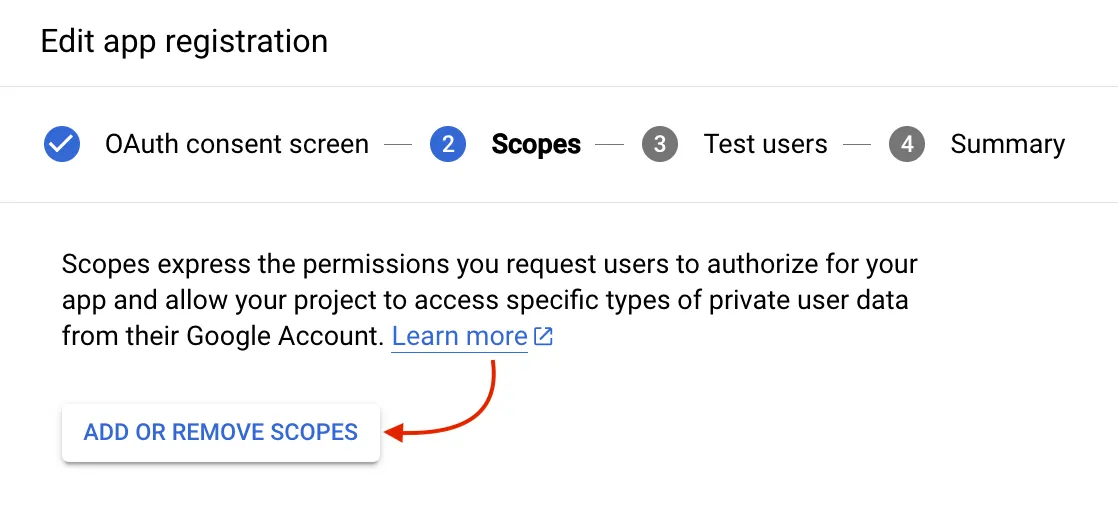
Upon clicking "Continue", you'll move on to define the scopes or permissions your app will request.
Scopes determine the type of access your application requests from users. While some default scopes may be pre-selected, ensure you only choose the ones necessary for your application to function. Over-requesting can discourage users from granting consent.
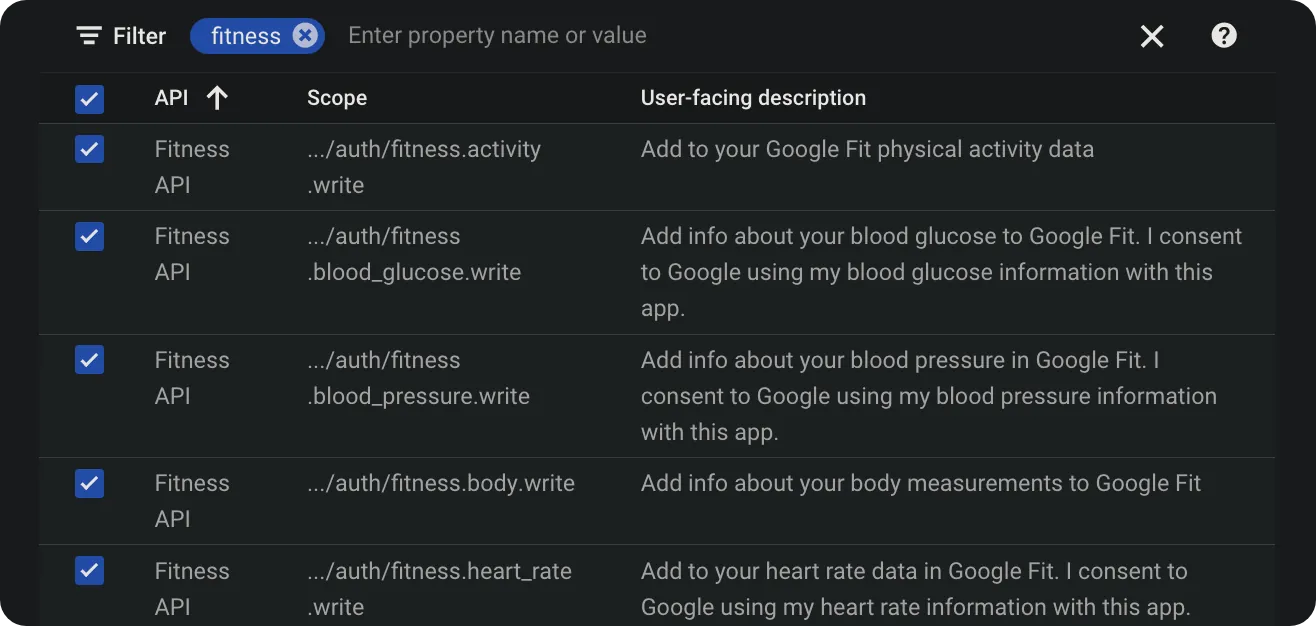
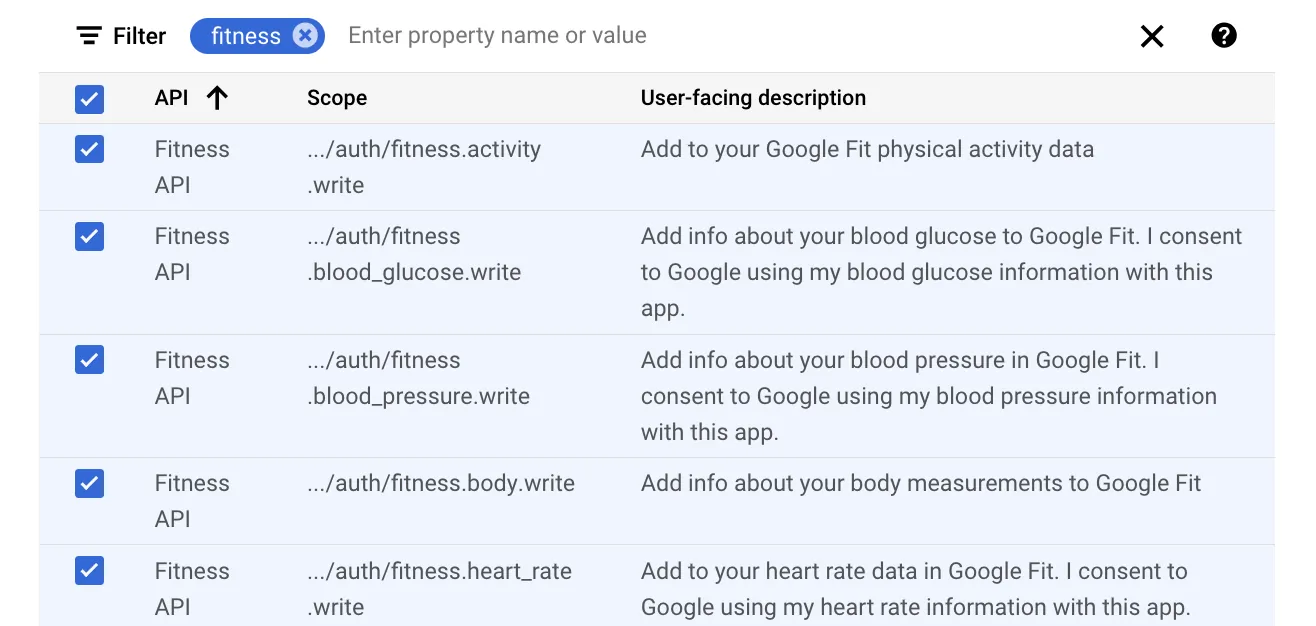
I will search for fitness in the scope list and select all.
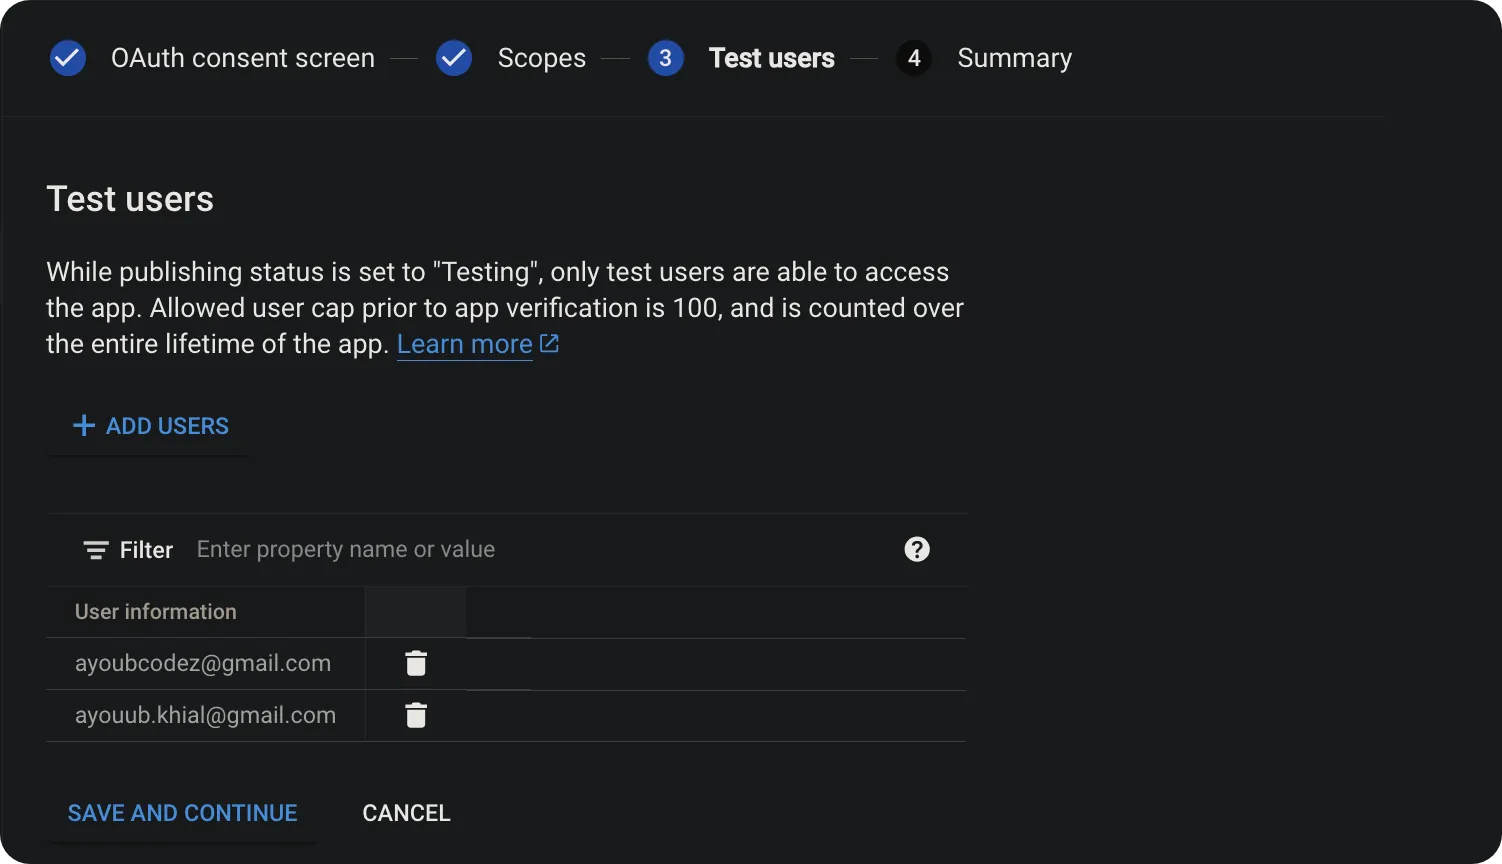
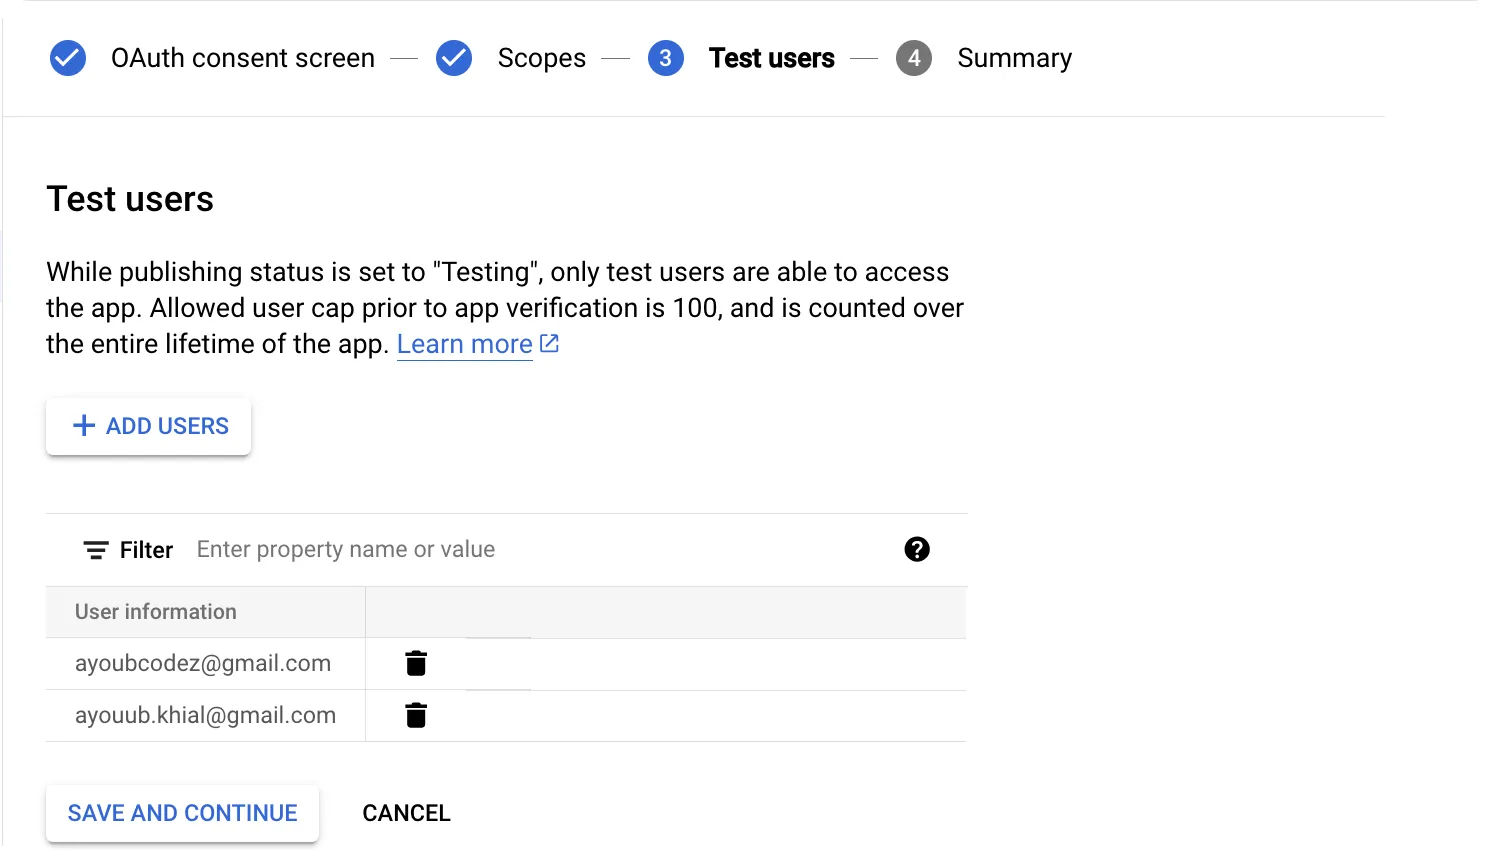
Finally, if you selected the "External" user type, you'd need to add test users. Only these specified users can grant consent during the testing phase.
Credentials
Credentials play a pivotal role in the Google API ecosystem. They serve as the digital handshake between your application and Google's services.
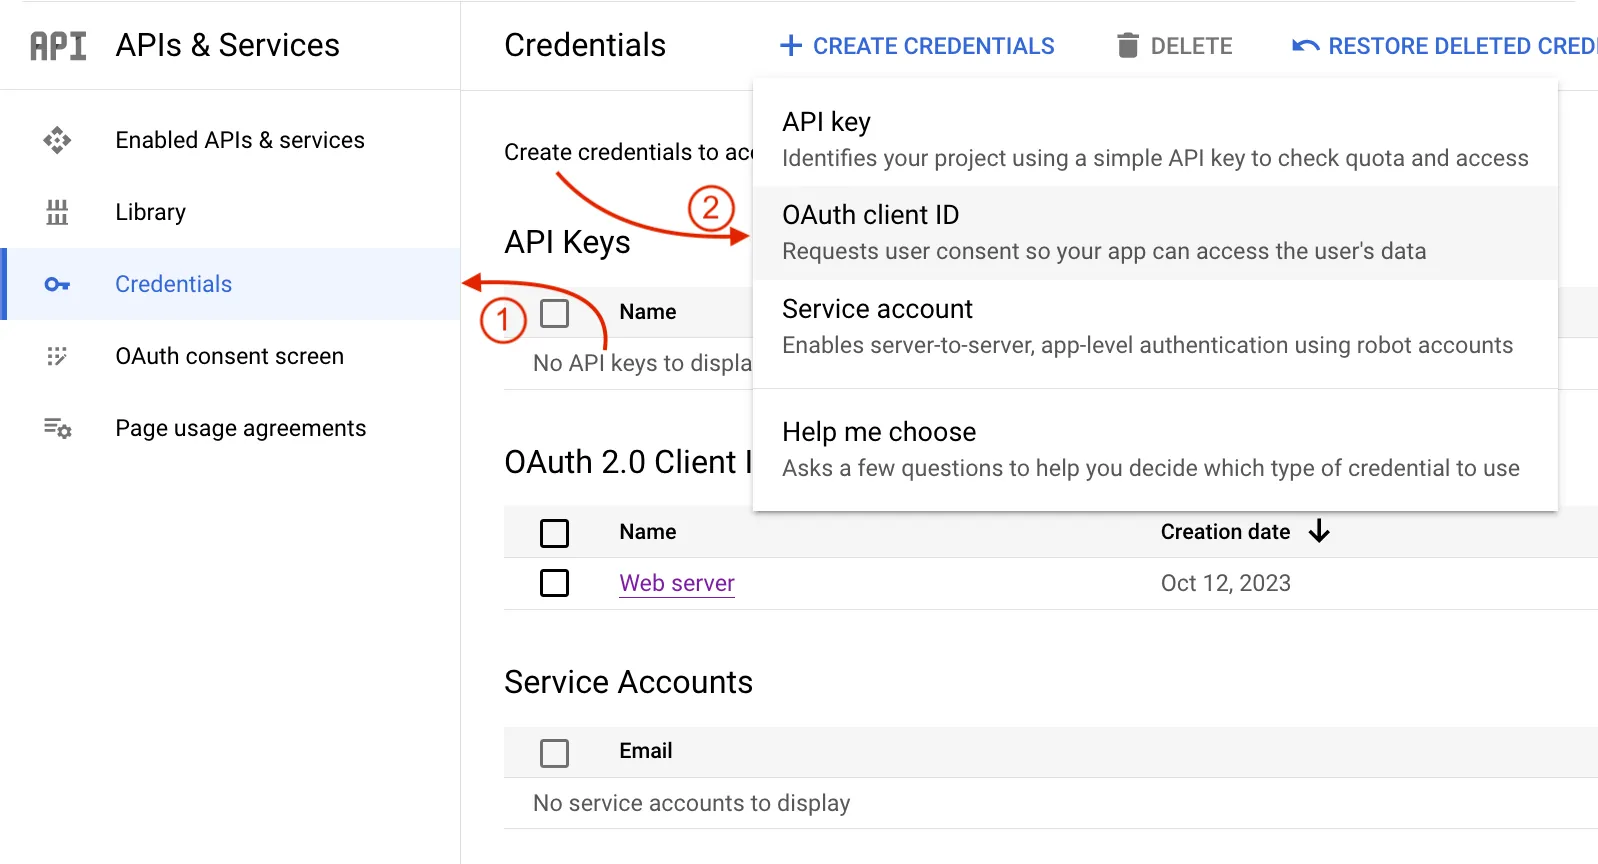
To set up credentials, Begin by clicking "Credentials" on the left menu within the Google API Console. Then click "Create Credentials" button at the top of the page and choose "OAuth client ID" from the dropdown.

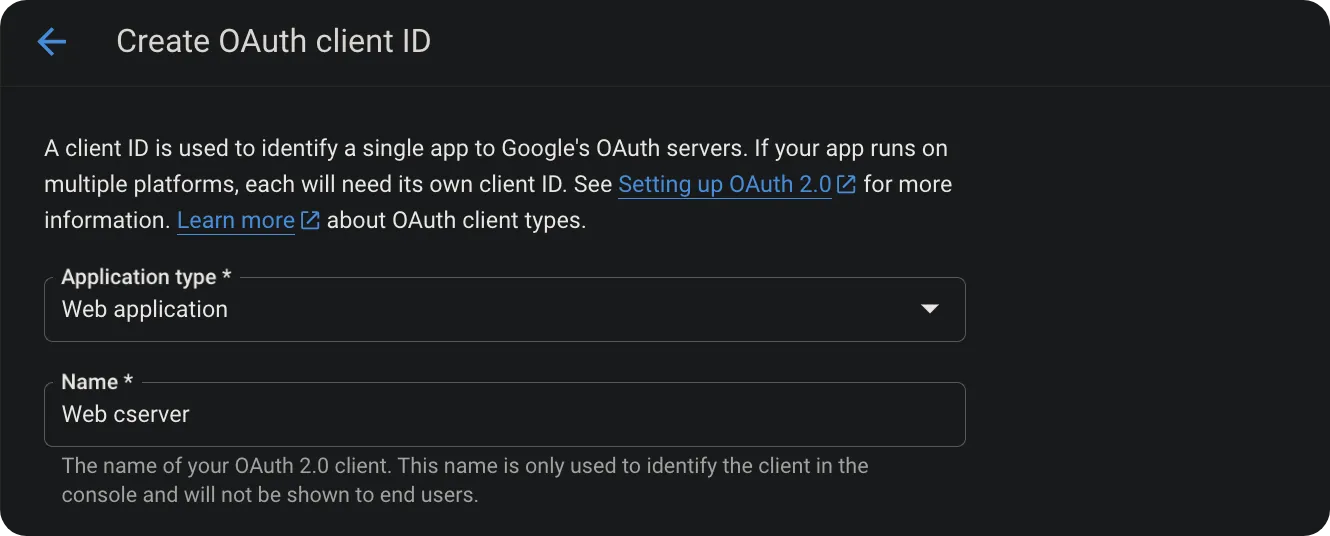
You will be prompted to designate the type of application you are developing, and your options will include:
- Web application: For apps that run on a server and are accessed through web browsers.
- Android: Specifically: for applications developed for Android operating systems.
- Chrome Extension: For browser extensions that run on Google Chrome.
- IOS: Suited for applications designed to operate on Apple's iOS platform.
- TVs and Limited Input Devices: Intended for smart TVs or other devices that lack web browsing capabilities.
- Universal Windows Platform (UWP): Ideal for applications that function across multiple platforms, including Windows 10 and Xbox.
I will select "Web application" since we aim to connect to the API through the express server.

While the "Authorized JavaScript origins" section isn't mandatory for web server applications, you must provide the "Authorized redirect URIs". For example, if you're using an Express server on port 8000, you might create a route like GET:/get-token.
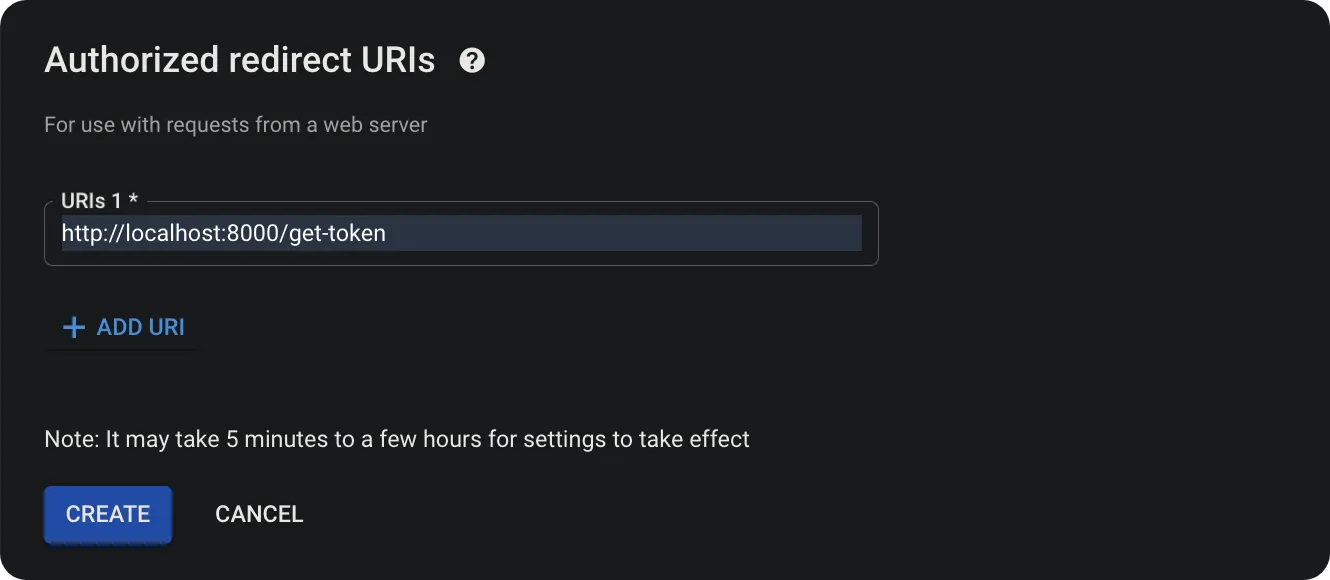
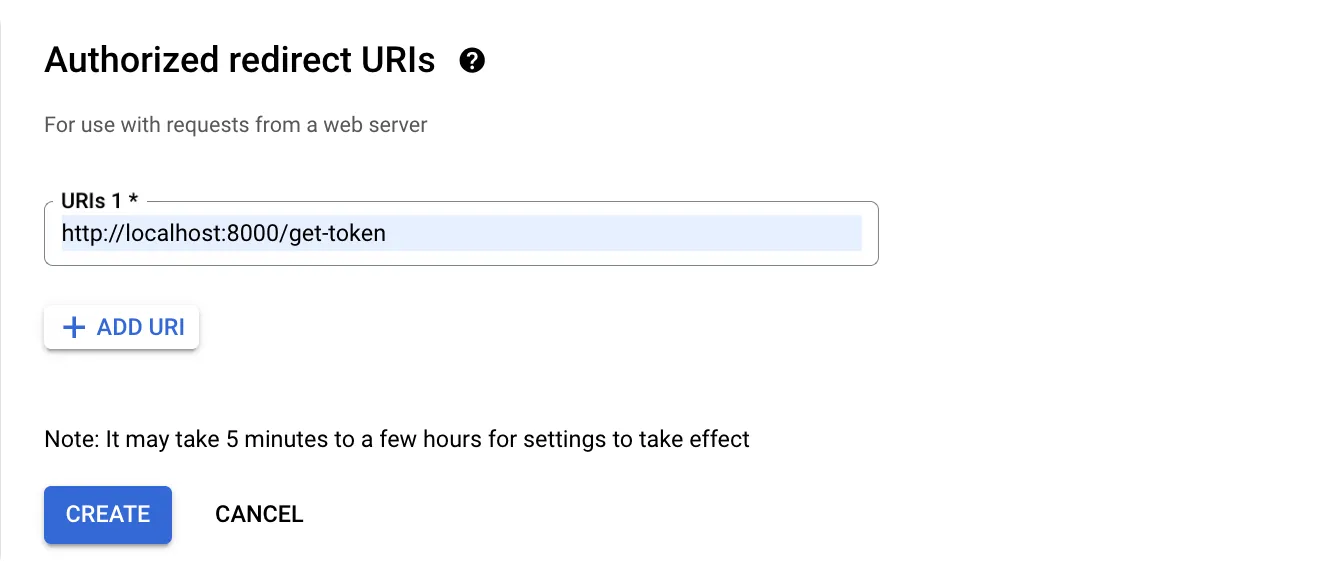
After providing the necessary details, click the "Create" button. Once done, you'll receive your OAuth 2.0 credentials, which include:
- Client ID: A unique string representing the registration information.
- Client Secret: A secret token your application uses to exchange for an access token.
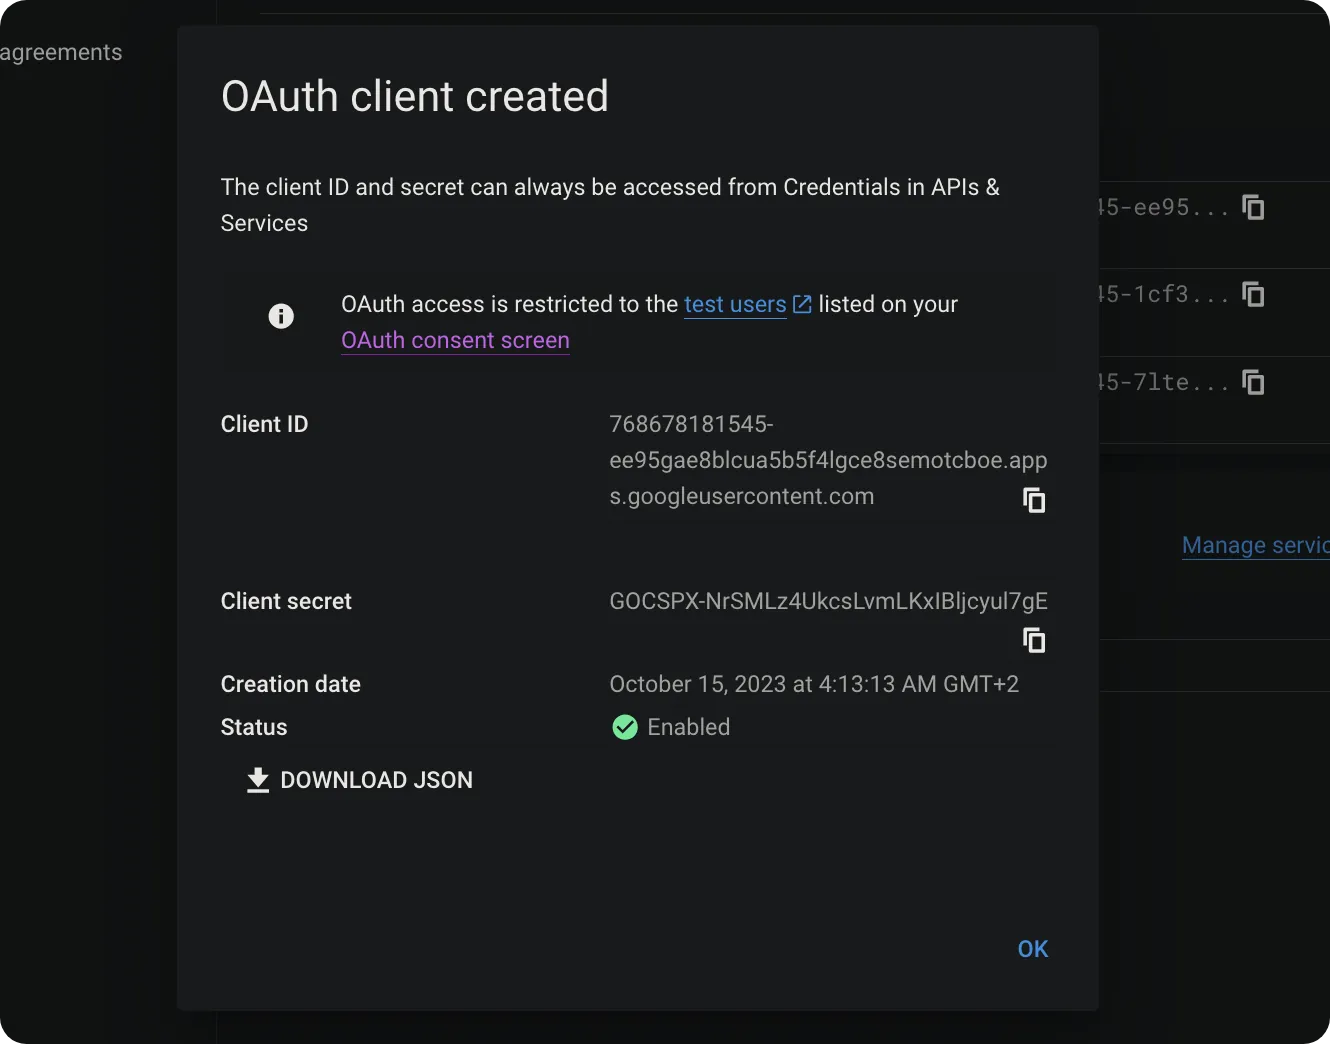
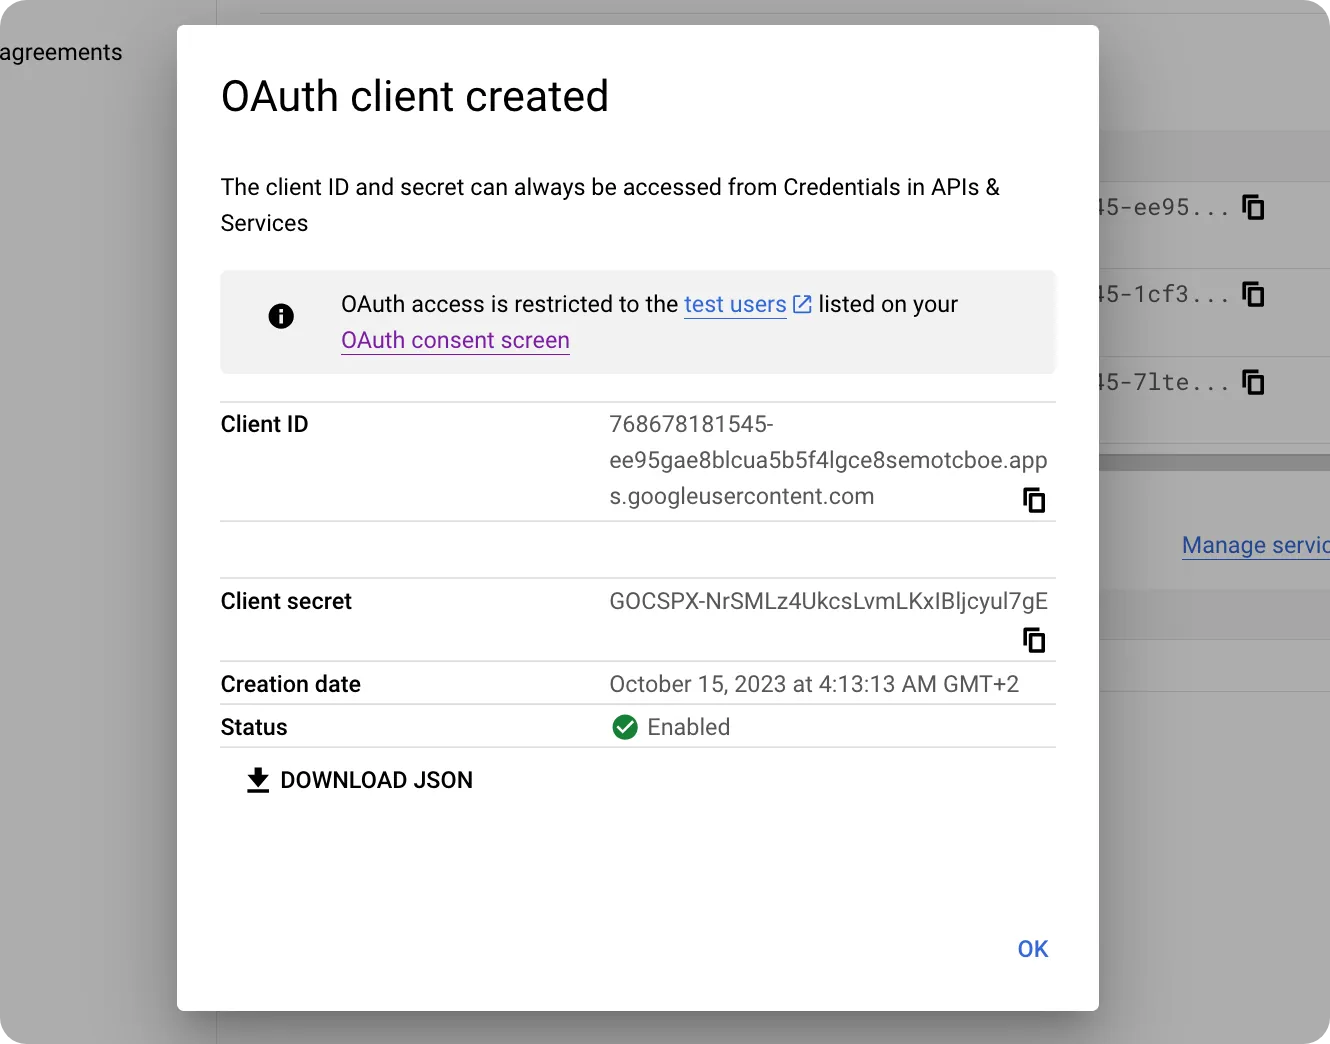
Securely store these credentials, especially the Client Secret, as they'll be essential for authenticating your application with Google services.
Integrating Google API with Express.js
Start by opening your terminal and navigating to the directory where you want your project to reside. Then, initialize a new Node.js project and install Express.js by running the following commands:
npm init -y
npm i express
npm init -y
npm i expressIn the root folder of your project, create an index.js file, which will serve as the main entry point. Then, generate a .env file to securely store sensitive information like API keys and other environment variables.
Fill the .env file with your Google Fit API credentials and other relevant variables:
NODE_PORT=8000
GOOGLE_CLIENT_ID=768678181545-7ltedqlg2jngn952olth7bju4pvc446t.apps.googleusercontent.com
GOOGLE_CLIENT_SECRET=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
GOOGLE_REDIRECT_URI=http://localhost:8000/get-token
GOOGLE_SCOPE=https://www.googleapis.com/auth/fitness.activity.readNODE_PORT=8000
GOOGLE_CLIENT_ID=768678181545-7ltedqlg2jngn952olth7bju4pvc446t.apps.googleusercontent.com
GOOGLE_CLIENT_SECRET=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
GOOGLE_REDIRECT_URI=http://localhost:8000/get-token
GOOGLE_SCOPE=https://www.googleapis.com/auth/fitness.activity.readUpdate your package.json file to include a start script that runs your Node app, watches for changes, and automatically loads environment variables from the .env file.
{
	"name": "fitness-app",
	"main": "index.js",
	"type": "module",
	"scripts": {
		"start": "node --env-file=.env --watch index.js"
	},
	"dependencies": {
		"express": "^4.18.2"
	}
}{
"name": "fitness-app",
"main": "index.js",
"type": "module",
"scripts": {
"start": "node --env-file=.env --watch index.js"
},
"dependencies": {
"express": "^4.18.2"
}
}With all the initial setup done, it's time to create a simple Express server. Open your index.js file and add the following code:
import express from 'express';

const PORT = process.env.NODE_PORT;
const app = express();

app.listen(PORT, () => {
	console.log(`App listening at ${PORT}`);
});import express from 'express';
const PORT = process.env.NODE_PORT;
const app = express();
app.listen(PORT, () => {
console.log(`App listening at ${PORT}`);
});Lastly, run the start script to ensure everything is set up correctly. You should see a log message confirming that your server is running:
npm start
# App listening at 8000
npm start
# App listening at 8000Connecting to Google Project
To interact with Google Fit API or any other Google API, Google provides a Node.js client library called googleapis. This library offers an easy and efficient way to work with a host of Google APIs, including but not limited to Google Drive, Google Sheets, and Google Calendar.
To see all available APIs, visit the Google APIs Explorer. It provides detailed documentation, guidelines, and sample requests to help you understand each API's capabilities.
npm i googleapisnpm i googleapisGoogle APIs often require secure authentication. The googleapis library supports multiple authentication strategies, including API keys and OAuth 2.0.
Since we're using OAuth 2.0 for this project, you must create a new OAuth2 client instance. This instance is critical in generating URLs for user consent and exchanging authorization codes for access tokens.
In the index.js file, import the Google API library and initialize the OAuth2 client:
import express from 'express';
import { google } from 'googleapis';

const PORT = process.env.NODE_PORT;
const app = express();

const oAuth2Client = new google.auth.OAuth2(
	process.env.GOOGLE_CLIENT_ID,
	process.env.GOOGLE_CLIENT_SECRET,
	process.env.GOOGLE_REDIRECT_URI
);

app.listen(PORT, () => {
	console.log(`App listening at ${PORT}`);
});import express from 'express';
import { google } from 'googleapis';
const PORT = process.env.NODE_PORT;
const app = express();
const oAuth2Client = new google.auth.OAuth2(
process.env.GOOGLE_CLIENT_ID,
process.env.GOOGLE_CLIENT_SECRET,
process.env.GOOGLE_REDIRECT_URI
);
app.listen(PORT, () => {
console.log(`App listening at ${PORT}`);
});The OAuth2 constructor requires three key arguments:
GOOGLE_CLIENT_ID: Obtained from the Google Developers Console, this ID uniquely identifies your app to Google's OAuth 2.0 server.GOOGLE_CLIENT_SECRET: Also obtained from the Google Developers Console, this secret acts similarly to a password. Your application will use it when requesting access tokens.GOOGLE_REDIRECT_URI: This URL is where Google will redirect users after they either grant or deny permission to your application. This URI should match one of the URIs you've registered in the Google Developers Console. It's an essential part of the OAuth 2.0 process, especially when exchanging authorization codes for access tokens.
Requst Access Token From Google API
After initializing the OAuth2 client, the first step is to navigate users to a consent screen provided by Google. This screen is instrumental in obtaining the user's approval to access specified Google services on their behalf.
We will use the generateAuthUrl method of the oAuth2Client instance we created to facilitate this. This method will generate the URL for Google's OAuth2 consent screen. This logic will reside in a dedicated route within our Express application for better organization.
import express from 'express';
import { google } from 'googleapis';

// ...existing code

app.get('/', (req, res) => {
	const url = oAuth2Client.generateAuthUrl({
		access_type: 'offline',
		scope: process.env.GOOGLE_SCOPE
	});
	res.json({ url });
});

app.listen(PORT, () => {
	console.log(`App listening at ${PORT}`);
});
import express from 'express';
import { google } from 'googleapis';
// ...existing code
app.get('/', (req, res) => {
const url = oAuth2Client.generateAuthUrl({
access_type: 'offline',
scope: process.env.GOOGLE_SCOPE
});
res.json({ url });
});
app.listen(PORT, () => {
console.log(`App listening at ${PORT}`);
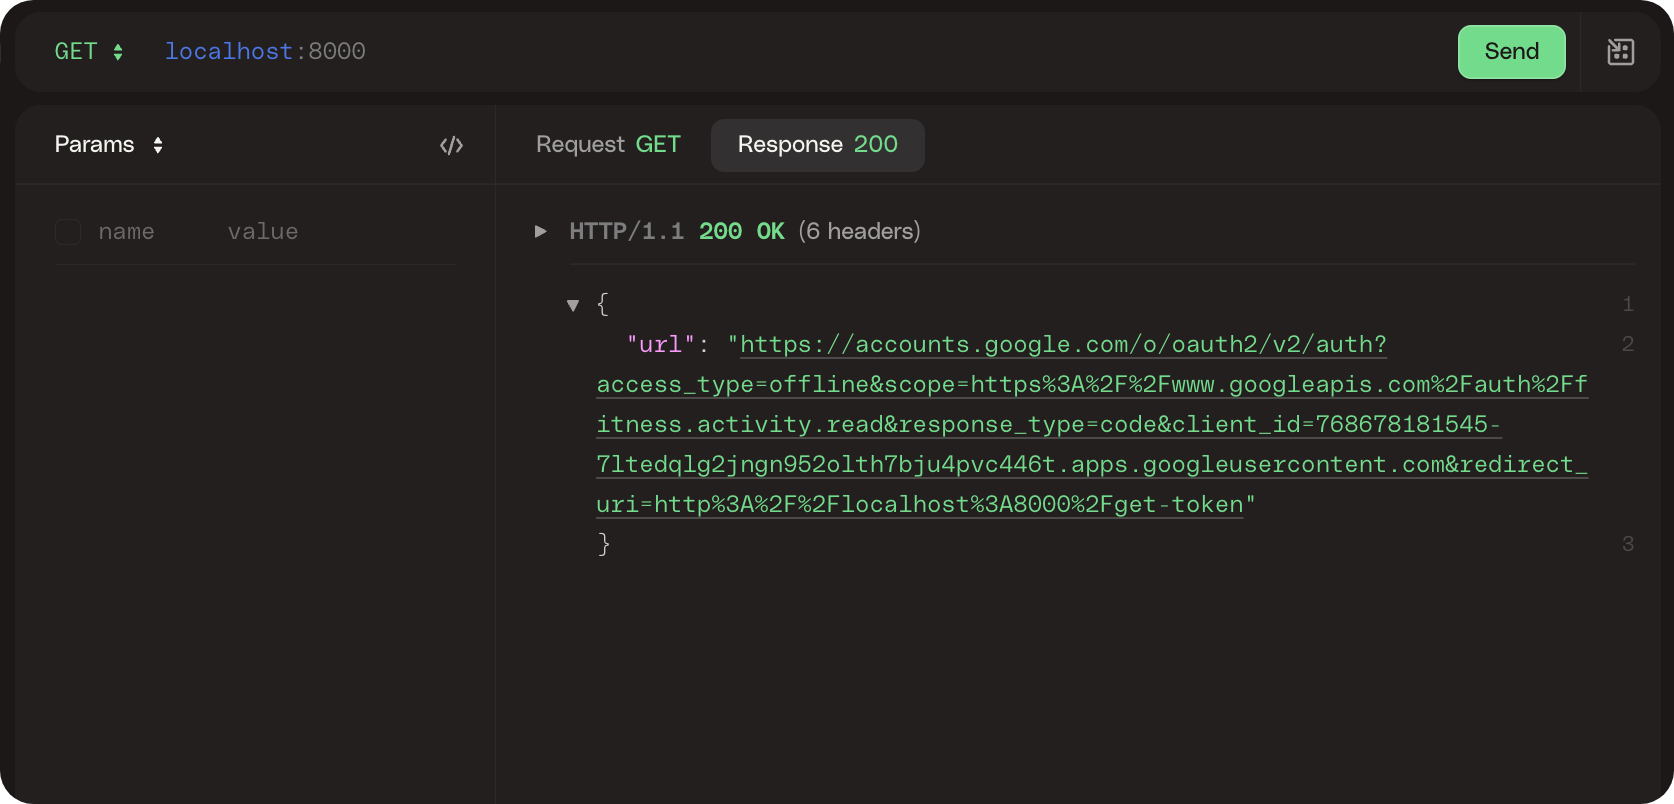
});The generateAuthUrl method generates the consent screen URL using the parameters you provide. Specifically, it takes an object with the following properties:
access_type: This is the type of access your application requests from the user. When set to'offline', your application will receive a refresh and initial access token. The refresh token is valuable because it allows your application to request new access tokens without requiring the user to re-grant permissions, ensuring uninterrupted access to the user's Google services.scope: This defines the permissions your app is seeking concerning Google's services. It specifies which Google service's data you aim to access. The scope value is generally a URL or URI that Google provides for each service, like Google Drive or Google Fit, that your app needs to access. In our example,I'm using the scopehttps://www.googleapis.com/auth/fitness.activity.read, which gives permission to see and store the physical activity data.
When you access this endpoint, it generates a redirect URL. This URL is the gateway for initiating the authentication and authorization process with Google.
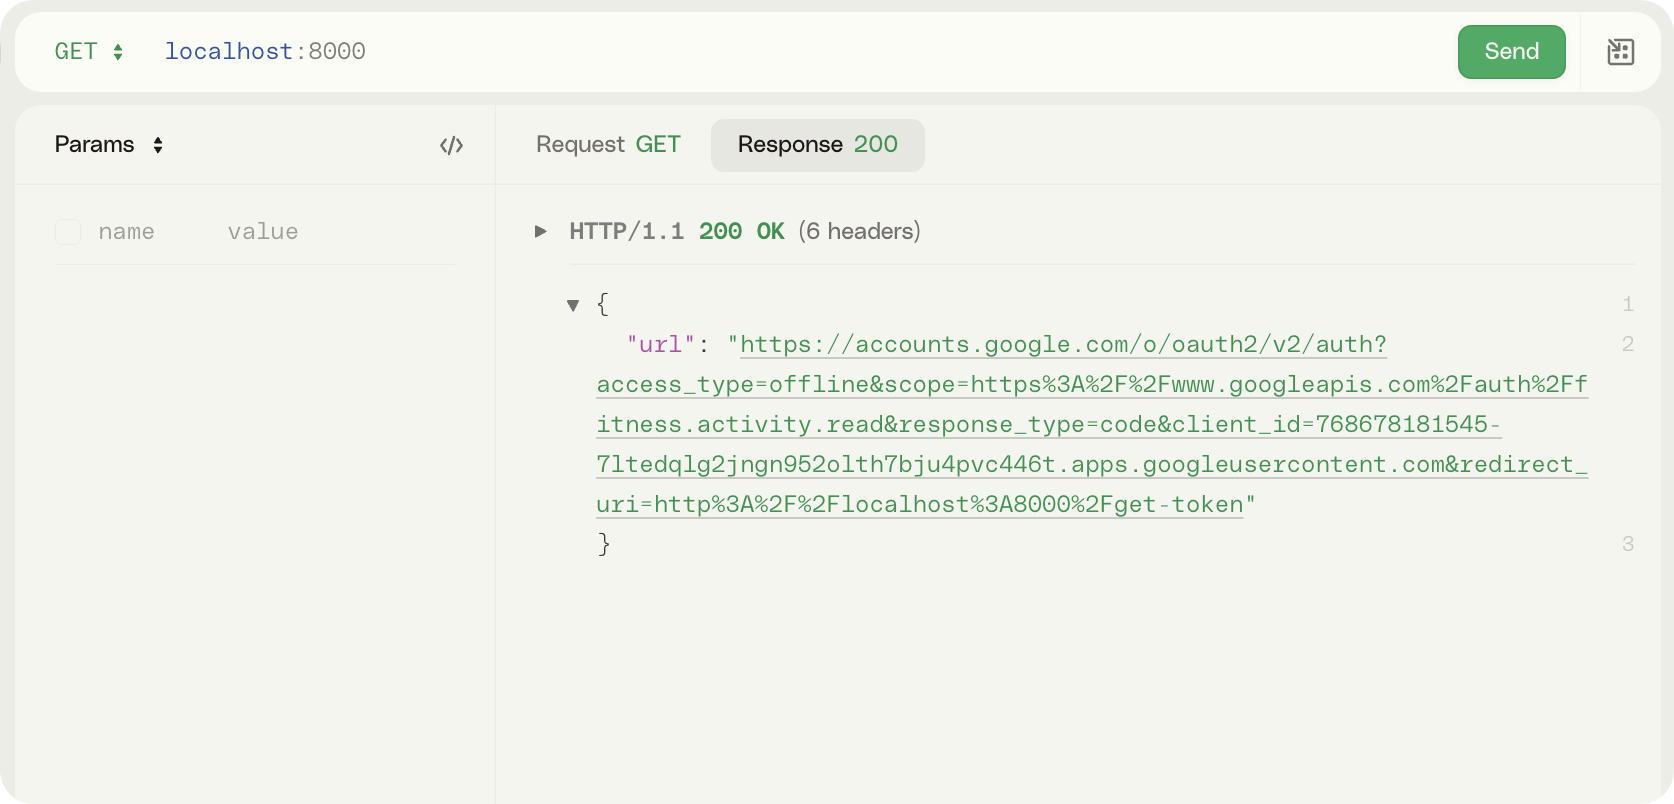
Before navigating the OAuth URL, setting up the redirect routes for your application is required. Recall that we configured a redirection URL in the Google Console as http://localhost:8000/get-token. Let's now set a GET route at this endpoint.
import express from 'express';
import { google } from 'googleapis';
import url from 'url';

// ...existing code

app.get('/get-token', async (req, res, next) => {
	try {
		const { code } = url.parse(req.url, true).query;
		const { tokens } = await oAuth2Client.getToken(code);
		res.json({ token: tokens.access_token });
	} catch (error) {
		next(error);
	}
});

app.listen(PORT, () => {
	console.log(`App listening at ${PORT}`);
});
import express from 'express';
import { google } from 'googleapis';
import url from 'url';
// ...existing code
app.get('/get-token', async (req, res, next) => {
try {
const { code } = url.parse(req.url, true).query;
const { tokens } = await oAuth2Client.getToken(code);
res.json({ token: tokens.access_token });
} catch (error) {
next(error);
}
});
app.listen(PORT, () => {
console.log(`App listening at ${PORT}`);
});A query parameter named code is included upon Google's redirection to the /get-token endpoint. We extract this code using Node.js' built-in url module to parse the request URL. Then, the getToken method of the oAuth2Client exchanges this authorization code for an access token. The returned object would contain the access token and possibly a refresh token if the access_type was previously set to 'offline'.
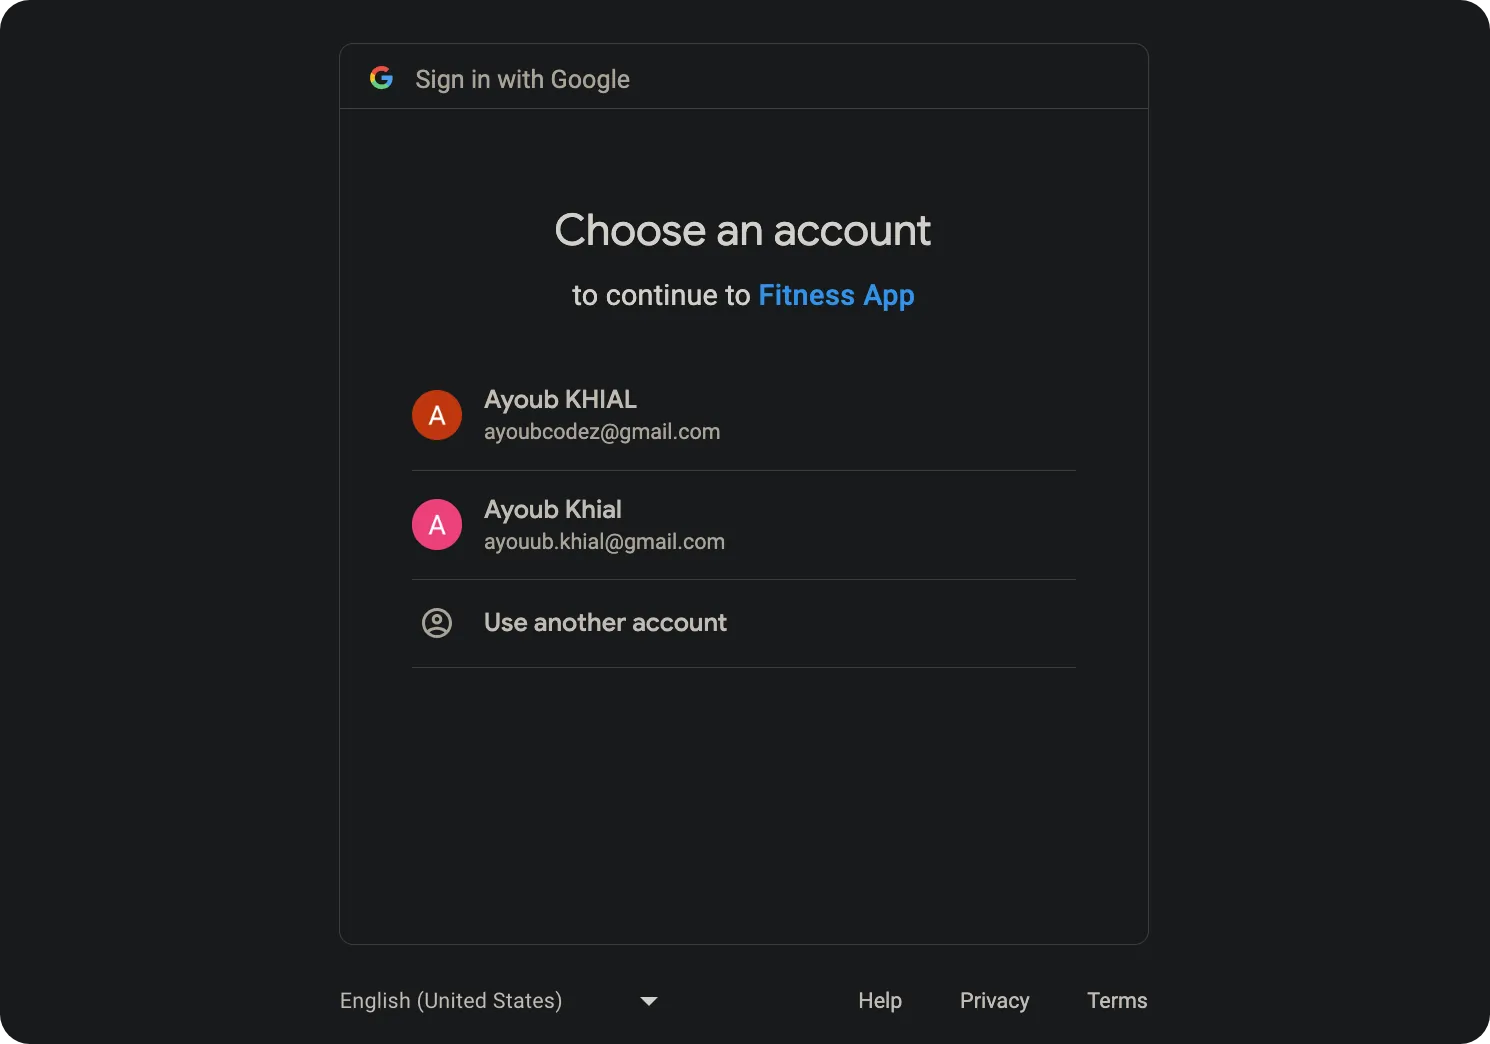
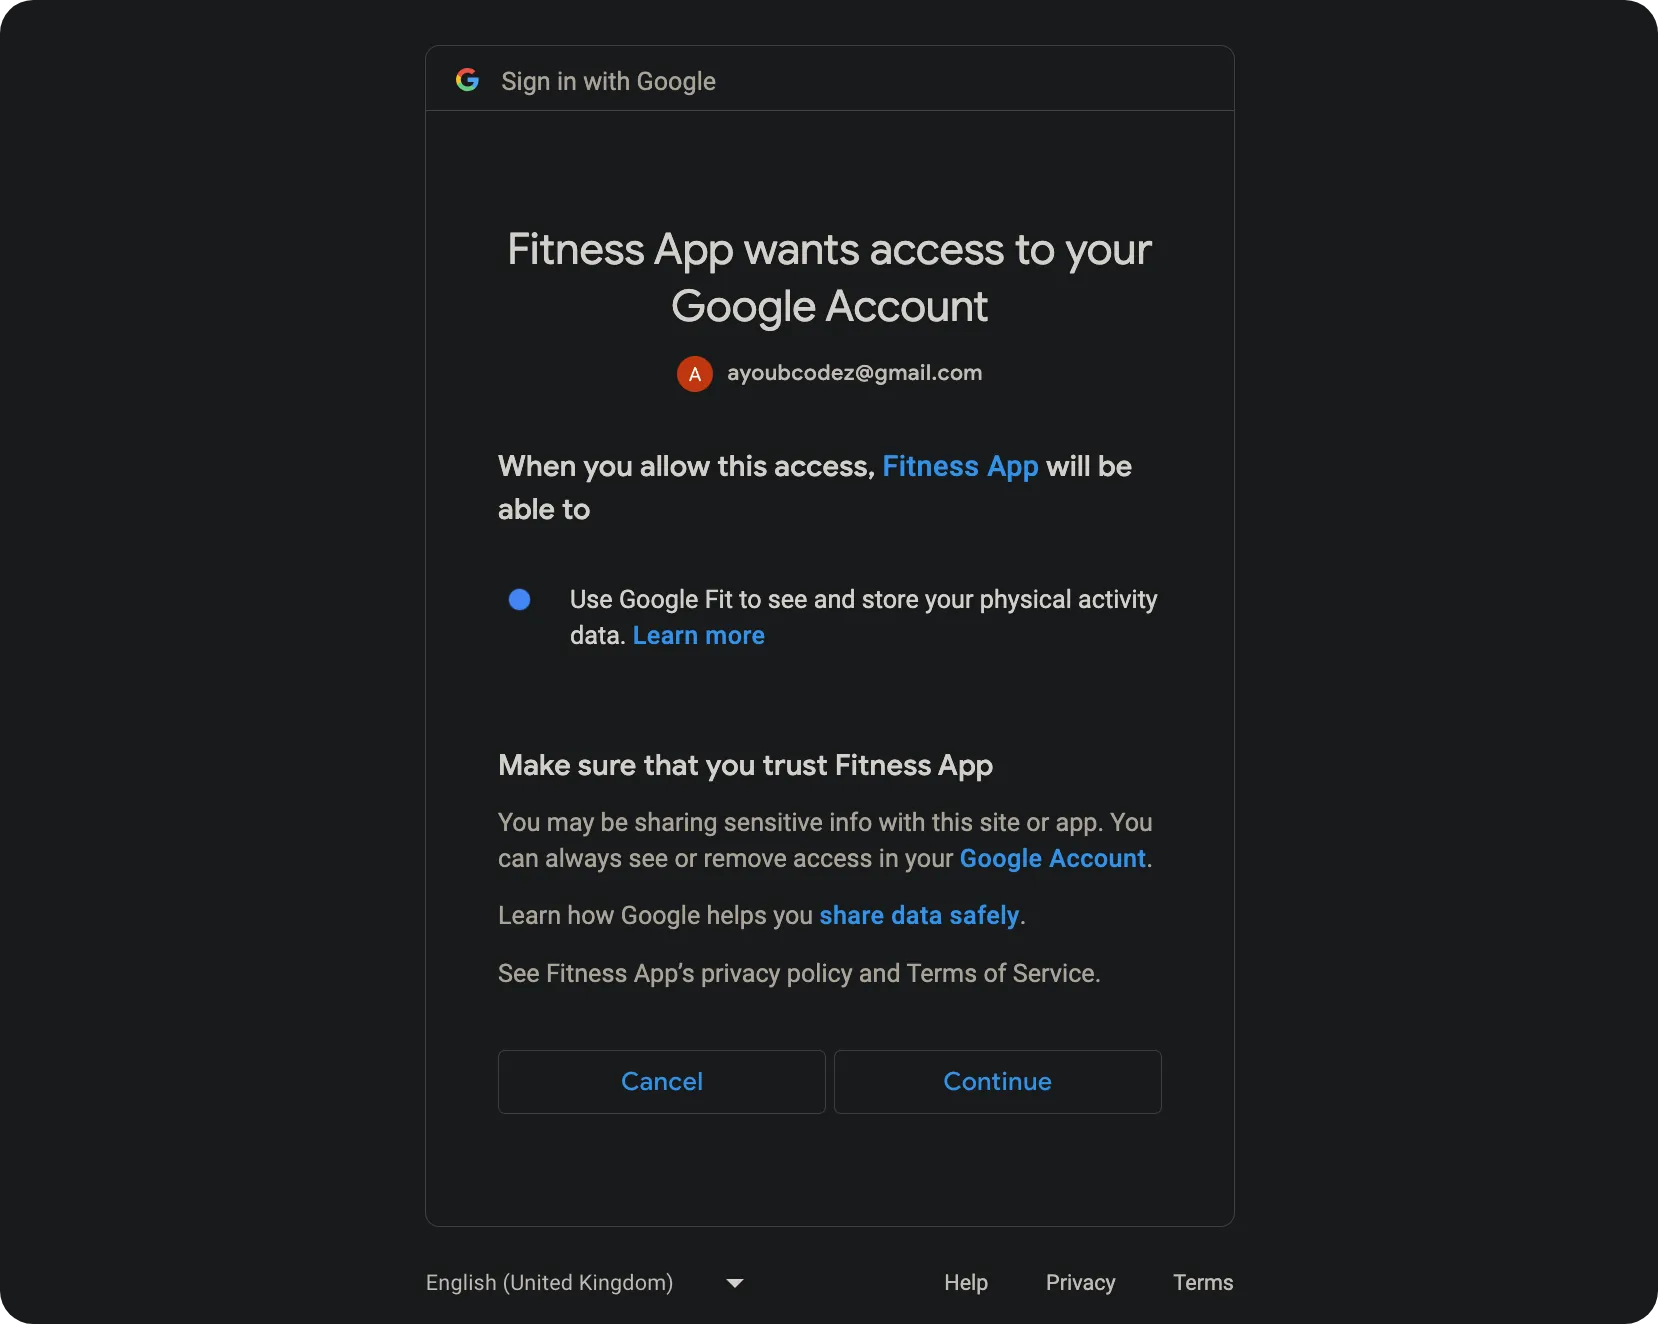
To initiate Google's OAuth 2.0 process, visit the URL generated from the initial GET:/ request. You'll see a consent screen displaying your application's name and the Google accounts you are logged into. Select the account you wish to connect with to acquire the token.

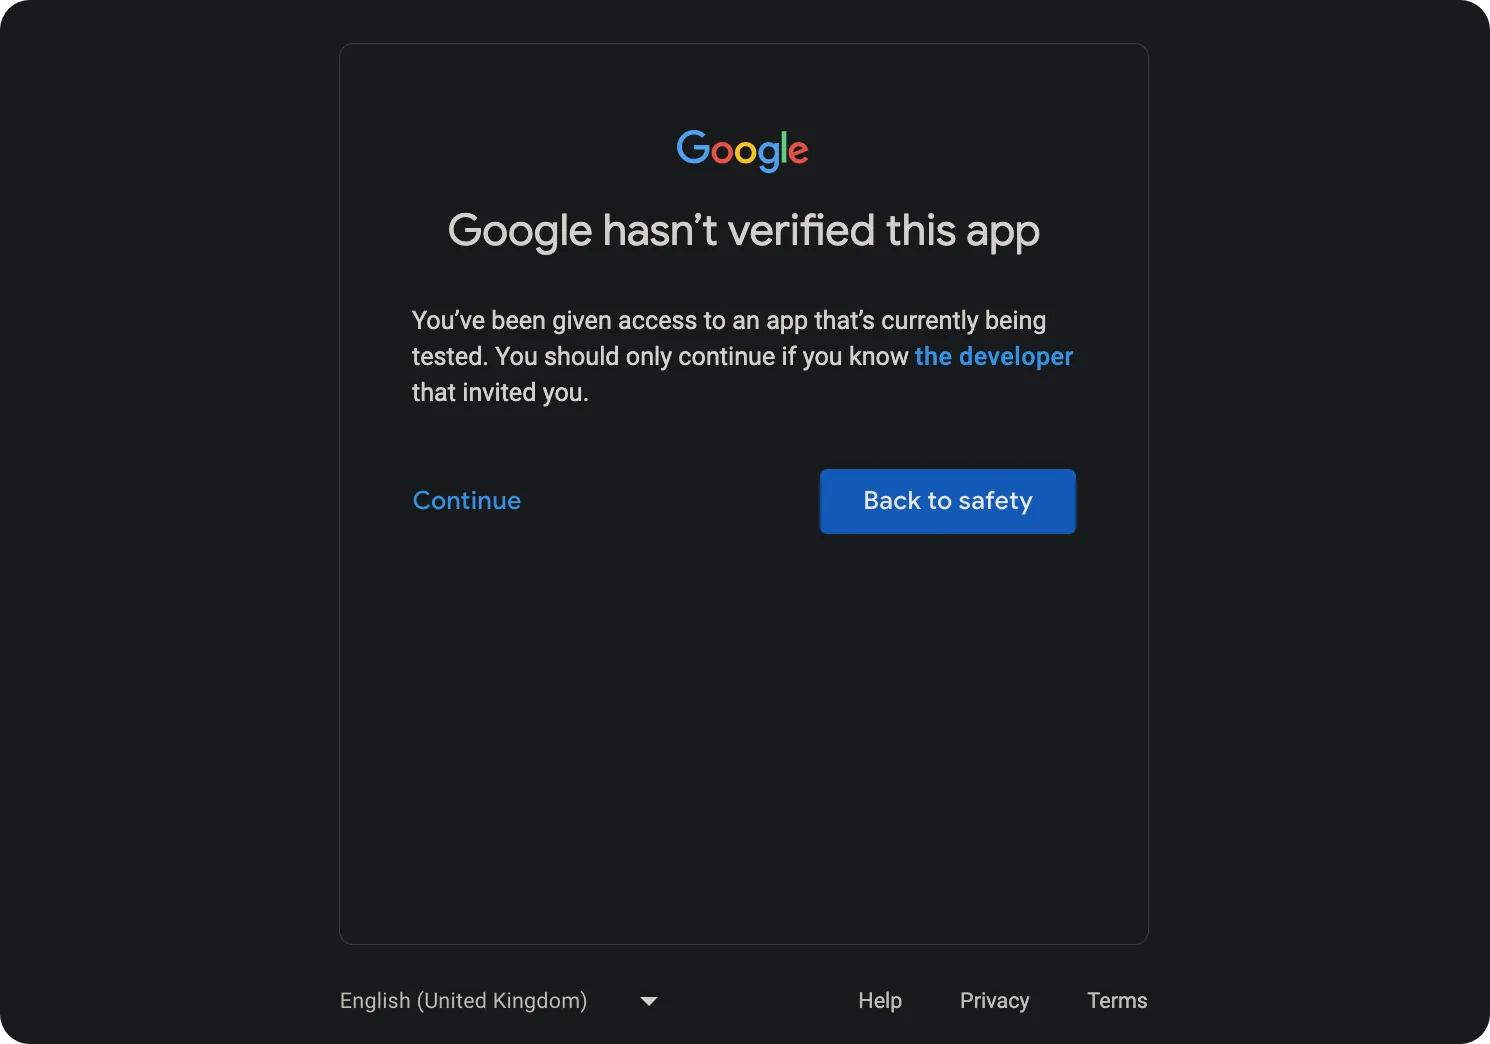
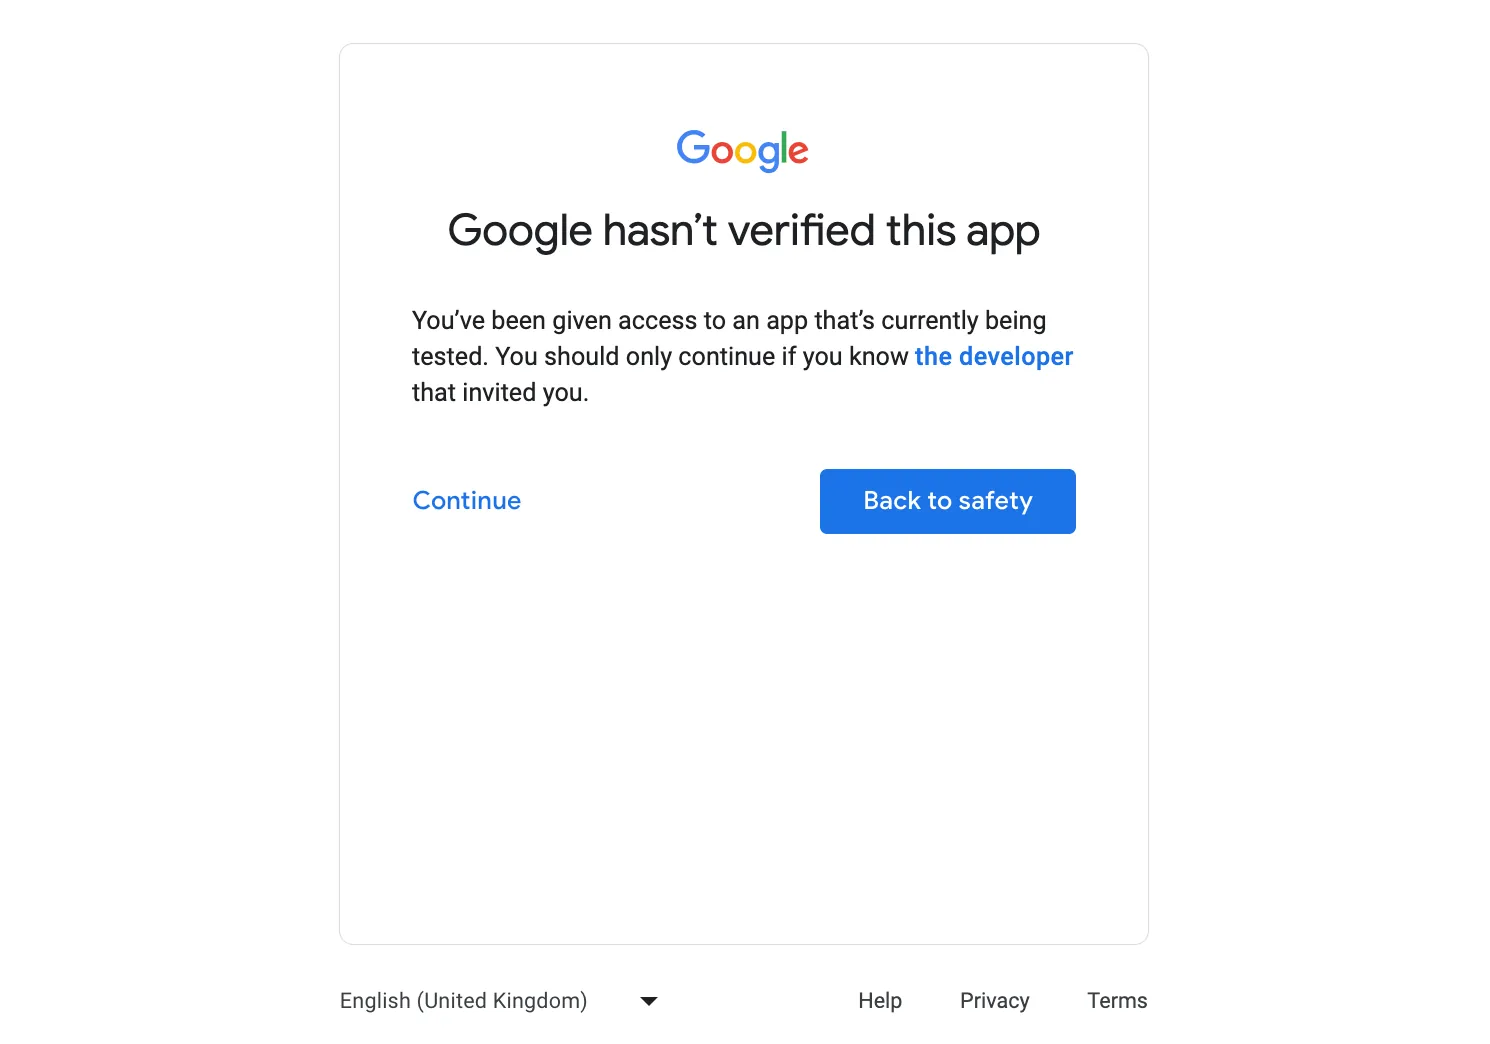
After selecting your account, a warning will appear because the app is in testing mode and has not received verification. Just click on "Continue".
On the following screen, users are presented with a choice to either grant or deny the requested permissions.
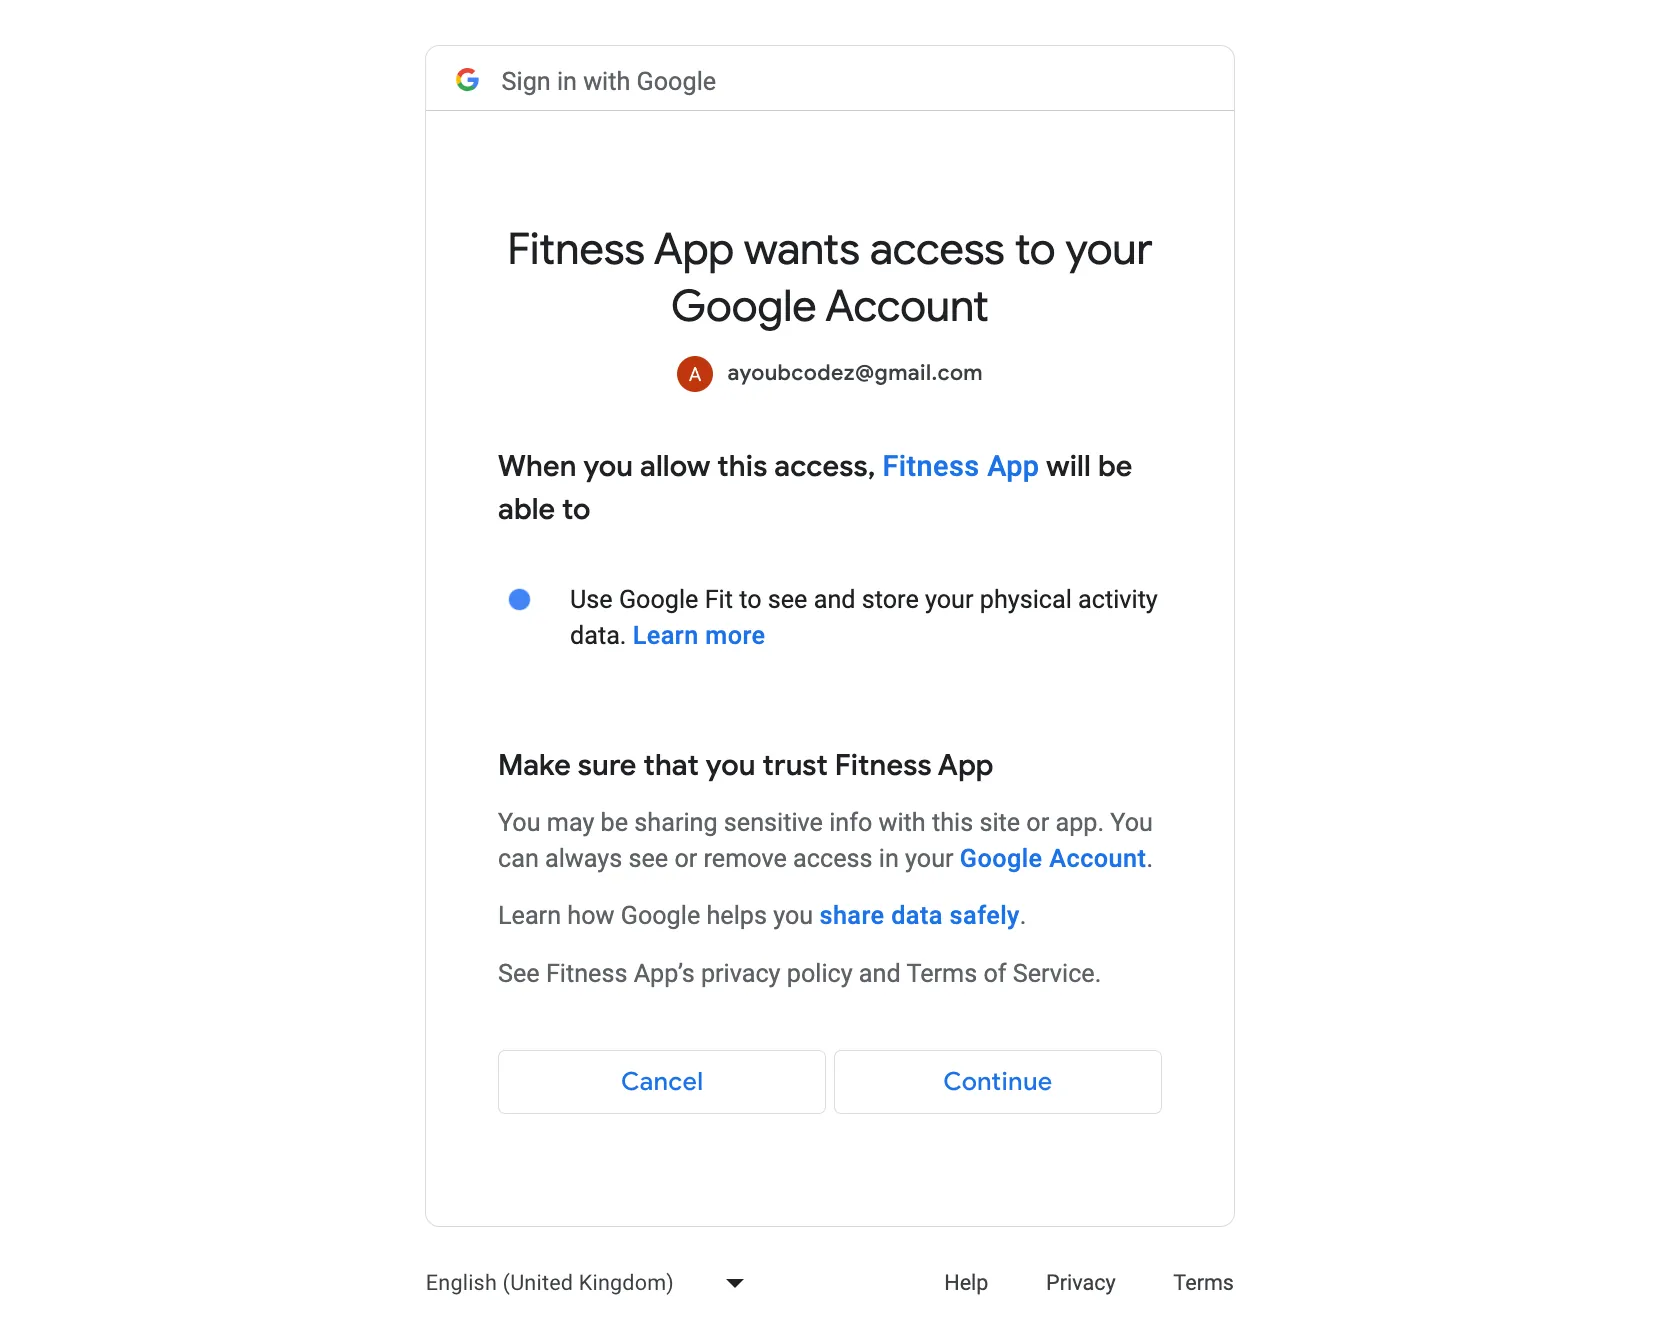
When a user grants permission, Google will direct the user to the URI specified in the redirect_uri parameter. In the example given, the URI is http://localhost:8000/get-token. Crucially, Google will add an authorization code parameter to this redirect URI. On the other hand, if the user denies permission, Google will still redirect to the specified redirect_uri. However, instead of an authorization code, it will append an error parameter to indicate that the user has been denied access.
If the permission is granted, The Google OAuth returns the token. You can also see the code parameter we used to generate the token in the address bar.
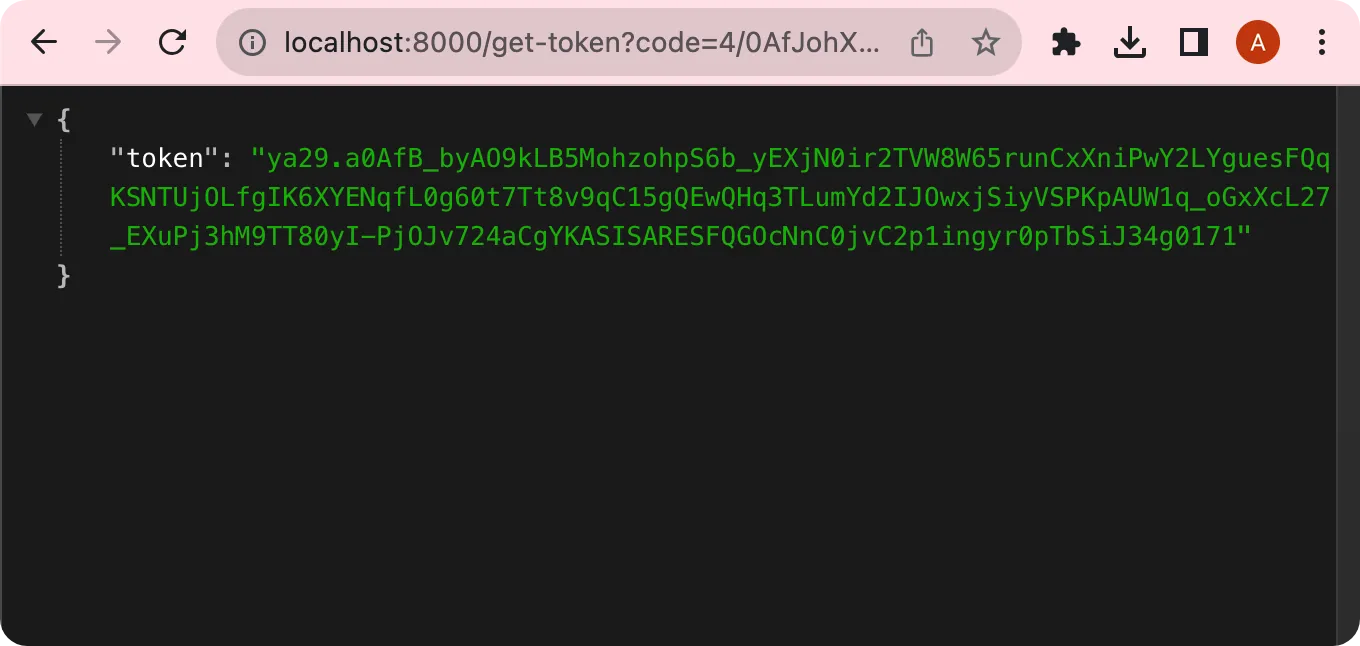
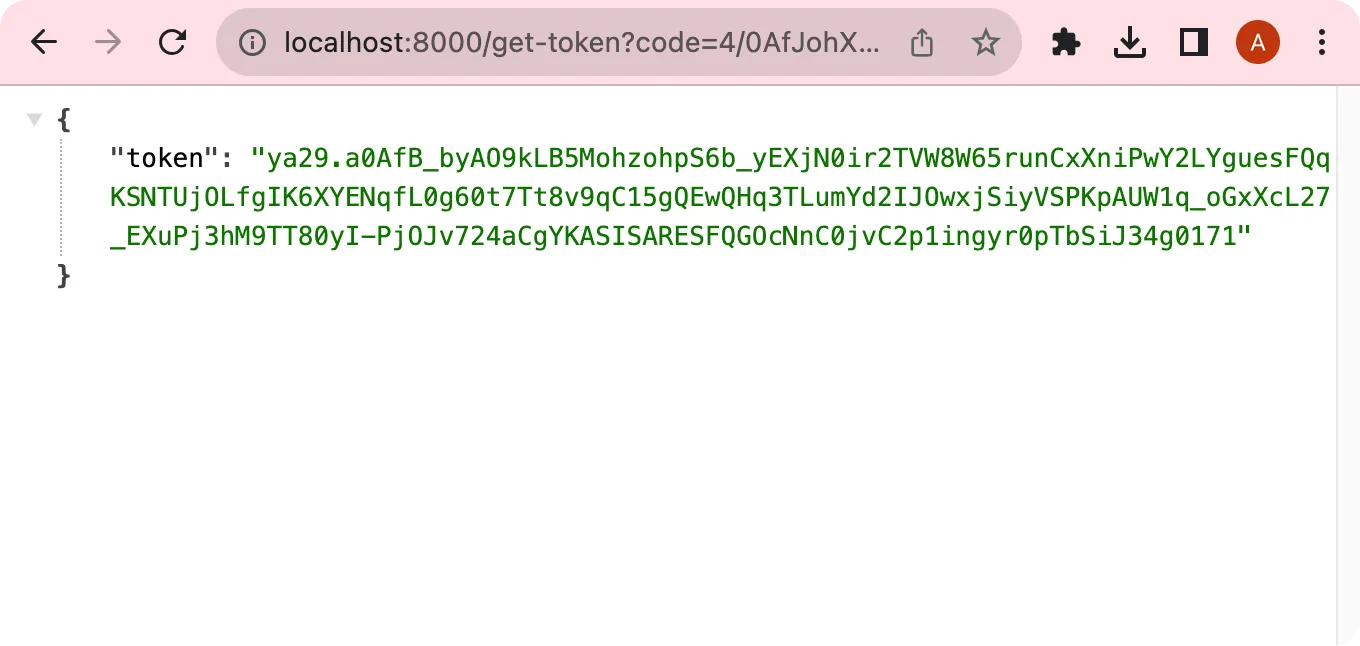
Once you have successfully obtained the access token, you are prepared to fetch data from the Google Fitness API. This token is a key to unlock specific scopes or data points your application can access.
Use Case: Fetch User Step Count Data
A good idea is to create a middleware function in your Express.js application. This middleware will run ahead of any routes that require secure access. It retrieves the token from the request header and attaches it to the req object, making it accessible throughout the subsequent route handlers.
import express from 'express';
import { google } from 'googleapis';
import url from 'url';

// ...existing code

app.use((req, res, next) => {
	const token = req.headers?.authorization?.split(' ')[1];
	if (!token) {
		return next(new Error('Please provide a token to access this resource'));
	}
	req.token = token;
	next();
});

app.listen(PORT, () => {
	console.log(`App listening at ${PORT}`);
});
import express from 'express';
import { google } from 'googleapis';
import url from 'url';
// ...existing code
app.use((req, res, next) => {
const token = req.headers?.authorization?.split(' ')[1];
if (!token) {
return next(new Error('Please provide a token to access this resource'));
}
req.token = token;
next();
});
app.listen(PORT, () => {
console.log(`App listening at ${PORT}`);
});Let's create a new route to retrieve step count data to validate that our API workflow functions as expected. This will be a concrete test to ensure that our token-based authentication and data retrieval processes work smoothly.
import express from 'express';
import { google } from 'googleapis';
import url from 'url';

// ...existing code

app.get('/steps', async (req, res, next) => {
	try {
		oAuth2Client.setCredentials({ access_token: req.token });
		const fitnessStore = google.fitness({ version: 'v1', auth: oAuth2Client });
		const dataTypeName = 'com.google.step_count.delta';
		const dataSourceId = 'derived:com.google.step_count.delta:com.google.android.gms:estimated_steps';
		const data = {
			aggregateBy: [{ dataTypeName, dataSourceId }],
			bucketByTime: { durationMillis: 24 * 60 * 60 * 1000 },
			startTimeMillis: Date.now() - 20 * 24 * 60 * 60 * 1000,
			endTimeMillis: Date.now()
		};
		const result = await fitnessStore.users.dataset.aggregate({
			userId: 'me',
			requestBody: data
		});
		res.json(result);
	} catch (error) {
		next(error);
	}
});

app.listen(PORT, () => {
	console.log(`App listening at ${PORT}`);
});
import express from 'express';
import { google } from 'googleapis';
import url from 'url';
// ...existing code
app.get('/steps', async (req, res, next) => {
try {
oAuth2Client.setCredentials({ access_token: req.token });
const fitnessStore = google.fitness({ version: 'v1', auth: oAuth2Client });
const dataTypeName = 'com.google.step_count.delta';
const dataSourceId = 'derived:com.google.step_count.delta:com.google.android.gms:estimated_steps';
const data = {
aggregateBy: [{ dataTypeName, dataSourceId }],
bucketByTime: { durationMillis: 24 * 60 * 60 * 1000 },
startTimeMillis: Date.now() - 20 * 24 * 60 * 60 * 1000,
endTimeMillis: Date.now()
};
const result = await fitnessStore.users.dataset.aggregate({
userId: 'me',
requestBody: data
});
res.json(result);
} catch (error) {
next(error);
}
});
app.listen(PORT, () => {
console.log(`App listening at ${PORT}`);
});Let's take this route apart and see what we're dealing with:
First, the setCredentials method assigns the obtained access token to oAuth2Client. Any subsequent API interactions using this client will automatically use this token for verification.
oAuth2Client.setCredentials({ access_token: token });oAuth2Client.setCredentials({ access_token: token });Using the fitnessStore, we instantiate Google's Fitness API client and authorize it with the oAuth2Client, designating its version as 'v1'.
const fitnessStore = google.fitness({ version: 'v1', auth: oAuth2Client });const fitnessStore = google.fitness({ version: 'v1', auth: oAuth2Client });We're all set to make API calls using the fitnessStore. For instance, if we want to fetch the user's step count for the previous three days and group it by day, we can send a specific aggregation object in the request body.
The aggregation object consists of the following parameters:
aggregateBy: This parameter defines the type of data you want to collect. Here, thedataTypeNamespecifies that we're interested in step count deltas, representing changes in the step count. ThedataSourceIdnarrows it to estimated steps collected by Google's Android services. (Read more about Data Types and Data Sources)bucketByTime: This parameter segments the data into time buckets, measured in milliseconds. In this example, each bucket represents 24 hours.startTimeMillis: This marks the beginning of the data collection time range; this example is set to three days from the current time.endTimeMillis: This marks the end of the time range for data collection.
Finally, we execute the aggregate method to pull the required data for the authenticated user, represented as 'me'.
const dataTypeName = 'com.google.step_count.delta';
const dataSourceId = 'derived:com.google.step_count.delta:com.google.android.gms:estimated_steps';
const body = {
	aggregateBy: [{ dataTypeName, dataSourceId }],
	bucketByTime: { durationMillis: 24 * 60 * 60 * 1000 },
	startTimeMillis: Date.now() - 3 * 24 * 60 * 60 * 1000,
	endTimeMillis: Date.now()
};
const result = await fitnessStore.users.dataset.aggregate({
	userId: 'me',
	requestBody: body
});
const dataTypeName = 'com.google.step_count.delta';
const dataSourceId = 'derived:com.google.step_count.delta:com.google.android.gms:estimated_steps';
const body = {
aggregateBy: [{ dataTypeName, dataSourceId }],
bucketByTime: { durationMillis: 24 * 60 * 60 * 1000 },
startTimeMillis: Date.now() - 3 * 24 * 60 * 60 * 1000,
endTimeMillis: Date.now()
};
const result = await fitnessStore.users.dataset.aggregate({
userId: 'me',
requestBody: body
});To test the /steps route, make a GET request and include the Google-issued token in the Authorization header. Use the format "Authorization: Bearer YOUR_TOKEN" to ensure proper authentication. Without this token, you won't be able to access the step count data.
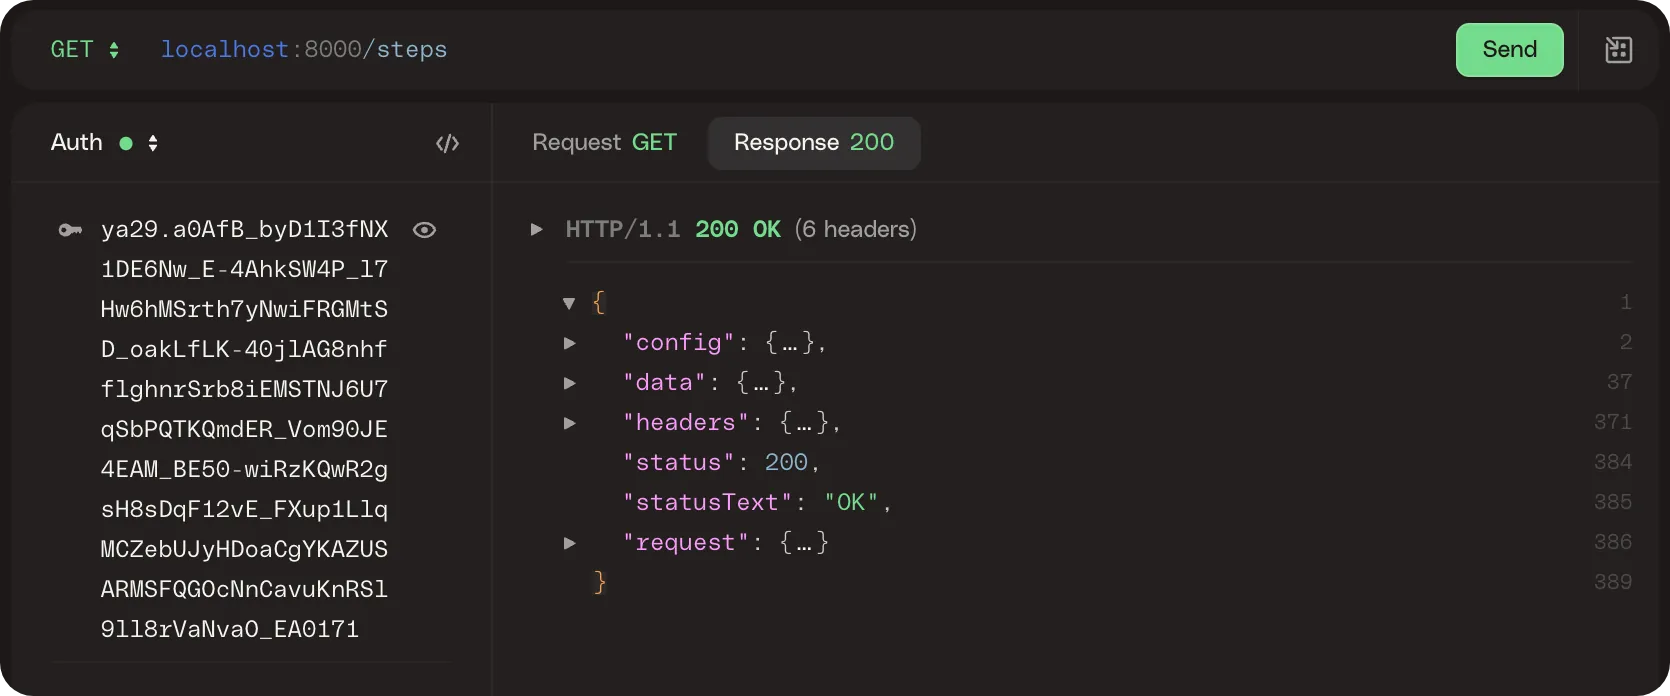
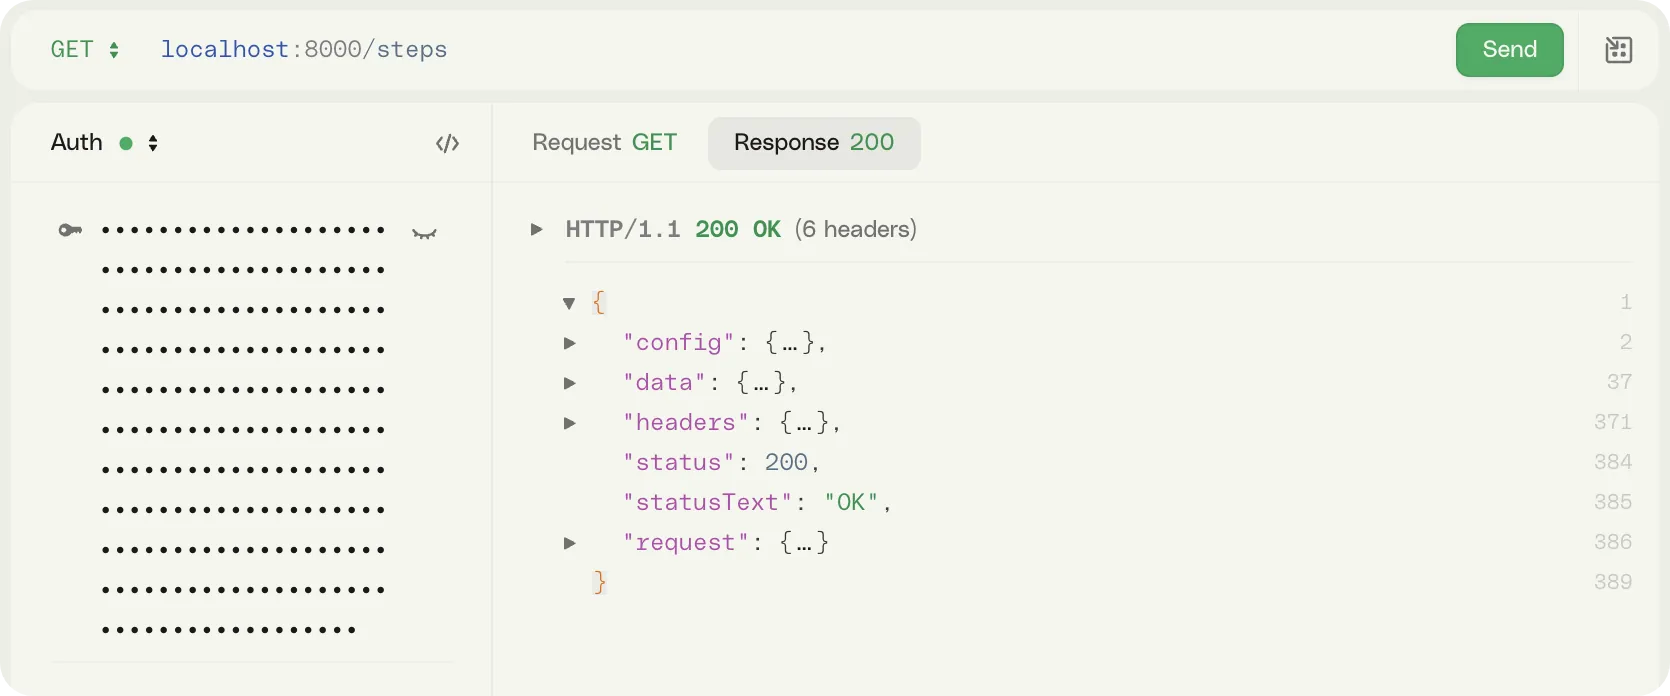
Let's examine each field in detail:
The config field outlines how the API request was configured. It consists of the following sub-fields:
{
	"url": "Target endpoint for the request",
	"method": "HTTP method employed (e.g., POST)",
    "userAgentDirectives": "Software initiating the request",
    "data": "Request body detailing desired data, including aggregation parameters and time range",
	"headers": "Supplementary info like content type, authentication, and user agent",
    "responseType": "Defines the data parsing method for the response"
}
{
"url": "Target endpoint for the request",
"method": "HTTP method employed (e.g., POST)",
"userAgentDirectives": "Software initiating the request",
"data": "Request body detailing desired data, including aggregation parameters and time range",
"headers": "Supplementary info like content type, authentication, and user agent",
"responseType": "Defines the data parsing method for the response"
}The data field is the core component containing the actual fitness data. It has only one sub-field, which holds each entry (day) data in an array composed of the following fields.
{
	"startTimeMillis": "Starting timestamp for each bucket",
	"endTimeMillis": "Ending timestamp for each bucket",
	"dataset": [{ // Array of detailed data points within the timeframe
		"dataSourceId": "Source identifier for aggregated data",
		"points": [{ // List of raw data entries
			"startTimeNanos": "Exact starting timestamp for each data point",
            "endTimeNanos": "Exact ending timestamp for each data point",
			"dataTypeName": "Type of data, e.g., step count delta",
			"originDataSourceId": "Initial data source pre-aggregation",
			"value": [{
				"intVal": "Actual data point value, with 'intVal' representing step count"
			}]
		}]
	}]
}
{
"startTimeMillis": "Starting timestamp for each bucket",
"endTimeMillis": "Ending timestamp for each bucket",
"dataset": [{ // Array of detailed data points within the timeframe
"dataSourceId": "Source identifier for aggregated data",
"points": [{ // List of raw data entries
"startTimeNanos": "Exact starting timestamp for each data point",
"endTimeNanos": "Exact ending timestamp for each data point",
"dataTypeName": "Type of data, e.g., step count delta",
"originDataSourceId": "Initial data source pre-aggregation",
"value": [{
"intVal": "Actual data point value, with 'intVal' representing step count"
}]
}]
}]
}The header field provides meta-information about the API response.
- Fields like
content-type,date, andserverdescribe the content and its origin. - Security headers such as
x-content-type-options,x-frame-options, andx-xss-protectionreflect the server's security measures.
The request field holds particulars about the initiating request, while status and statusText specify the response status, with a code of 200 indicating success.
Alternative Approach For Data Fetching
While the previous section uses Google's Node.js client library to fetch step count data, it's worth noting that you can achieve the same results with a more direct approach. This method directly interacts with the Google Fit API using standard HTTP requests, offering flexibility that might be desirable in certain situations.
In this alternative approach, you manually compose an HTTP POST request, set the necessary headers like Authorization and Content-Type, and send the request to Google Fit's API endpoint. JavaScript's native fetch function can be used to handle these HTTP operations.
import express from 'express';
import { google } from 'googleapis';
import url from 'url';

// ...existing code

app.get('/steps2', async (req, res, next) => {
	try {
		const dataTypeName = 'com.google.step_count.delta';
		const dataSourceId = 'derived:com.google.step_count.delta:com.google.android.gms:estimated_steps';
		const data = {
			aggregateBy: [{ dataTypeName, dataSourceId }],
			bucketByTime: { durationMillis: 24 * 60 * 60 * 1000 },
			startTimeMillis: Date.now() - 20 * 24 * 60 * 60 * 1000,
			endTimeMillis: Date.now()
		};
		const endpoint = 'https://www.googleapis.com/fitness/v1/users/me/dataset:aggregate';
		const response = await fetch(endpoint, {
			method: 'POST',
			headers: {
				Authorization: `Bearer ${req.token}`,
				'Content-Type': 'application/json',
			},
			body: JSON.stringify(data)
		});
		const result = await response.json();
		res.json(result);
	} catch (error) {
		next(error);
	}
});

app.listen(PORT, () => {
	console.log(`App listening at ${PORT}`);
});
import express from 'express';
import { google } from 'googleapis';
import url from 'url';
// ...existing code
app.get('/steps2', async (req, res, next) => {
try {
const dataTypeName = 'com.google.step_count.delta';
const dataSourceId = 'derived:com.google.step_count.delta:com.google.android.gms:estimated_steps';
const data = {
aggregateBy: [{ dataTypeName, dataSourceId }],
bucketByTime: { durationMillis: 24 * 60 * 60 * 1000 },
startTimeMillis: Date.now() - 20 * 24 * 60 * 60 * 1000,
endTimeMillis: Date.now()
};
const endpoint = 'https://www.googleapis.com/fitness/v1/users/me/dataset:aggregate';
const response = await fetch(endpoint, {
method: 'POST',
headers: {
Authorization: `Bearer ${req.token}`,
'Content-Type': 'application/json',
},
body: JSON.stringify(data)
});
const result = await response.json();
res.json(result);
} catch (error) {
next(error);
}
});
app.listen(PORT, () => {
console.log(`App listening at ${PORT}`);
});This method can be particularly useful if you wish to have more control over the API request and response handling. It also makes the code less dependent on any specific client library, which could be beneficial for various reasons, such as simplifying dependencies or meeting unique project requirements.
Performance Improvement with Partial Responses
Working with APIs often involves dealing with voluminous data, much of which you may not need. Google Fit Store offers a solution to this issue with its feature of partial responses. By incorporating the fields parameter in your API request, you can selectively filter the data you receive, enhancing performance and readability.
Here's an example using Google's Node.js client library:
const result = await fitnessStore.users.dataset.aggregate({
	userId: 'me',
	requestBody: body,
	fields: 'bucket(dataset(point(value(intVal))))'
});
const result = await fitnessStore.users.dataset.aggregate({
userId: 'me',
requestBody: body,
fields: 'bucket(dataset(point(value(intVal))))'
});The field selection is a string that uses a specific syntax to specify the fields to include in the response. In this case, the field selection consists of the bucket, dataset, point, and value fields, as well as the intVal property of the value field. Doing so limits the amount of data returned, making the response quicker and easier to handle.
If you are using the direct HTTP request approach described in the previous section, you can also add the fields query parameter to the endpoint URL like so:
const endpoint = 'https://www.googleapis.com/fitness/v1/users/me/dataset:aggregate?fields=bucket(dataset(point(value(intVal))))';const endpoint = 'https://www.googleapis.com/fitness/v1/users/me/dataset:aggregate?fields=bucket(dataset(point(value(intVal))))';By integrating this technique, you achieve the following benefits:
- Reduced Response Time: Filtering data at the API level minimizes the data transmitted, making the response quicker.
- Enhanced Data Management: Only fetching the fields you need simplifies the task of parsing and manipulating the API response.
- Resource Optimization: A lighter payload reduces memory and bandwidth consumption, improving overall system performance.
Conclusion
In conclusion, this guide has provided a comprehensive overview of integrating the Google Fit API with an Express.js server. From setting up your project to handling user data, we've covered the steps to get you started. However, this is just the beginning. I recommend checking out the resources listed below for those looking to further explore Google APIs and better understand their capabilities.
The complete source code for this project is available on this GitHub repository.