Introduction
In the previous part, we explored the key components of the MEAN stack and how they work together. We also got a good grasp of the monorepo approach and how to structure folders.
In this part, we will take a hands-on approach and focus on coding and experimenting with the monorepo methodology. Following step-by-step instructions, we will learn how to effectively set up and use the monorepo approach, which will allow us to create web applications that are scalable and easy to maintain. We'll gain valuable insights into seamlessly integrating Express.js and TypeScript, empowering us to build robust and efficient projects with utmost ease. Exciting stuff, right?
What Makes TypeScript a Great Choice for a MEAN Stack?
Certainly! TypeScript needs no introduction, as its powerful features and developer experience are well-known in the web development community. However, let's highlight a few key elements that will significantly benefit our MEAN stack project in a monorepo environment:
- Full Stack Consistency: TypeScript brings uniformity to your entire MEAN stack. Since Angular already uses TypeScript, incorporating TypeScript with Express.js on your server side enhances stack consistency and compatibility. You can maintain the same development practices, whether working on the front or back.
- Shared Type Definitions: A common challenge in full-stack JavaScript development is keeping data model definitions consistent between the server and client. In a monorepo setup with TypeScript, you can share type definitions (like interfaces or types) across your front and back. This approach ensures that your MongoDB data models, Express.js services, and Angular components agree about the data structures they are dealing with.
- Scalability and Maintainability: As monorepo houses multiple projects within a single repository, they allow for easier code sharing and dependency management. Combining this with TypeScript's strong typing helps create scalable and maintainable web applications that can grow with the project's needs.
- Enhanced Code Collaboration: In a monorepo project involving multiple developers, TypeScript's type annotations are effective documentation, promoting seamless communication and comprehension among team members. This fosters improved collaboration and minimizes the chances of code conflicts, resulting in smoother development workflows.
Combining TypeScript with Express.js in a monorepo MEAN stack application provides numerous benefits, including improved code quality, productivity, and maintainability. It ensures consistency, enhances collaboration, and enables scalable web development.
Now let's shift our focus to another critical aspect of managing projects efficiently: package management.
PNPM: A performant package manager
pnpm is a package manager for JavaScript that is open-source, efficient, and performance-driven. It is often considered an alternative to npm and Yarn. pnpm stands out in monorepo setups by providing the same features as its counterparts but with unique advantages. Its content-addressable filesystem reduces duplication and saves disk space, resulting in faster and more efficient installations than npm or Yarn. pnpm's workspace feature makes managing multiple packages within a repository easy by linking them together for seamless updates across projects, thereby enhancing workflow efficiency.
Here are some key advantages of using pnpm to manage your monorepo:
- Enhanced Performance: Due to its efficient storage approach, pnpm installs packages faster than npm or Yarn. When a package is already in the store, and a project requests its installation, pnpm only creates a hard link between the project's node_modules directory and the package in the store, resulting in faster installation times.
- Workspace Management: pnpm provides first-class support for managing multiple packages in a monorepo through its workspace feature. You can run scripts, install, update, and link packages across the entire workspace, making it easier to manage interdependent packages. Also, it offers out-of-the-box support for monorepos with features like the workspace:* protocol and
--filterflag. - Single instance storage: pnpm utilizes a distinctive approach called single instance storage, which involves linking packages in a centralized global storage location on your machine. This innovative method ensures that if multiple projects rely on the same package version, it is stored only once, substantially reducing disk space usage.
- Strong Compatibility: pnpm integrates seamlessly with npm and Yarn, ensuring compatibility and smooth transition. Migrating existing projects from npm or Yarn to pnpm requires minimal changes to configurations or package structures, making the adoption process straightforward.
Overall, pnpm provides a reliable and efficient solution for effectively managing large-scale projects, making it a compelling option for monorepo-based development.
Let's explore how to implement a monorepo structure using pnpm.
Create a monorepo structure using PNPM
Before installing pnpm, make sure that Node.js is already installed on your system. You can check if Node.js is installed by executing the following command:
node -v
# v20.4.0
node -v
# v20.4.0If you don't have Node.js installed, you can download it from the official website. npm is bundled with Node.js, so you'll get both when you install Node.js.
As of the day this article is published, I am utilizing the latest version available, 20.4.0.
After setting up Node.js and npm, the next step is to install pnpm. You can use Brew (if it's already installed) or npm as an alternative.
# using brew
brew install pnpm
# using npm
npm install -g pnpm
# using brew
brew install pnpm
# using npm
npm install -g pnpmFor more information on installing pnpm, please refere to the installation guide, which provides various options.
To ensure that pnpm has been installed correctly, you can verify its version:
pnpm -v
# 8.6.7
pnpm -v
# 8.6.7To set up the root of your monorepo, create a new directory. As an example, I will name mine bugsight.
Create an apps directory within the root directory. Make separate directories for your client and server applications inside the apps directory.
Next, create a packages directory at the root level. This will hold shared code that can be used by both the client and server applications. For instance, you can create a tsconfig package that houses your shared TypeScript configuration.
Here is the expected directory structure for your monorepo:
bugsight
├── apps
├   ├── server
├   └── client
└── packages
    ├── tsconfig
    └── ....
bugsight
├── apps
├ ├── server
├ └── client
└── packages
├── tsconfig
└── ....To generate a top-level package.json file, initialize pnpm in the root directory.
pnpm initpnpm initOnce you have initiated the process, you will notice that the package.json file has been generated.
{
    "name": "bugsight",
    "version": "1.0.0",
    "description": "",
    "main": "index.js",
    "scripts": {
        "test": "echo \"Error: no test specified\" && exit 1"
    },
    "keywords": [],
    "author": "",
    "license": "ISC"
}{
"name": "bugsight",
"version": "1.0.0",
"description": "",
"main": "index.js",
"scripts": {
"test": "echo \"Error: no test specified\" && exit 1"
},
"keywords": [],
"author": "",
"license": "ISC"
}To set up pnpm workspaces within our monorepo, we need to make a pnpm-workspace.yaml file at the top level. This file outlines the layout of the monorepo and identifies the paths for the workspaces or packages contained within it. pnpm will then recognize and handle these sub-packages accordingly.
packages:
	- 'apps/*'
- 'packages/*'packages:
- 'apps/*'
- 'packages/*'It's worth mentioning that you can use the .npmrc file to control package management in a pnpm monorepo. This file significantly influences pnpm's operations and the monorepo structure. However, these settings require careful consideration to align with your project's requirements. Read more about it in the official docs.
After setting up our monorepo structure using pnpm, it's time to move on to the following section. In this step, we will work on creating a basic Express server.
Create a minimal Express server
To start, go to the server folder and initialize a package.json file.
pnpm initpnpm initAfter using pnpm init, the package.json file is generated automatically with default values without any prompts. You must access the package.json file and modify the main field value. Specifically, please change it to src/index.js instead of index.js.
{
    "name": "server",
    "version": "1.0.0",
    "description": "",
    "main": "src/index.js",
    ...
}{
"name": "server",
"version": "1.0.0",
"description": "",
"main": "src/index.js",
...
}To set up your server code, create a src directory. Inside this directory, create an index.js file.
Add a straightforward JavaScript code to validate the setup that will print a value.
const print = message => {
	console.log(message);
};

print('JavaScript is AWESOME');const print = message => {
console.log(message);
};
print('JavaScript is AWESOME');To execute this JavaScript file, use the following command from the server folder:
node src/index.jsnode src/index.jsThe "JavaScript is AWESOME" message should be printed in your terminal.
Let's install Express, which will allow us to create a server.
pnpm add express --filter serverpnpm add express --filter serverIn a monorepo setup, running commands from the root folder is often convenient to avoid frequent folder switching.
pnpm --filter <package-name> <command>
# pnpm --filter server dev
pnpm --filter <package-name> <command>
# pnpm --filter server devFor a well-organized and structured codebase, creating a server.js file that exports a start method is recommended. This method can be utilized in our entry point index.js, which may include additional functionalities besides starting an express server.
const express = require('express');

const start = () => {
	const app = express();

	app.use('/', (req, res, next) => {
		return res.send('JavaScript is AWESOME');
	});

	app.listen(4000, () => {
		console.info(`Server running on port 4000...`);
	});
};

module.exports = { start };const express = require('express');
const start = () => {
const app = express();
app.use('/', (req, res, next) => {
return res.send('JavaScript is AWESOME');
});
app.listen(4000, () => {
console.info(`Server running on port 4000...`);
});
};
module.exports = { start };For the sake of simplicity, we have hardcoding the port number. However, later, we will explore how to handle environment variables.
To start the server, invoke the start method in the main index.js file.
const server = require('./server');

server.start();const server = require('./server');
server.start();We can start the server using the same method we used for running the JavaScript file previously.
node src/index.js
# Server running on port 4000...
node src/index.js
# Server running on port 4000...To access your server, open your favorite browser and navigate to http://localhost:4000, which invokes the endpoint /. Once there, you should observe the message "JavaScript is AWESOME" displayed on the page.
Hot reloading with Nodemon
Nodemon is a utility that provides hot reloading for Node.js applications, allowing real-time updates without manually stopping and restarting the server. This feature significantly speeds up the development process, as developers can instantly see the effects of their changes.
Nodemon is typically installed as a development dependency. You can install it via:
pnpm add -D nodemon --filter serverpnpm add -D nodemon --filter serverAfter installing Nodemon, you can use it to launch your application by replacing node with nodemon in your command. This feature enables hot reloading, which automatically restarts the server when code changes are detected.
nodemon src/index.js
# Server running on port 4000...
nodemon src/index.js
# Server running on port 4000...It's a good practice to include a script to launch the server. While the current command may be short and straightforward, as time progresses, it may require additional arguments depending on the instance (e.g., prod, test, dev).
{
	"name": "server",
	"version": "1.0.0",
	"description": "",
	"main": "src/index.ts",
	"scripts": {
		"dev": "nodemon src/index.ts",
	}
    ...
}{
"name": "server",
"version": "1.0.0",
"description": "",
"main": "src/index.ts",
"scripts": {
"dev": "nodemon src/index.ts",
}
...
}You can include a script in your root package.json file to run the server from any folder. This script will allow you to start the server quickly regardless of your current working directory.
{
	"name": "bugsight",
	"version": "1.0.0",
	"description": "",
	"scripts": {
		"dev:server": "pnpm --filter server dev"
	},
    ...
}{
"name": "bugsight",
"version": "1.0.0",
"description": "",
"scripts": {
"dev:server": "pnpm --filter server dev"
},
...
}Similar to adding dependencies, we use the -—filter flag to specify the package and an additional argument to indicate the script that should be executed (dev).
To run the server from the root folder, use this command:
pnpm run dev:serverpnpm run dev:serverAlternatively, you can include the -w flag in your command if you prefer to run it from any other folder.
pnpm -w run dev:serverpnpm -w run dev:serverNow that we have explored Nodemon and its benefits for server development let's move on to the next section, where we will discuss integrating TypeScript with Express.
Integrate TypeScript with Express.js
First, we must create a shared package for our TypeScript configuration. Inside the packages directory, create a new folder named tsconfig.
Using your terminal, navigate to the tsconfig folder and initialize a package.json file.
pnpm initpnpm initChanging the package name to @bugsight/tsconfig is recommended to prevent naming conflicts with other npm packages. Using a scoped name, you can avoid issues with existing packages on the npm registry if you decide to publish your packages.
{
	"name": "@bugsight/tsconfig",
    "version": "1.0.0",
    "description": "",
    ...
}{
"name": "@bugsight/tsconfig",
"version": "1.0.0",
"description": "",
...
}Install TypeScript as a development dependency. In this workspace, TypeScript is the sole dependency required.
pnpm add -D typescriptpnpm add -D typescriptTo create a shared tsconfig file for our server, client, or other packages, we need to generate the
tsconfig.base.json file, which serves as the configuration file for TypeScript. This file guides the TypeScript compiler during the compilation process to transform our project into JavaScript. You can manually create the tsconfig.base.json file or utilize the npx tsc --init command, which generates a default file with preset compiler options.
{
	"compilerOptions": {
		"noImplicitAny": true,
		"allowSyntheticDefaultImports": true,
		"forceConsistentCasingInFileNames": true,
		"strict": true,
		"alwaysStrict": true,
		"useUnknownInCatchVariables": true,
		"allowUnreachableCode": false,
		"noImplicitReturns": true,
		"noUncheckedIndexedAccess": true,
		"noFallthroughCasesInSwitch": true,
		"exactOptionalPropertyTypes": true
	}
}{
"compilerOptions": {
"noImplicitAny": true,
"allowSyntheticDefaultImports": true,
"forceConsistentCasingInFileNames": true,
"strict": true,
"alwaysStrict": true,
"useUnknownInCatchVariables": true,
"allowUnreachableCode": false,
"noImplicitReturns": true,
"noUncheckedIndexedAccess": true,
"noFallthroughCasesInSwitch": true,
"exactOptionalPropertyTypes": true
}
}Now that we've finished configuring our package, we can add it as a dependency to the package.json file for the server.
{
	"name": "server",
	"main": "src/index.js",
	"dependencies": {
		"@bugsight/tsconfig": "workspace:*",
		"express": "^4.18.2"
	}
    ...
}{
"name": "server",
"main": "src/index.js",
"dependencies": {
"@bugsight/tsconfig": "workspace:*",
"express": "^4.18.2"
}
...
}To proceed, please execute the following command to install the required package or any missing package:
pnpm install --filter serverpnpm install --filter serverLet's take a close look at how pnpm treats the installed packages.
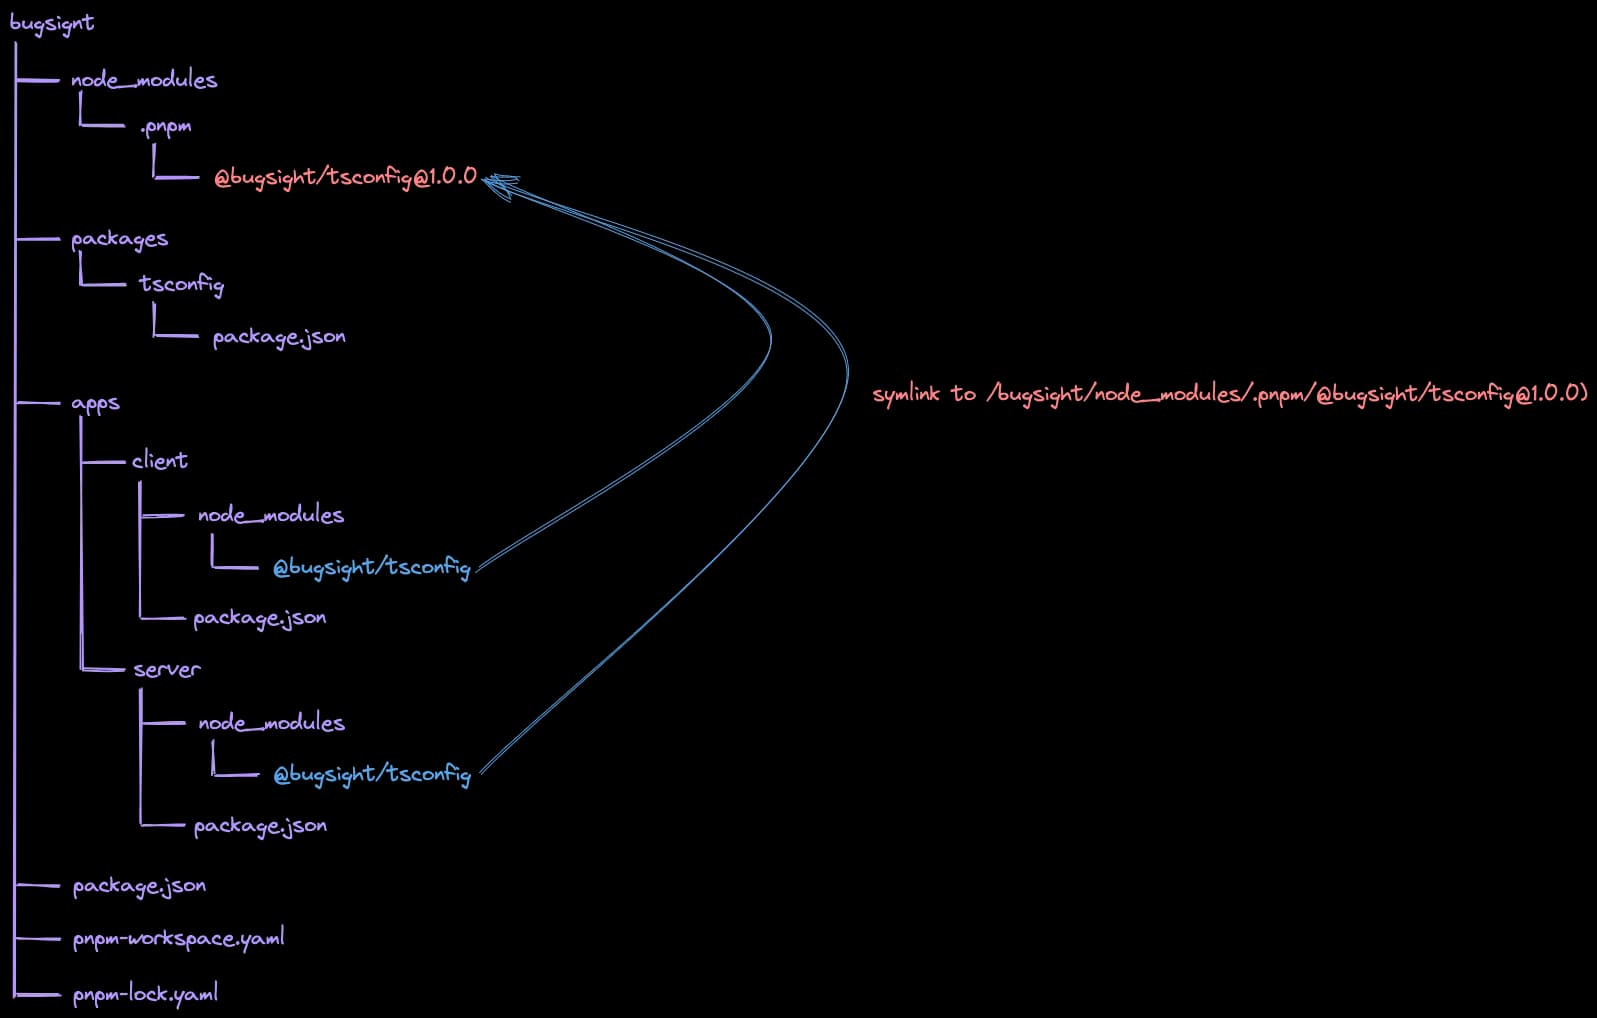
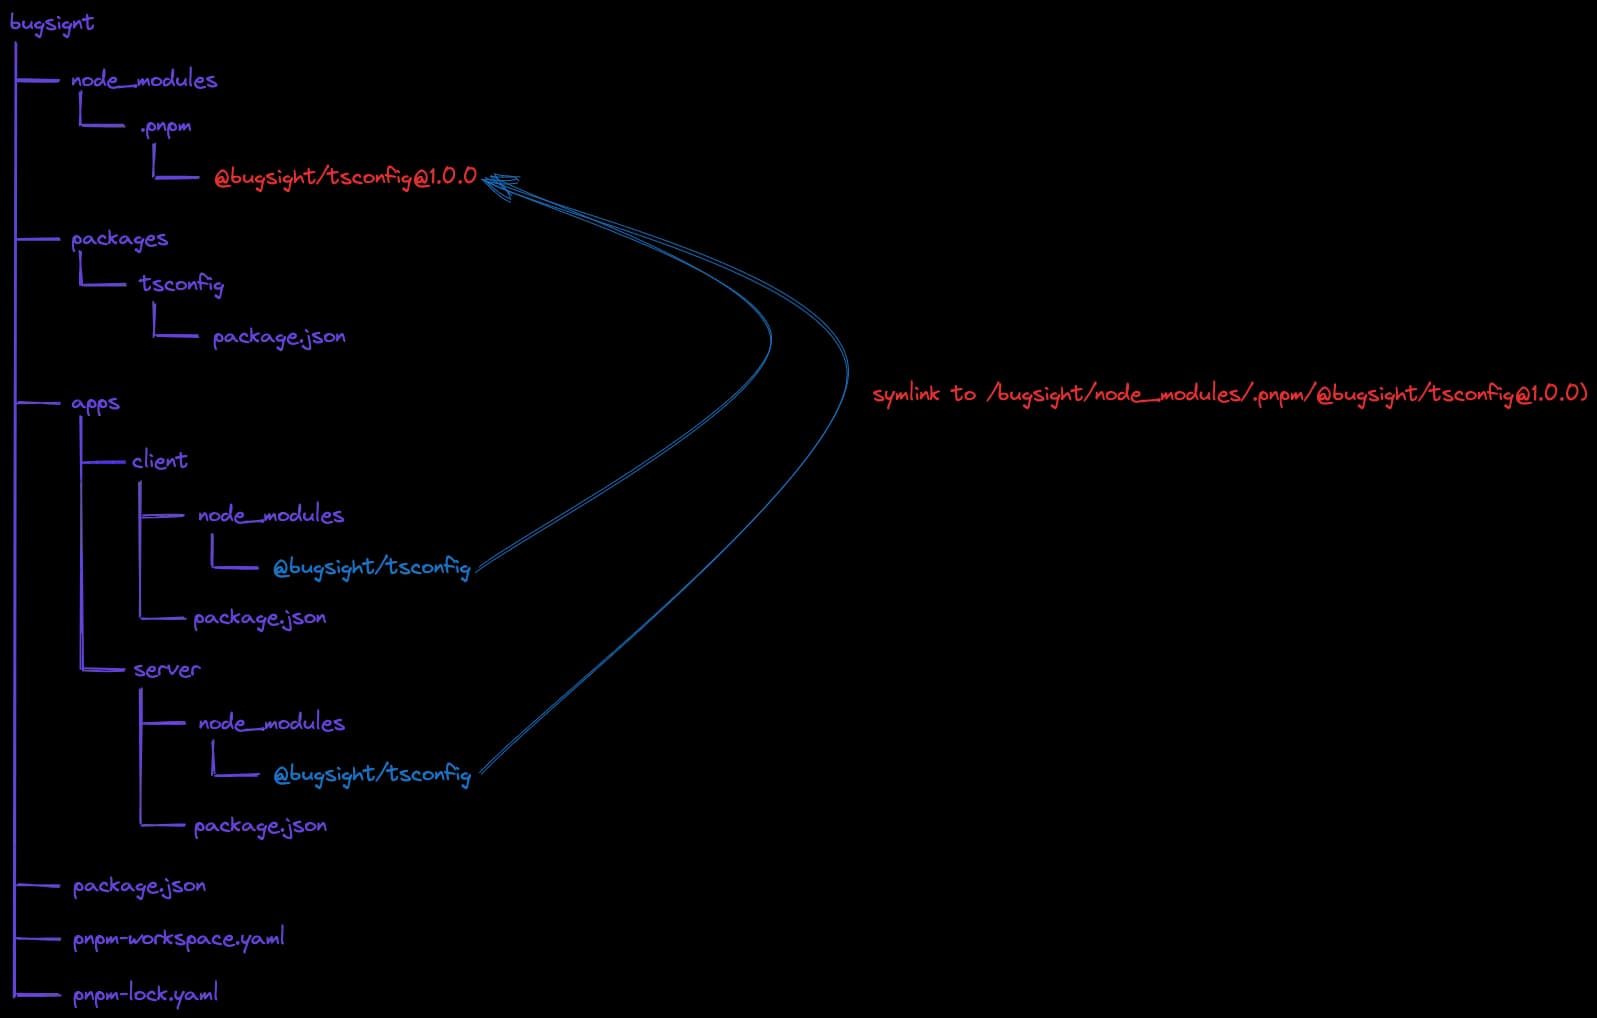
bugsight is the root of your monorepo, and node_modules at the root is the shared node_modules. client and server are your applications, each with a node_modules directory containing symlinks to dependencies in the shared node_modules folder.
The shared tsconfig package is installed in the root node_modules directory and symlinked into each application's node_modules. The client and server can use the shared tsconfig package while maintaining disk efficiency and avoiding duplicate installations.
Monorepos often lead to many node_modules directories, which can clutter your workspace using an editor like VSCode. However, VSCode offers a way to minimize this visual clutter. Modifying your settings allows you to hide all node_modules folders from the explorer panel.
To do this, open your settings file and add the following:
"files.exclude": {
    "**/node_modules": true
}```"files.exclude": {
"**/node_modules": true
}```Also, you can avoid polluting search results by excluding node_modules and pnpm-lock file:
"search.exclude": {
	"**/node_modules": true,
	"pnpm-lock.yaml": true
}"search.exclude": {
"**/node_modules": true,
"pnpm-lock.yaml": true
}Next, let's create a tsconfig.json file within the server directory. This will help to extend the base configuration and include extra settings specifically for the server.
{
	"extends": "@bugsight/tsconfig/tsconfig.base.json",
	"include": ["src/**/*"],
	"compilerOptions": {
		"module": "commonjs",
		"target": "es6",
		"esModuleInterop": true,
		"moduleResolution": "node",
		"outDir": "dist",
		"baseUrl": "./src"
	}
}{
"extends": "@bugsight/tsconfig/tsconfig.base.json",
"include": ["src/**/*"],
"compilerOptions": {
"module": "commonjs",
"target": "es6",
"esModuleInterop": true,
"moduleResolution": "node",
"outDir": "dist",
"baseUrl": "./src"
}
}It's important to mention that we refer to the tsconfig.base.json file without using a relative path. Instead, we refer to it by name because it's installed as a dependency in the node_modules directory.
Let's change the file extensions of index.js and server.js to .ts. Moreover, update the files' content to use ES6 modules, which require the use of import and export syntax, as demonstrated below:
import express from 'express';

const start = () => {
	const app = express();

	app.use('/', (req, res, next) => {
		return res.send('JavaScript is AWESOME');
	});

	app.listen(4000, () => {
		console.info(`Server running on port 4000...`);
	});
};

export { start };import express from 'express';
const start = () => {
const app = express();
app.use('/', (req, res, next) => {
return res.send('JavaScript is AWESOME');
});
app.listen(4000, () => {
console.info(`Server running on port 4000...`);
});
};
export { start };import * as server from './server';
server.start();import * as server from './server';
server.start();You will encounter errors that appear in your ts files. This is a good sign that your TypeScript configuration is correctly set up.
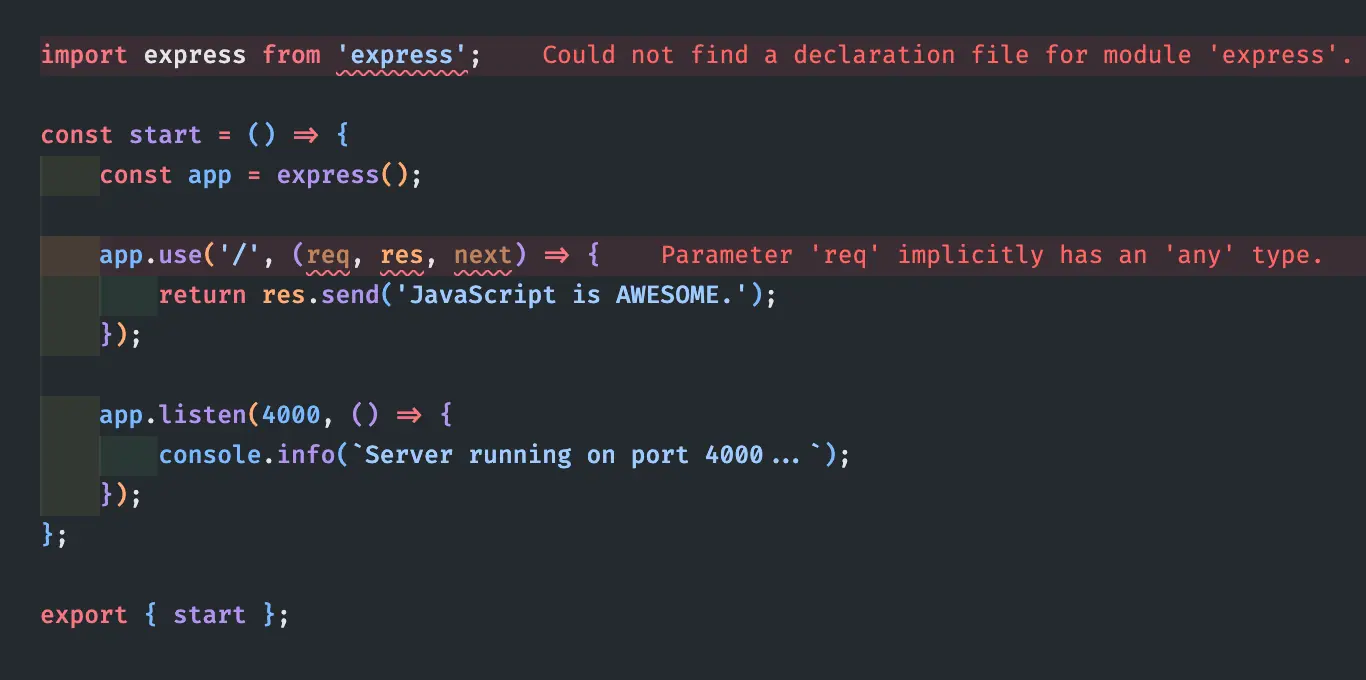
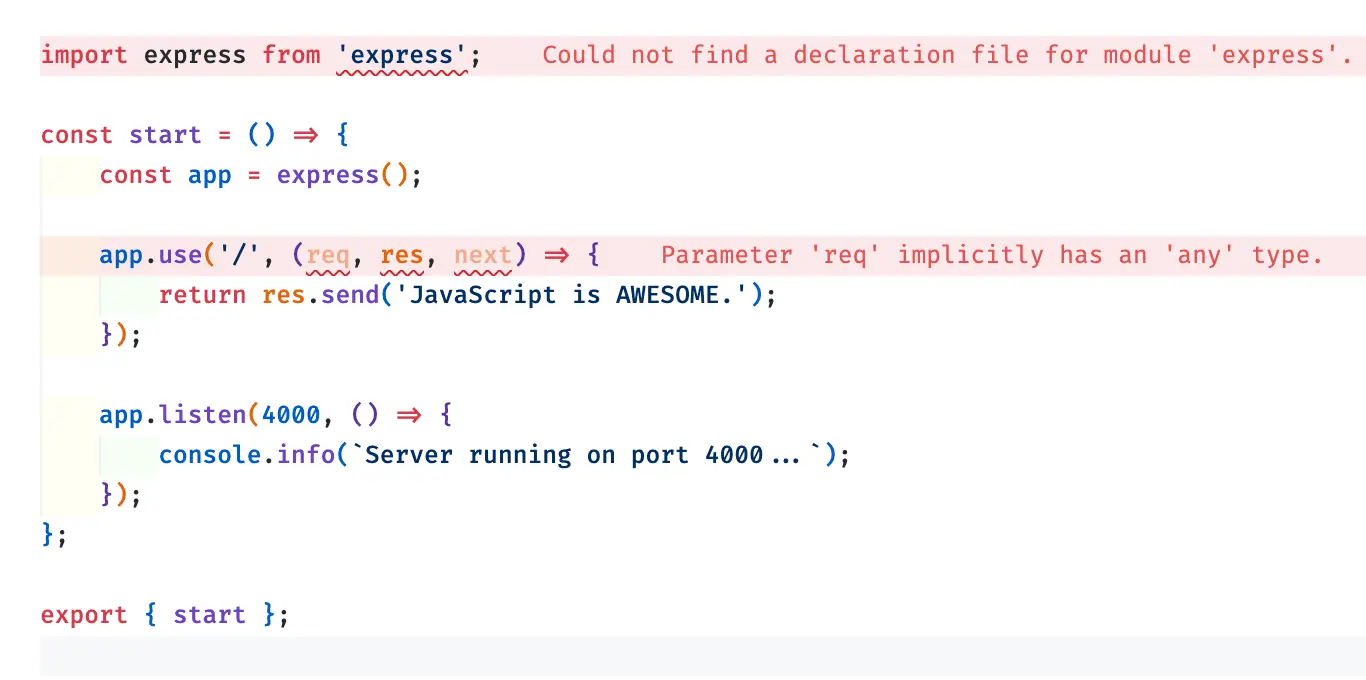
The first error with the express import indicates that the express package is written in JavaScript and has no exported modules.
The second error occurs because the three parameters have an implicit any type, which goes against the noImplicitAny rule in our base tsconfig. This error is actually connected to the first error. If the express package had exported modules, the parameters would have received proper types automatically.
Although Node.js and Express are coded in JavaScript, TypeScript's type-checking can still be utilized by incorporating type definitions from the DefinitelyTyped repository on GitHub. This repository provides top-notch TypeScript definitions for various JavaScript libraries, including Node.js and Express. To avoid creating type declarations from the beginning, you can efficiently locate these type-declarations utilizing the @types/{packageName} pattern.
Use this command to install type definitions as development dependencies (-D). This is recommended as these definitions are only required during development and are not necessary for the production
build.
pnpm add -D @types/node @types/express --filter serverpnpm add -D @types/node @types/express --filter serverThe package associated with @types/node contains definitions for APIs such as file, process, and path. Installing these types should resolve any errors in your TypeScript file.
We need to update the package.json file to use the TypeScript version.
{
	"name": "server",
	"version": "1.0.0",
	"description": "",
	"main": "src/index.ts",
	"scripts": {
		"dev": "nodemon src/index.ts"
	}
}{
"name": "server",
"version": "1.0.0",
"description": "",
"main": "src/index.ts",
"scripts": {
"dev": "nodemon src/index.ts"
}
}Let's attempt to start up the server.
pnpm run dev:serverpnpm run dev:serverAn error is expected to occur.
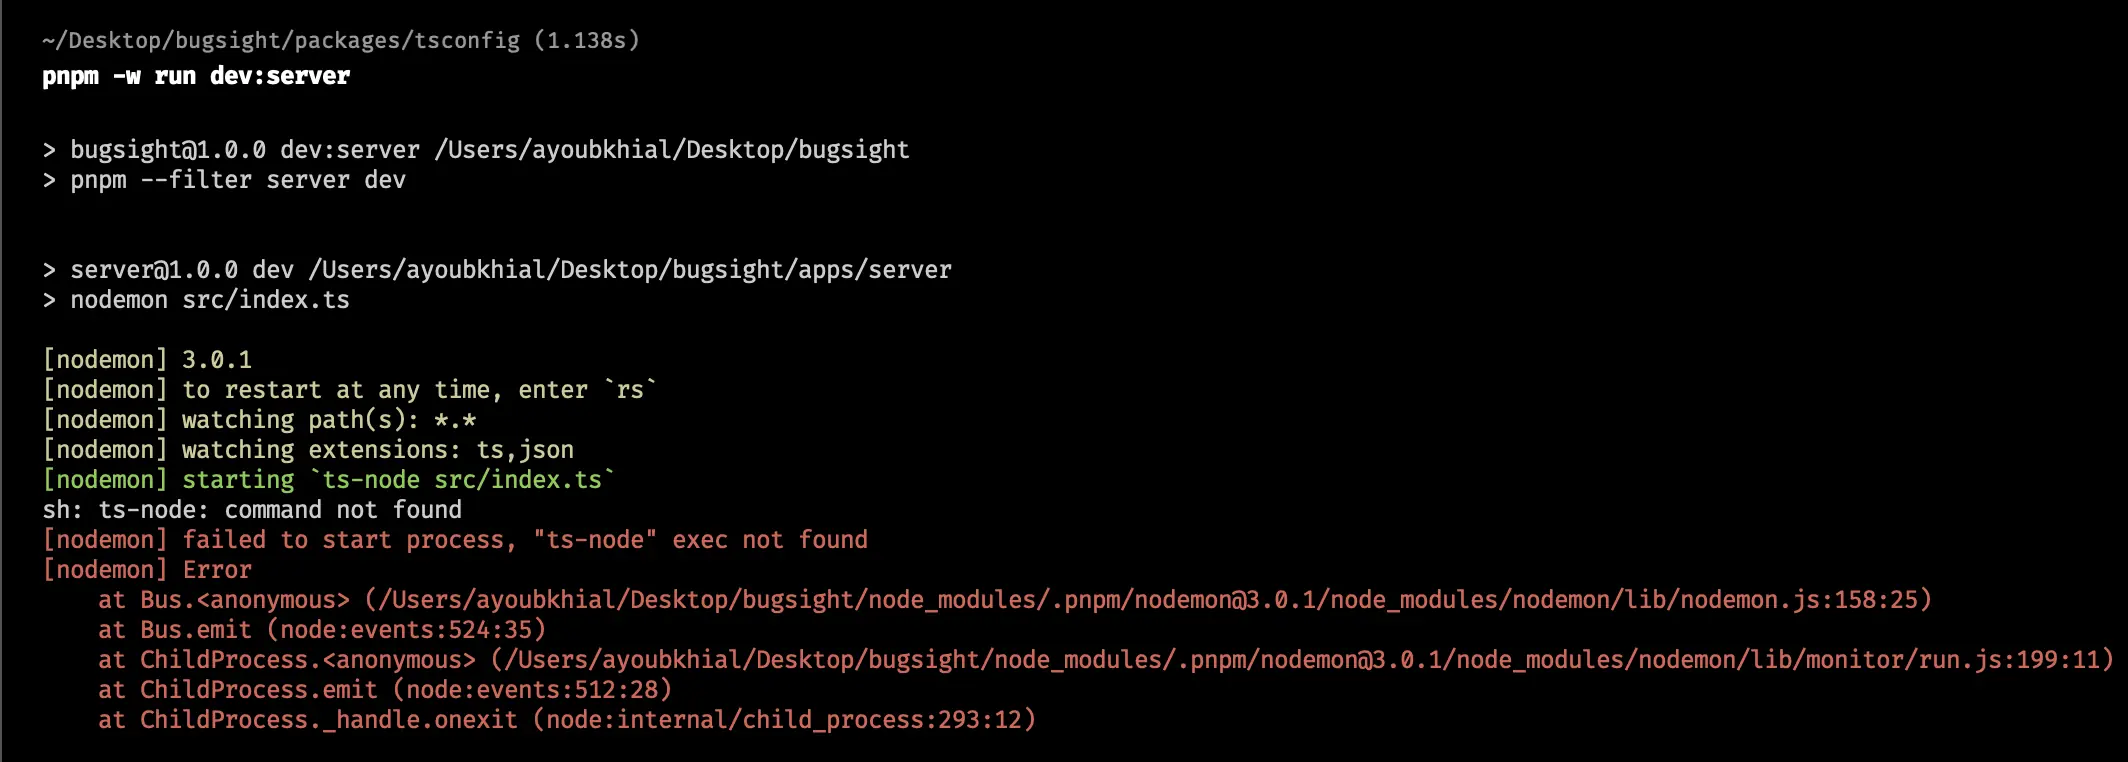
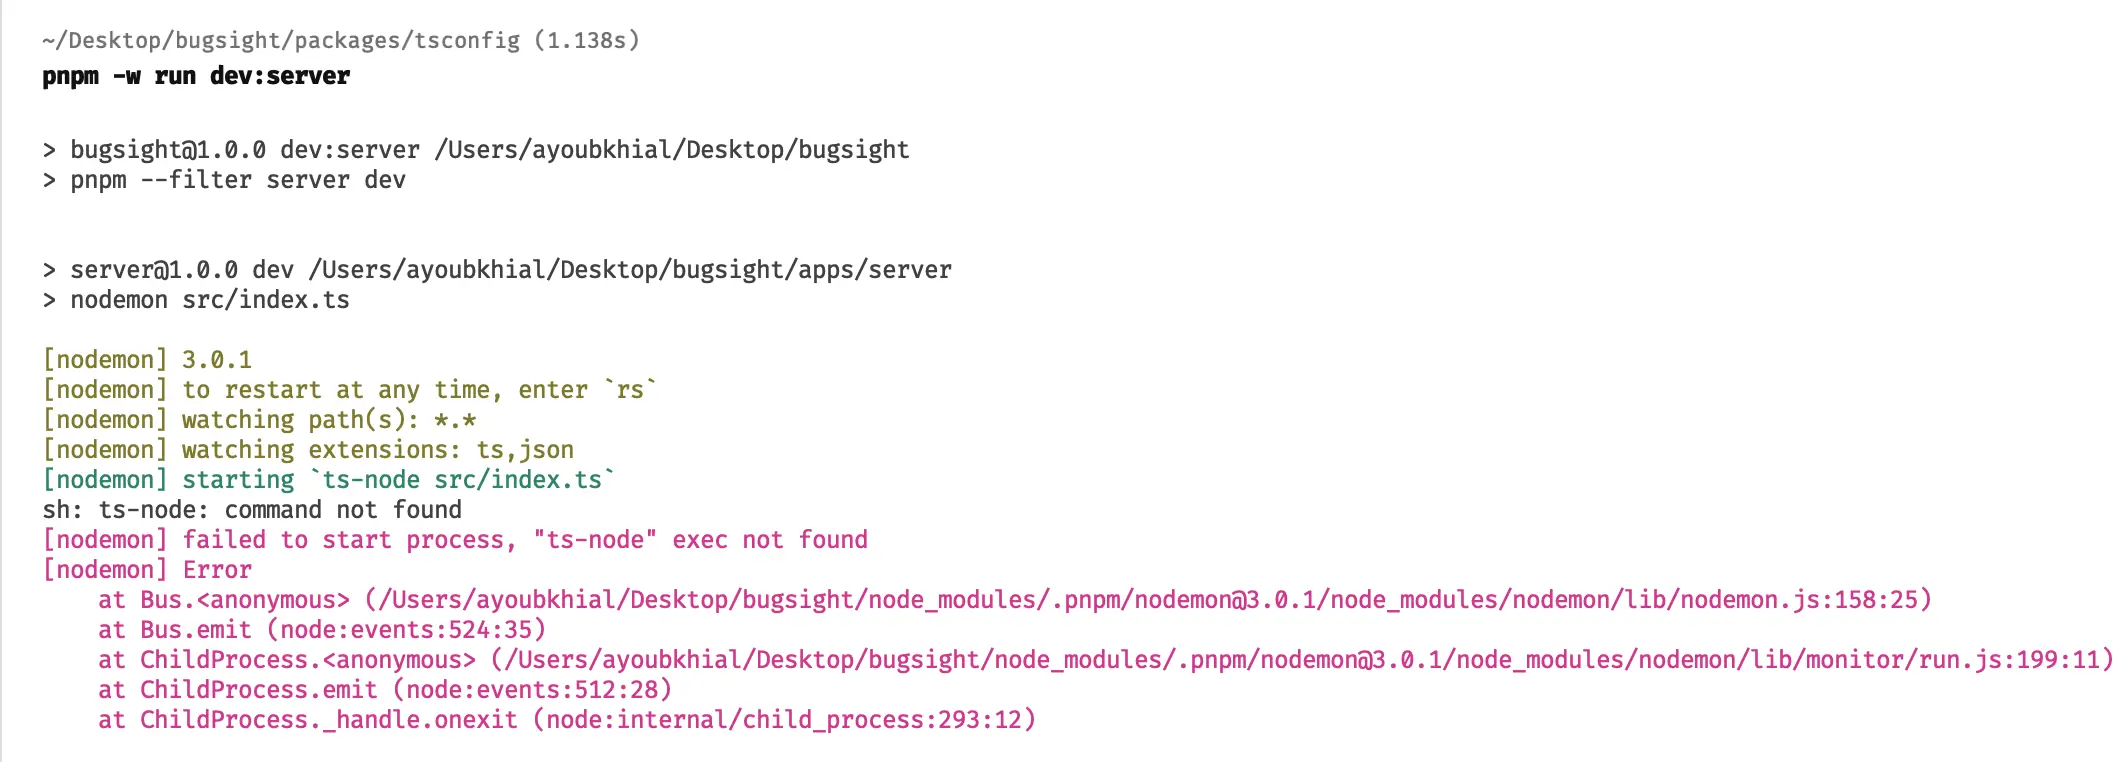
We need to use a ts-node package to execute the TypeScript file in a Node.js environment. This package compiles the TypeScript file on the fly, converting it to a JavaScript file that can be executed with nodemon.
Once you rerun the development script, the TypeScript-based Express server should run without issues. Visit https://localhost:4000 to confirm that the message is displayed on the screen.
Next, we will include two additional scripts: build and prod. These scripts play vital roles in the development, testing, and deployment phases of your project.
{
	"name": "server",
	"version": "1.0.0",
	"description": "",
	"main": "src/index.ts",
	"scripts": {
		"build": "tsc --build",
		"dev": "nodemon src/index.ts",
		"prod": "npm run build && node ./dist/index.js"
	}
}{
"name": "server",
"version": "1.0.0",
"description": "",
"main": "src/index.ts",
"scripts": {
"build": "tsc --build",
"dev": "nodemon src/index.ts",
"prod": "npm run build && node ./dist/index.js"
}
}The purpose of the build script is to compile our TypeScript code into JavaScript. It's specified with the tsc command. This command translates our TypeScript files into JavaScript counterparts, outputting them in the ./dist directory as defined by the outDir parameter in** tsconfig.json**.
The prod script serves our application in production mode. It starts the production server by running the compiled index.js from the ./dist directory. This script is typically executed after the application has been built using the build script.
Just like with the dev script, you can include both scripts in the route package.json file so they can be accessed from anywhere.
{
	"name": "bugsight",
	"version": "1.0.0",
	"description": "",
	"main": "index.js",
	"scripts": {
		"build:server": "pnpm --filter server build",
		"dev:server": "pnpm --filter server dev",
		"prod:server": "pnpm --filter server prod"
	}
}{
"name": "bugsight",
"version": "1.0.0",
"description": "",
"main": "index.js",
"scripts": {
"build:server": "pnpm --filter server build",
"dev:server": "pnpm --filter server dev",
"prod:server": "pnpm --filter server prod"
}
}Pushing to GitHub
Head to GitHub and create a new repository. You don't need to initialize it with a README or .gitignore.
In your local project directory, use the terminal to initialize Git (if not already done) by using the command:
pnpm run dev:serverpnpm run dev:serverThen, add the URL of your new GitHub repository with the command:
git remote add origin <your-github-repo-url>
# git remote add origin https://github.com/ayoubkhial/bugsight-app.git
git remote add origin <your-github-repo-url>
# git remote add origin https://github.com/ayoubkhial/bugsight-app.gitThis connects your local repository to the remote one on GitHub.
Before you push your code to a GitHub repository, setting up a .gitignore file to specify which files or directories should not be included in the repository is essential. This is especially crucial for a monorepo setup to avoid cluttering your repo with unnecessary files.
In your project's root directory, create a new file named .gitignore.
node_modules
dist
.vscode
.DS_Storenode_modules
dist
.vscode
.DS_StoreUsing this configuration, you can prevent specific directories and files, such as node_modules, dist (usually containing compiled code), .DS_Store (created by macOS), and the .vscode folder containing your IDE workspace settings, from being included when pushing to GitHub.
Now you can stage, commit and push your local commits to the remote repository
git add .
git commit -m "Initial commit"
git push -u origin master
git add .
git commit -m "Initial commit"
git push -u origin masterconclusion
In conclusion, integrating TypeScript in a MEAN stack can significantly enhance your development experience by providing robust typing and intuitive error-checking.
You can find the complete code source in this repository; feel free to give it a star ⭐️.
If you want to keep up with this series, consider subscribing to my newsletter to receive updates as soon as I publish an article.