Introduction
In modern web application development, managing configuration is fundamental, and environment variables are a robust solution for this challenge. They enable a clean separation of configuration data from the application code, enhancing security and maintainability. This separation is precious for segregating configurations based on various environments, such as development, staging, and production. This article will delve into the practical aspects of leveraging environment variables in a Node.js application built with Express and TypeScript. We will introduce dotenv, a convenient Node.js module that simplifies the process of loading environment variables from a .env file, allowing developers to create applications that can adapt effortlessly to different settings without requiring modifications to the codebase.
What are Environment Variables?
Environment variables are key-value pairs set at the operating system level and accessible to any process running on that system. These variables act as placeholders for data that command-line interfaces, applications, and scripts can be retrieved and used without knowing the actual values.
In the context of a Node.js application, environment variables are a secure and efficient way to andle configuration settings. Unlike hard-coded values, they are abstracted from the application code, which provides multiple benefits:
- Security: Since environment variables are not embedded in the application's code, they are not exposed to the public once the application is deployed. This is essential when working with sensitive information, such as API keys or database credentials.
- Scalability: Environment variables enable you to have a uniform codebase across different environments (development, testing, production, etc.). The same code can behave differently based on the values set in the environment variables, making deployments smoother.
- Maintainability: Centralizing configuration settings in environment variables makes the application easier to manage and modify. Instead of scouring through the code to make changes, you can adjust the environment variables, typically defined in one place.
- Portability: Environment variables allow you to migrate your application more efficiently. Since configuration settings are not hard-coded, you can move the application to different servers or environments without changing the application code itself.
In Node.js, environment variables are accessed through the process.env global object. This object contains the user environment, and its properties resemble the named environment variables. Reading an environment variable in a Node.js application is as simple as referencing the property with the name of the variable you are interested in. For example, to access an environment variable named MY_VARIABLE, you would use the following code:
console.log(process.env.MY_VARIABLE);console.log(process.env.MY_VARIABLE);This command would print the value of MY_VARIABLE to the console, assuming that this environment variable has been set at the operating system level or loaded through a module like dotenv.
When to Use Environment Variables?
Environment variables have become an essential tool in modern software development. But when exactly should one use them? Let's delve into some ideal scenarios:
- Sensitive Information: Anytime your application needs to handle sensitive information like API keys, database credentials, or secret tokens, it's best to use environment variables. Storing such data directly in your codebase poses significant security risks and could lead to unintentional exposure.
- Configuration Flexibility: If your application may run in multiple environments (development, staging, production), environment variables allow you to easily change the application's behavior without altering the code. For example, you might have different database connections for staging and production.
- Conditional Behavior: In cases where certain features or behaviors of your application need to be toggled on or off, environment variables act as switches. For instance, enabling detailed debugging logs only in a development environment.
- System Paths and Directories: When applications need to be aware of specific system paths, such as the location of temporary folders or user directories, environment variables can consistently provide this information.
- Integration and Deployment Tools: Many CI/CD (Continuous Integration/Continuous Deployment) tools use environment variables to inject values or configurations at a build or deploy time, enabling automated and parameterized deployments.
- Microservices Communication: In architectures with multiple services, environment variables can store information about service endpoints, ensuring loose coupling and easy reconfiguration if services move or change.
- Third-party Configurations: When integrating third-party services or libraries that require configuration, it's often cleaner and more secure to pass configurations as environment variables rather than hardcoding them.
In essence, environment variables should be your go-to mechanism whenever there's a need for dynamic values, configuration outside of the codebase, or protection of sensitive data. They ensure a clear separation of configuration from code, bolstering security and promoting best practices in software deployment and execution.
Setting Up Environment Variables Through the Command Line
The Command Line Interface (CLI) is a powerful tool that allows developers to interact directly with their operating system or software. One everyday use case is setting environment variables that applications can pick up and use. This section explores how to use the CLI to set environment variables, with attention to both temporary (session-specific) and persistent (system-wide) methods.
Temporary Environment Variables
Temporary environment variables exist only during a specific session, vanishing when the session (like a terminal window) concludes. This transient nature makes them ideal for short-lived tasks or experimental testing. On Unix-like systems, you'd typically set them using a syntax like:
# VARIABLE_NAME=value command_to_run
NODE_PORT=4000 pnpm run dev:server
# VARIABLE_NAME=value command_to_run
NODE_PORT=4000 pnpm run dev:serverIf you're on Windows, you can use the set command:
# set VARIABLE_NAME=value&&command_to_run
set NODE_PORT=4000&&pnpm run dev:server
# set VARIABLE_NAME=value&&command_to_run
set NODE_PORT=4000&&pnpm run dev:serverPersistent Environment Variables
In contrast, persistent environment variables retain their values across sessions, making them the choice for settings that demand consistency, such as API keys or database URIs. On Unix-like systems, You can add the export command to a profile script file like ~/.bashrc, ~/.bash_profile, or
~/.zshrc, depending on your shell:
echo 'export NODE_PORT=4000' >> ~/.bashrc
source ~/.bashrc
echo 'export NODE_PORT=4000' >> ~/.bashrc
source ~/.bashrcFor Windows, persistent environment variables can be set using the System Properties > Advanced > Environment Variables or via command prompt:
setx NODE_PORT "4000"setx NODE_PORT "4000"setx will set the environment variable permanently, but the change will only be seen in new Command Prompt instances, not in the current session.
Once set, these environment variables are accessible from within any Node.js application through the process.env object.
const PORT = process.env.NODE_PORT;
console.log(port); // This will output 4000
const PORT = process.env.NODE_PORT;
console.log(port); // This will output 4000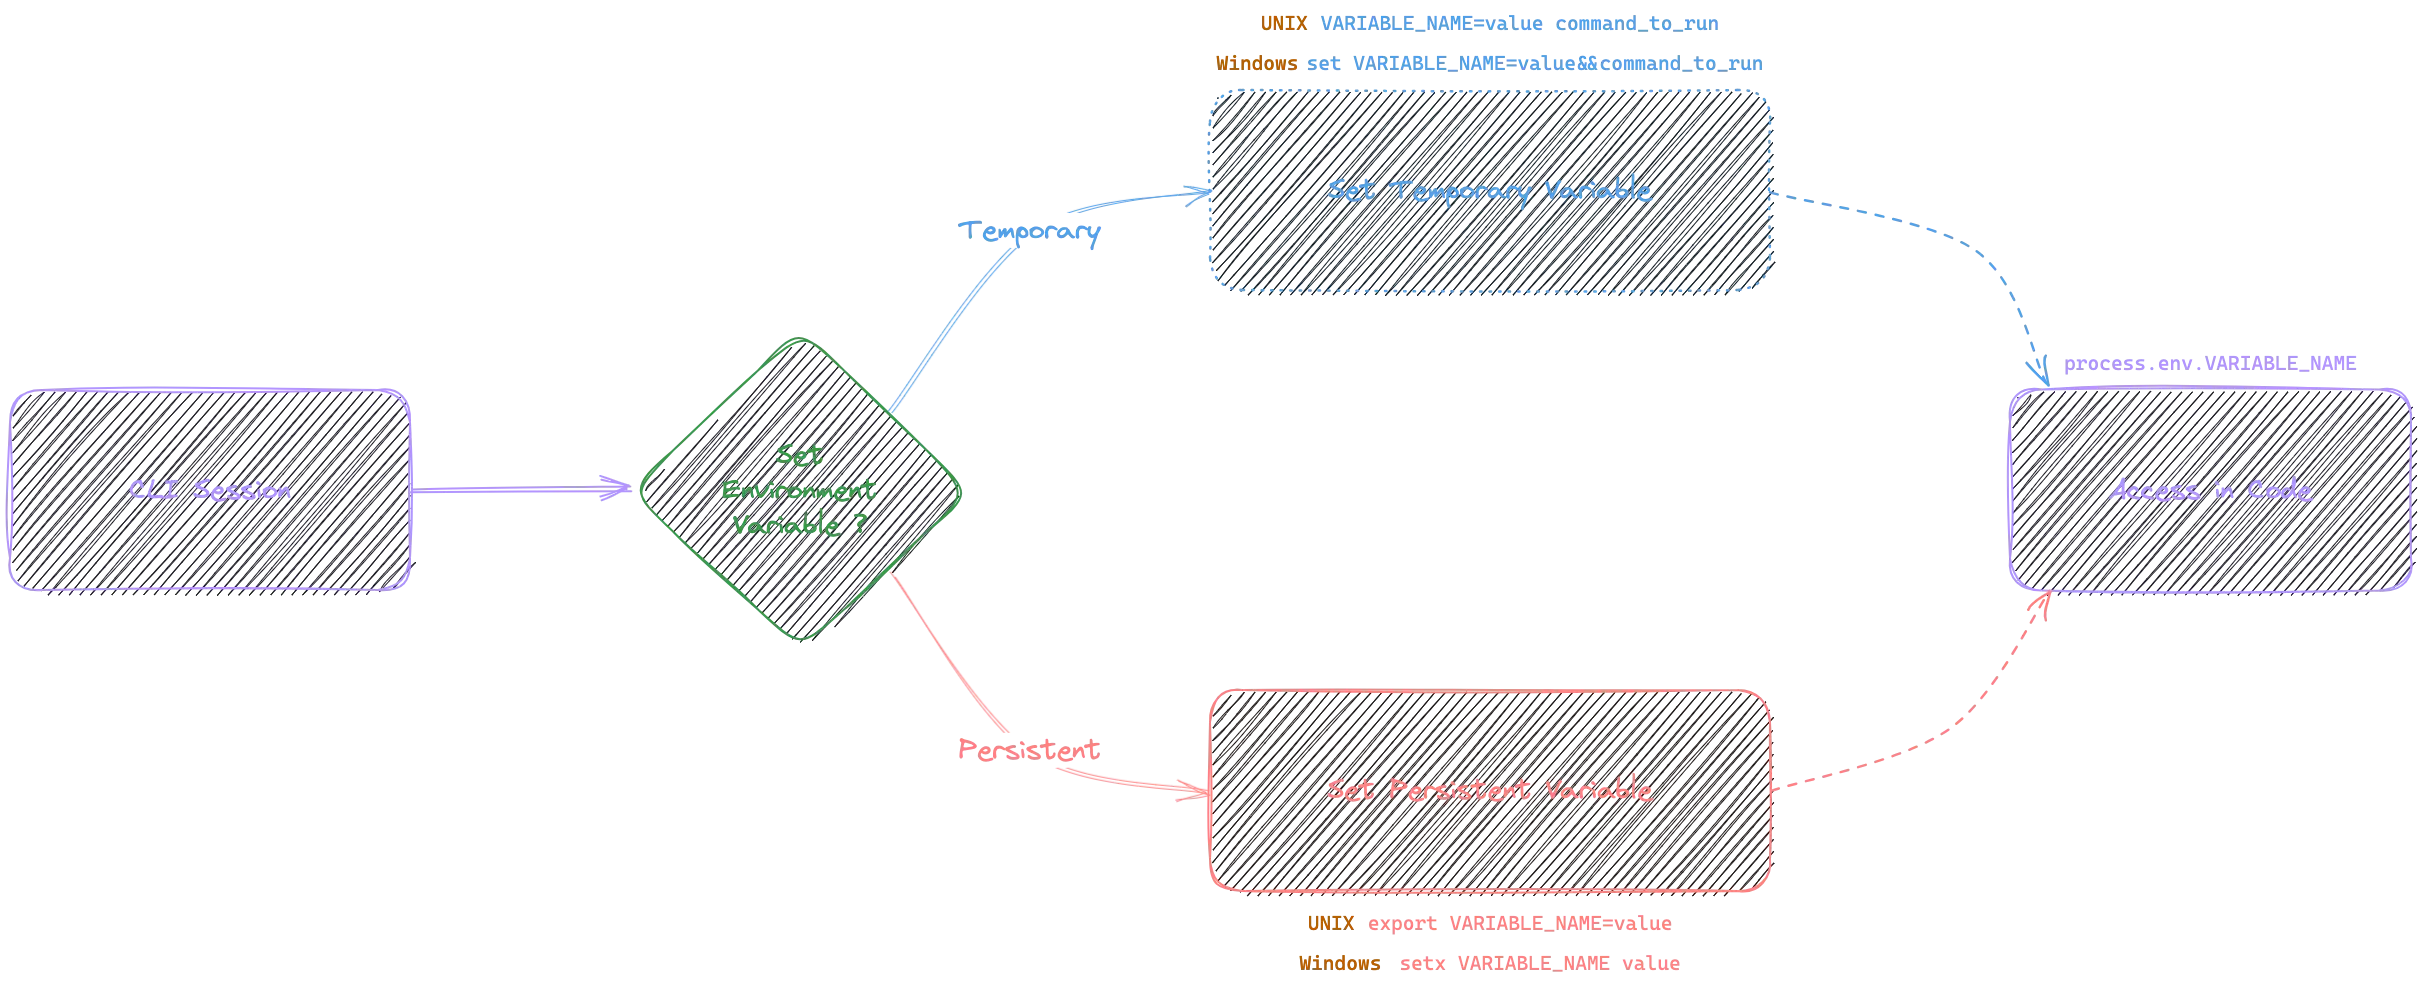
While setting environment variables through the Command Line Interface (CLI) is a quick and straightforward approach, it comes with limitations and risks, particularly for larger and more complex applications.
- Temporary Nature: Variables set via the CLI are often session-specific. They disappear when the session ends, which may not be ideal for applications that require consistent configurations across multiple runs or after a system reboot.
- Exposure of Sensitive Data: When setting environment variables via the CLI, there is a risk that sensitive information like API keys or database passwords can be exposed in the command history or logs, which could be a significant security risk.
- Hard to Manage: As your application grows, managing a long list of environment variables via the CLI can become cumbersome and error-prone. It's much easier to manage them in a single, centralized file, as dotenv allows.
- Lack of Validation: Unlike configuration management tools or specialized software, the command line doesn't validate your environment variables. A typo or incorrect value could lead to application errors or security vulnerabilities.
- Lack of Portability: CLI-set environment variables are machine-specific. When your application moves from development to production or when you're working in a team, ensuring that everyone has the correct environment variables set via the CLI can be a hassle.
While the command line offers a quick way to set or access environment variables, it's imperative to understand the associated risks. For long-term or production scenarios, consider using dedicated configuration management tools, dotenv files, or secret management services that provide more safety, validation, and tracking.
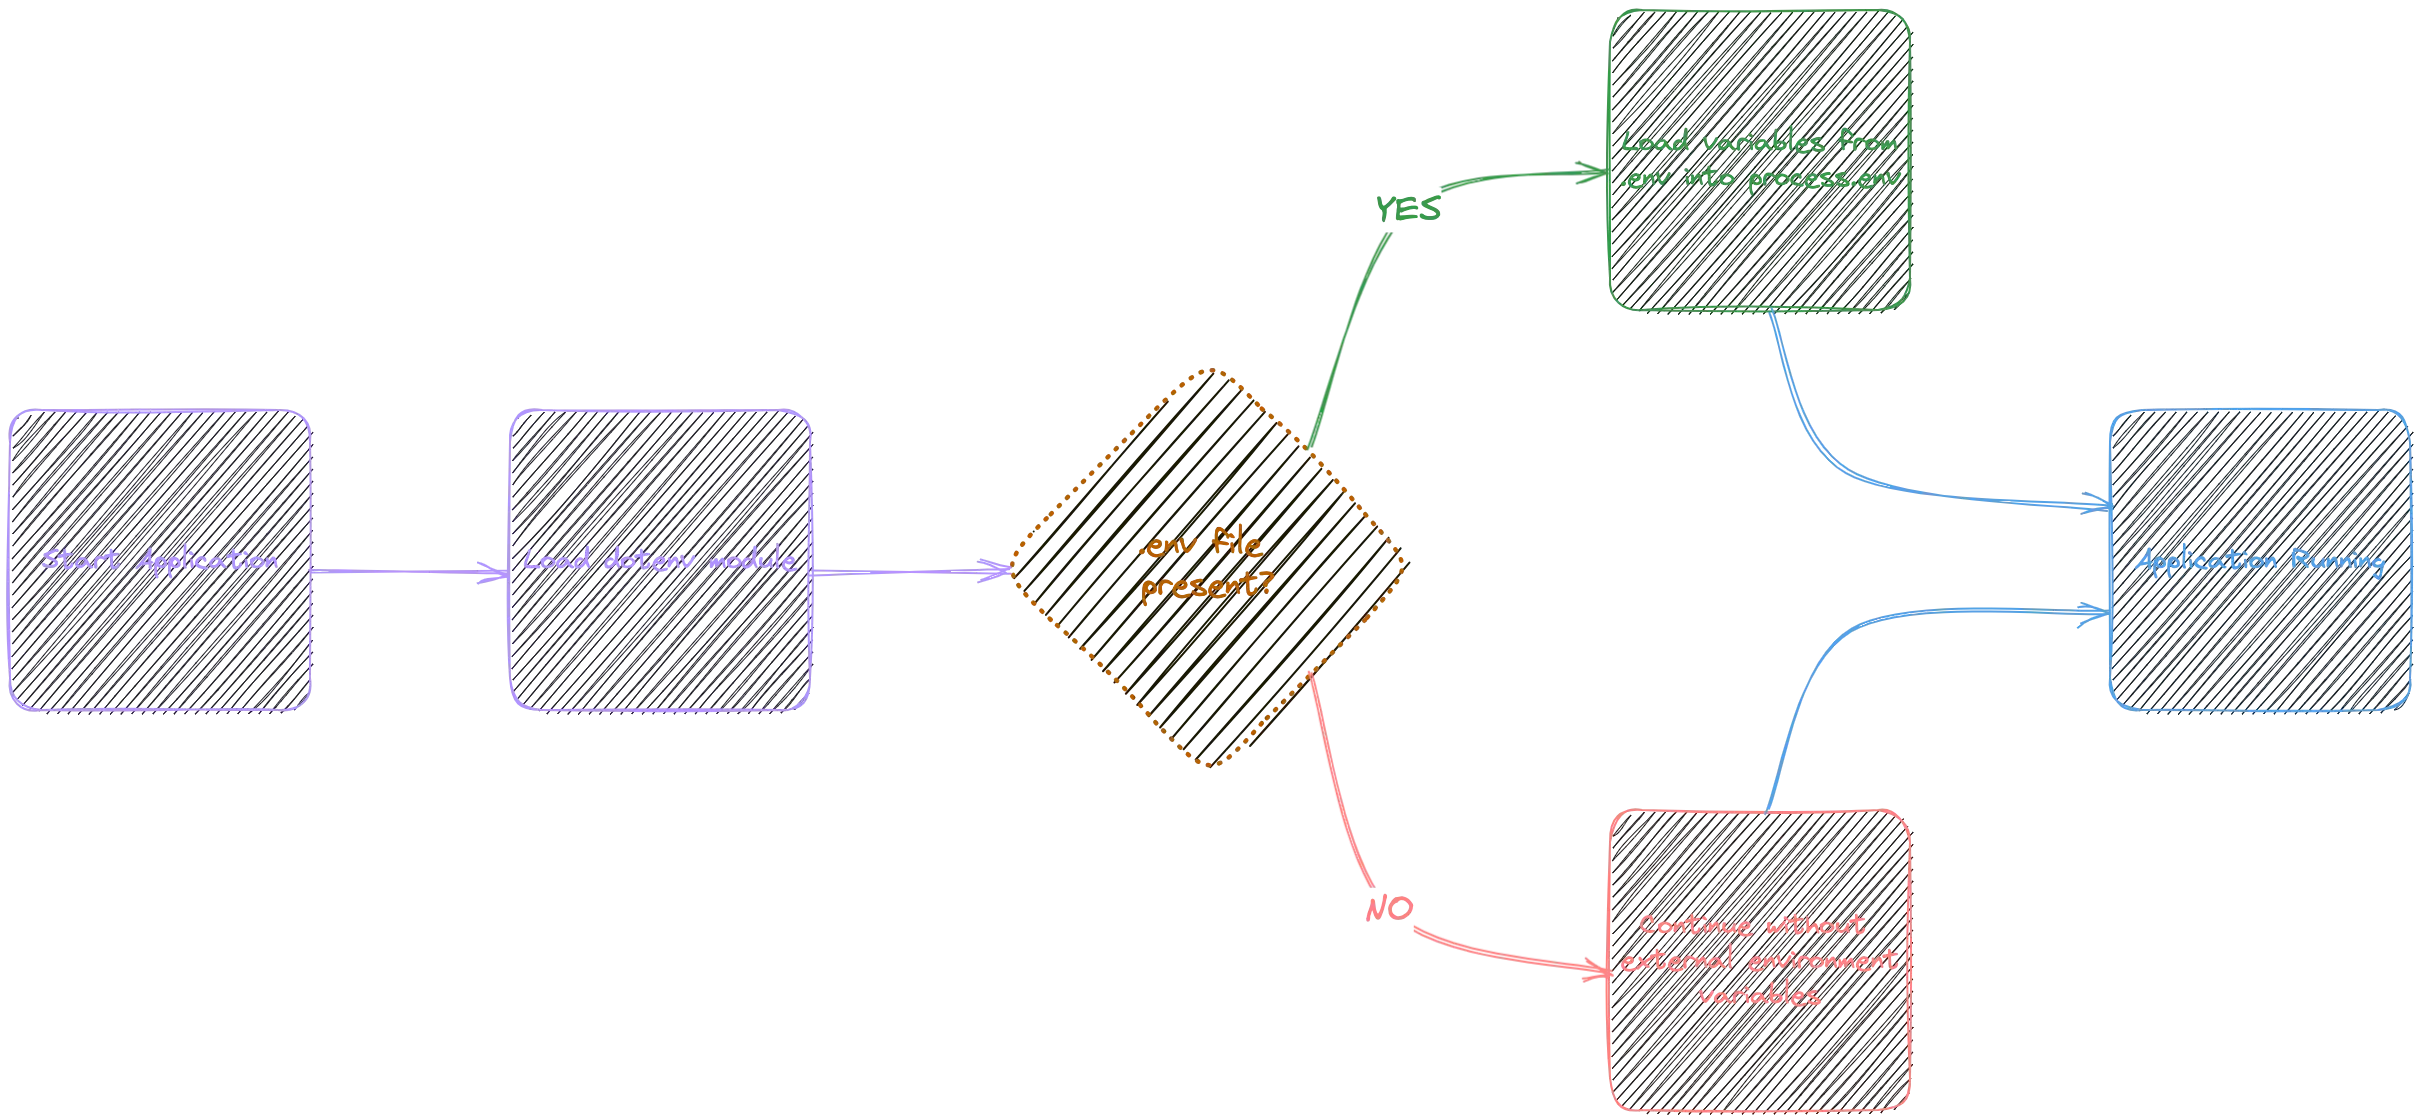
Loading Environment Variables with dotenv
dotenv is a zero-dependency module for Node.js that loads environment variables from a .env file into process.env. This allows developers to define their environment-specific configurations in a file, particularly useful during the development phase where environment variables might not be set externally.
Start by installing dotenv as a dependency in your server workspace.
pnpm add dotenv --filter serverpnpm add dotenv --filter serverNavigate to the src directory of your project and create a subfolder named env. This env subfolder will be a dedicated TypeScript module rather than just a regular directory. This setup has advantages over placing .env files in the project's root directory. Primarily, it streamlines the integration of TypeScript validation for your environment variables. Treating the env folder as a module makes it straightforward to define and export types and interfaces for your configuration, creating a cleanly organized and strongly typed configuration module within your project.
|-- server/
|   |-- node_modules/
|   |-- src/
|   |   |-- project/
|   |   |-- providers/
|   |   |-- env/
|   |   |   |-- .env.development # Main .env file (for local development)
|   |   |   |-- .env.production # Production specific environment variables
|   |   |   |-- ...
|   |   |-- app.ts
|   |   |-- index.ts
|-- server/
| |-- node_modules/
| |-- src/
| | |-- project/
| | |-- providers/
| | |-- env/
| | | |-- .env.development # Main .env file (for local development)
| | | |-- .env.production # Production specific environment variables
| | | |-- ...
| | |-- app.ts
| | |-- index.tsIn the .env.development file within the env subfolder, define the NODE_PORT variable by adding a line specifying the desired port number for your development environment. For example:
NODE_PORT=4000NODE_PORT=4000This line sets the NODE_PORT environment variable to 4000, which your application will use as the port number when running in a development environment.
For your production environment, create a separate file named .env.production in the same env folder. This file sets a different NODE_PORT variable to illustrate the distinction between development and production configurations. For example:
NODE_PORT=3000NODE_PORT=3000This sets the NODE_PORT environment variable to 3000 for the production environment, demonstrating how to maintain distinct settings across different stages of your application's lifecycle.
In the index.ts file within the providers/server directory, use the installed dotenv package to load environment variables. Replace the hard-coded value of PORT with references to process.env to dynamically access these loaded variables.
import dotenv from 'dotenv';
dotenv.config({ path: './src/env/.env.development' });
// Other imports

const PORT = process.env.NODE_PORT;

const start = async () => {
	...
	app.listen(PORT, () => {
		console.info(`Server running on port ${PORT}...`);
	});
};

export { start };import dotenv from 'dotenv';
dotenv.config({ path: './src/env/.env.development' });
// Other imports
const PORT = process.env.NODE_PORT;
const start = async () => {
...
app.listen(PORT, () => {
console.info(`Server running on port ${PORT}...`);
});
};
export { start };To dynamically load environment variables based on the current application environment (development, production, etc.), we need to set a NODE_ENV variable directly within our NPM scripts. This allows us to determine the appropriate environment before our application loads the corresponding set of variables.
{
	"scripts": {
		"build": "tsc --build",
		"dev": "NODE_ENV=development nodemon src/index.ts",
		"prod": "NODE_ENV=production npm run build && node ./dist/index.js",
		"lint": "eslint ."
	}
}{
"scripts": {
"build": "tsc --build",
"dev": "NODE_ENV=development nodemon src/index.ts",
"prod": "NODE_ENV=production npm run build && node ./dist/index.js",
"lint": "eslint ."
}
}When NODE_ENV is set to development, we can configure the path of dotenv config to load variables from the .env.development file. Conversely, when NODE_ENV is set to production, the target will be .env.production file.
import dotenv from 'dotenv';
dotenv.config({ path: `.env.${process.env.NODE_ENV}` });
// Other imports

const PORT = process.env.NODE_PORT;

const start = async () => {
	...
	app.listen(PORT, () => {
		console.info(`Server running on port ${PORT}...`);
	});
};

export { start };import dotenv from 'dotenv';
dotenv.config({ path: `.env.${process.env.NODE_ENV}` });
// Other imports
const PORT = process.env.NODE_PORT;
const start = async () => {
...
app.listen(PORT, () => {
console.info(`Server running on port ${PORT}...`);
});
};
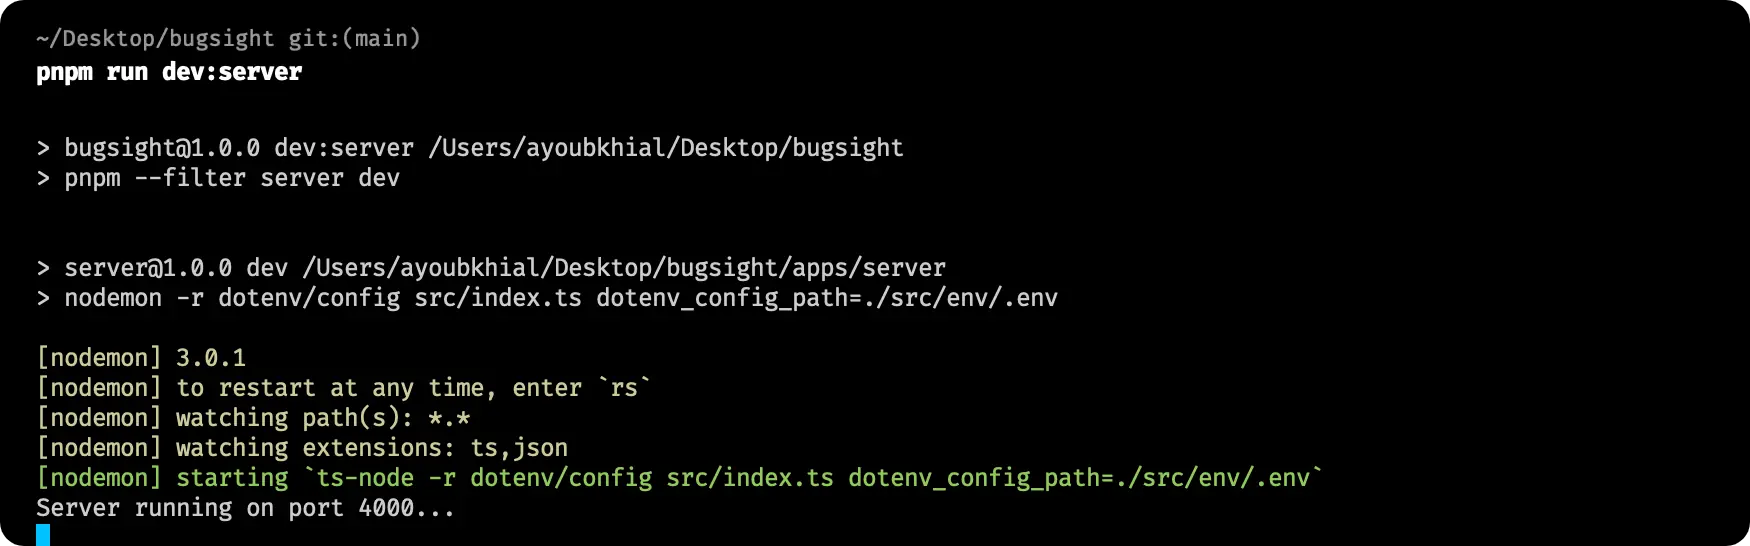
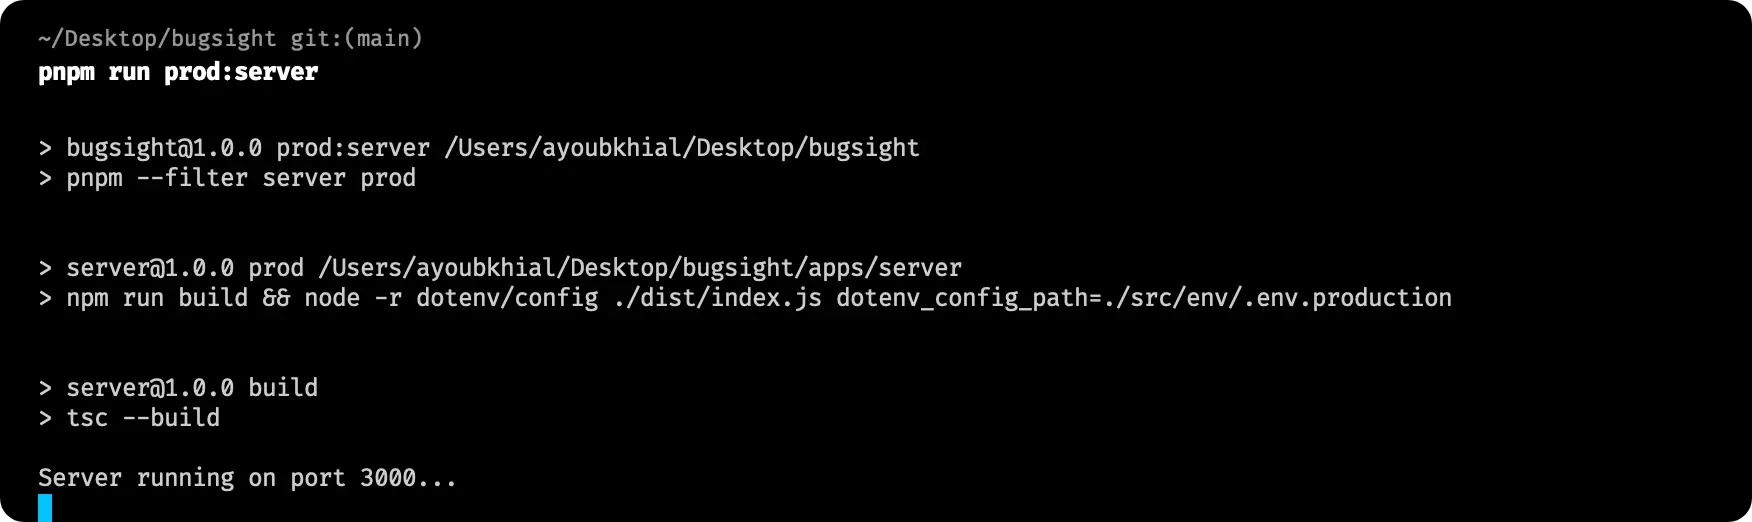
export { start };To test this configuration, execute the dev script. The server should now run on port 4000, as specified in your .env.development file.
On the other hand, executing the prod script will start the server on port 3000, as specified in your .env.production file.

Preloading Environment Variables with dotenv
While many developers are familiar with dotenv and the traditional require('dotenv').config() way of loading environment variables from a .env file, fewer are aware of the more concise dotenv/config method. This approach uses Node's preloading feature, allowing the .env file's contents to be loaded before the application code runs.
First, it is essential to move the dotenv package from your project's dependencies to development dependencies. This adjustment is recommended because dotenv is utilized to preload environment variables during the development phase rather than being directly invoked within your application code. To accomplish this transition, you can run the following commands:
pnpm remove dotenv --filter server
pnpm add -D dotenv --filter server
pnpm remove dotenv --filter server
pnpm add -D dotenv --filter serverTo preload environment variables before your application starts, use the -r dotenv/config flag in your npm scripts. This preloads the dotenv package and allows you to specify the path to the appropriate .env file using the dotenv_config_path option, ensuring the correct configurations are loaded based on your environment.
In your package.json, set up your scripts like this:
{
	"scripts": {
		"build": "tsc --build",
		"dev": "nodemon -r dotenv/config src/index.ts dotenv_config_path=./src/env/.env.development",
		"prod": "npm run build && node -r dotenv/config ./dist/index.js dotenv_config_path=./src/env/.env.production",
		"lint": "eslint ."
	},
}{
"scripts": {
"build": "tsc --build",
"dev": "nodemon -r dotenv/config src/index.ts dotenv_config_path=./src/env/.env.development",
"prod": "npm run build && node -r dotenv/config ./dist/index.js dotenv_config_path=./src/env/.env.production",
"lint": "eslint ."
},
}And similarly, you can now access these environment variables via the process.env object without using the dotenv.config() method. For example, in your server startup script:
const PORT = process.env.NODE_PORT;

const start = async () => {
	...
	app.listen(PORT, () => {
		console.info(`Server running on port ${PORT}...`);
	});
};

export { start };const PORT = process.env.NODE_PORT;
const start = async () => {
...
app.listen(PORT, () => {
console.info(`Server running on port ${PORT}...`);
});
};
export { start };Ensuring Type Safety for Environment Variables with TypeScript
In a Node.js application, environment variables are accessed through the process.env object, which is always available without the need to import or require anything. However, TypeScript considers process.env as an object with a string-indexer, so it doesn't know in advance which properties (environment variables in this case) are available on process.env and assumes that values can be
string | undefined.
Because of this, if you try to access environment variables in TypeScript (e.g., process.env.NODE_PORT), you won't get any IntelliSense suggestions or type-checking based on your .env file. This absence of suggestions can lead to errors when accessing environment variables that might not exist in certain environments.
Create a module to get and export those variables as a strongly typed JavaScript object. This is beneficial because it allows your application to catch potential errors at compile time rather than runtime.
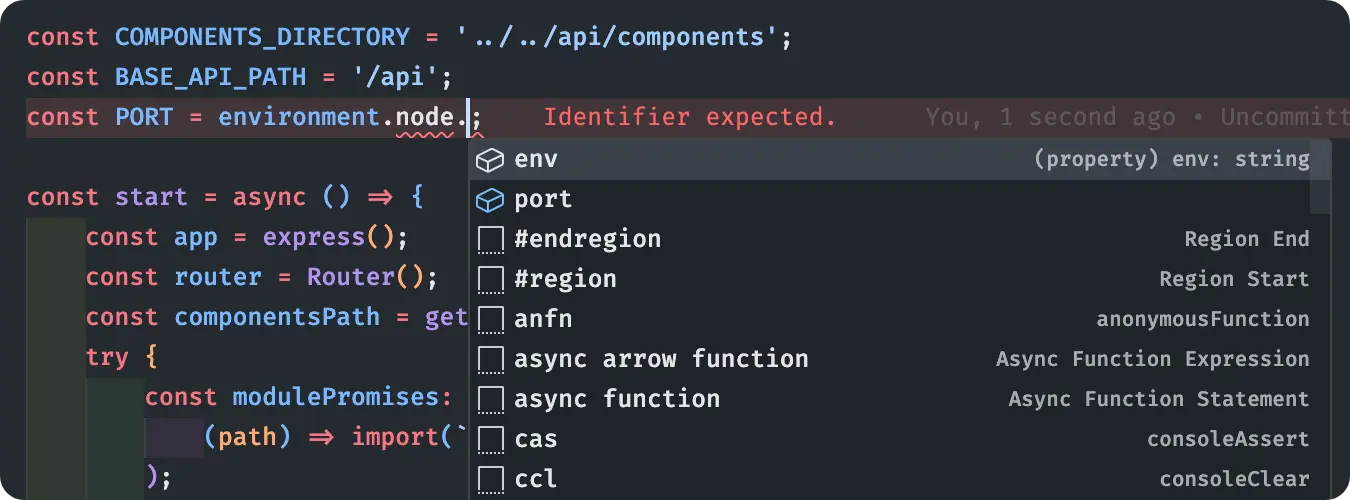
In your src/env folder, create an index.ts file as the entry point to the env module.
interface NodeEnvironment {
	node: {
		env: string;
		port: number;
	};
}

const env = process.env;

const environment: NodeEnvironment = {
	node: {
		env: env.NODE_ENV!,
		port: Number(process.env.NODE_PORT)
	}
};

export default environment;interface NodeEnvironment {
node: {
env: string;
port: number;
};
}
const env = process.env;
const environment: NodeEnvironment = {
node: {
env: env.NODE_ENV!,
port: Number(process.env.NODE_PORT)
}
};
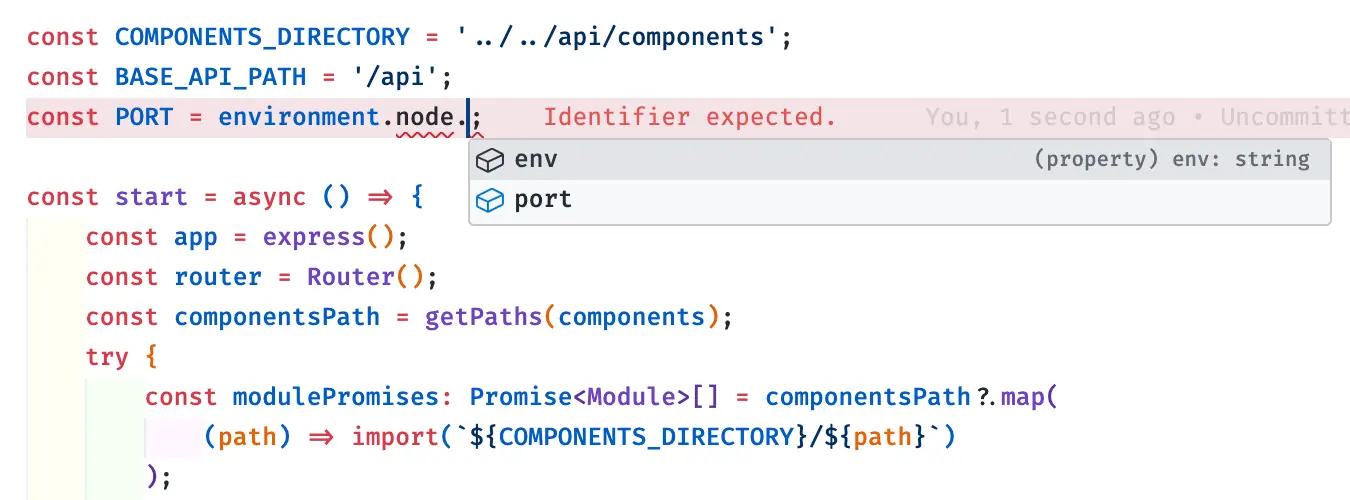
export default environment;This environment object holds our configuration in a structured and typed format. If you attempt to access a property not existing on the environment.node, TypeScript will raise a compilation error.
You can now import and use this configuration as any Typescript module.
import environment from '../../env';

const PORT = environment.node.port;

const start = async () => {
	...
	app.listen(PORT, () => {
		console.info(`Server running on port ${PORT}...`);
	});
};

export { start };import environment from '../../env';
const PORT = environment.node.port;
const start = async () => {
...
app.listen(PORT, () => {
console.info(`Server running on port ${PORT}...`);
});
};
export { start };This way, TypeScript knows precisely what properties are available on the environment.node, and their types, providing autocompletion and reducing the risk of errors.
Managing .env files when pushing to GIT
To protect sensitive information in your project, it's essential to keep .env files containing API keys or database credentials out of your Git repositories.
To prevent Git from tracking your .env files, add them to your .gitignore file.
node_modules
dist
.vscode
.DS_Store
.env
.env.productionnode_modules
dist
.vscode
.DS_Store
.env
.env.productionWhile ignoring the actual .env files, it's a good practice to include a template or example file in your repository to show other developers what environment variables they need to set up. This file should not contain any real credentials or secrets but just the keys and possibly example values.
Create a new file in your project directory named .env.template with a list of all the environment variable keys that your application uses, along with example values (if necessary) or comments describing what each variable is for:
## NODE VARIABLES
# Set your environment here. ex: development
NODE_ENV=development
# Set your port here. ex: 4000
NODE_PORT=4000## NODE VARIABLES
# Set your environment here. ex: development
NODE_ENV=development
# Set your port here. ex: 4000
NODE_PORT=4000Conclusion
In conclusion, this article has navigated through managing environment variables in a Node.js application, transitioning from initial CLI methods to the more secure and streamlined use of the dotenv package. We emphasized the importance of safeguarding sensitive information, advocating for the exclusion of .env files from Git repositories while providing a template for team collaboration. Additionally, we explored the integration of TypeScript, highlighting its ability to enhance our configurations with an invaluable layer of type safety, thereby contributing to the maintainability of our applications.
You can find the complete code source in this repository; feel free to give it a star ⭐️.
If you want to keep up with this series, consider subscribing to my newsletter to receive updates as soon as I publish an article.