Introduction
If you've been following our series, you know we've covered a lot of ground, from building a robust Express.js architecture to using environment variables for better portability in your Node.js app. But now, as we move on to our 6th part, we're kicking things up a notch!
In this article, we will explore the heart of any web application: the database. Specifically, we'll discuss Mongoose, an Object Data Modeling (ODM) library for MongoDB and Node.js. With Mongoose, you can define objects with a strongly typed schema mapped to a MongoDB collection. Additionally, we will introduce MongoDB Atlas, which will host our MongoDB and make it easier than ever to manage our database.
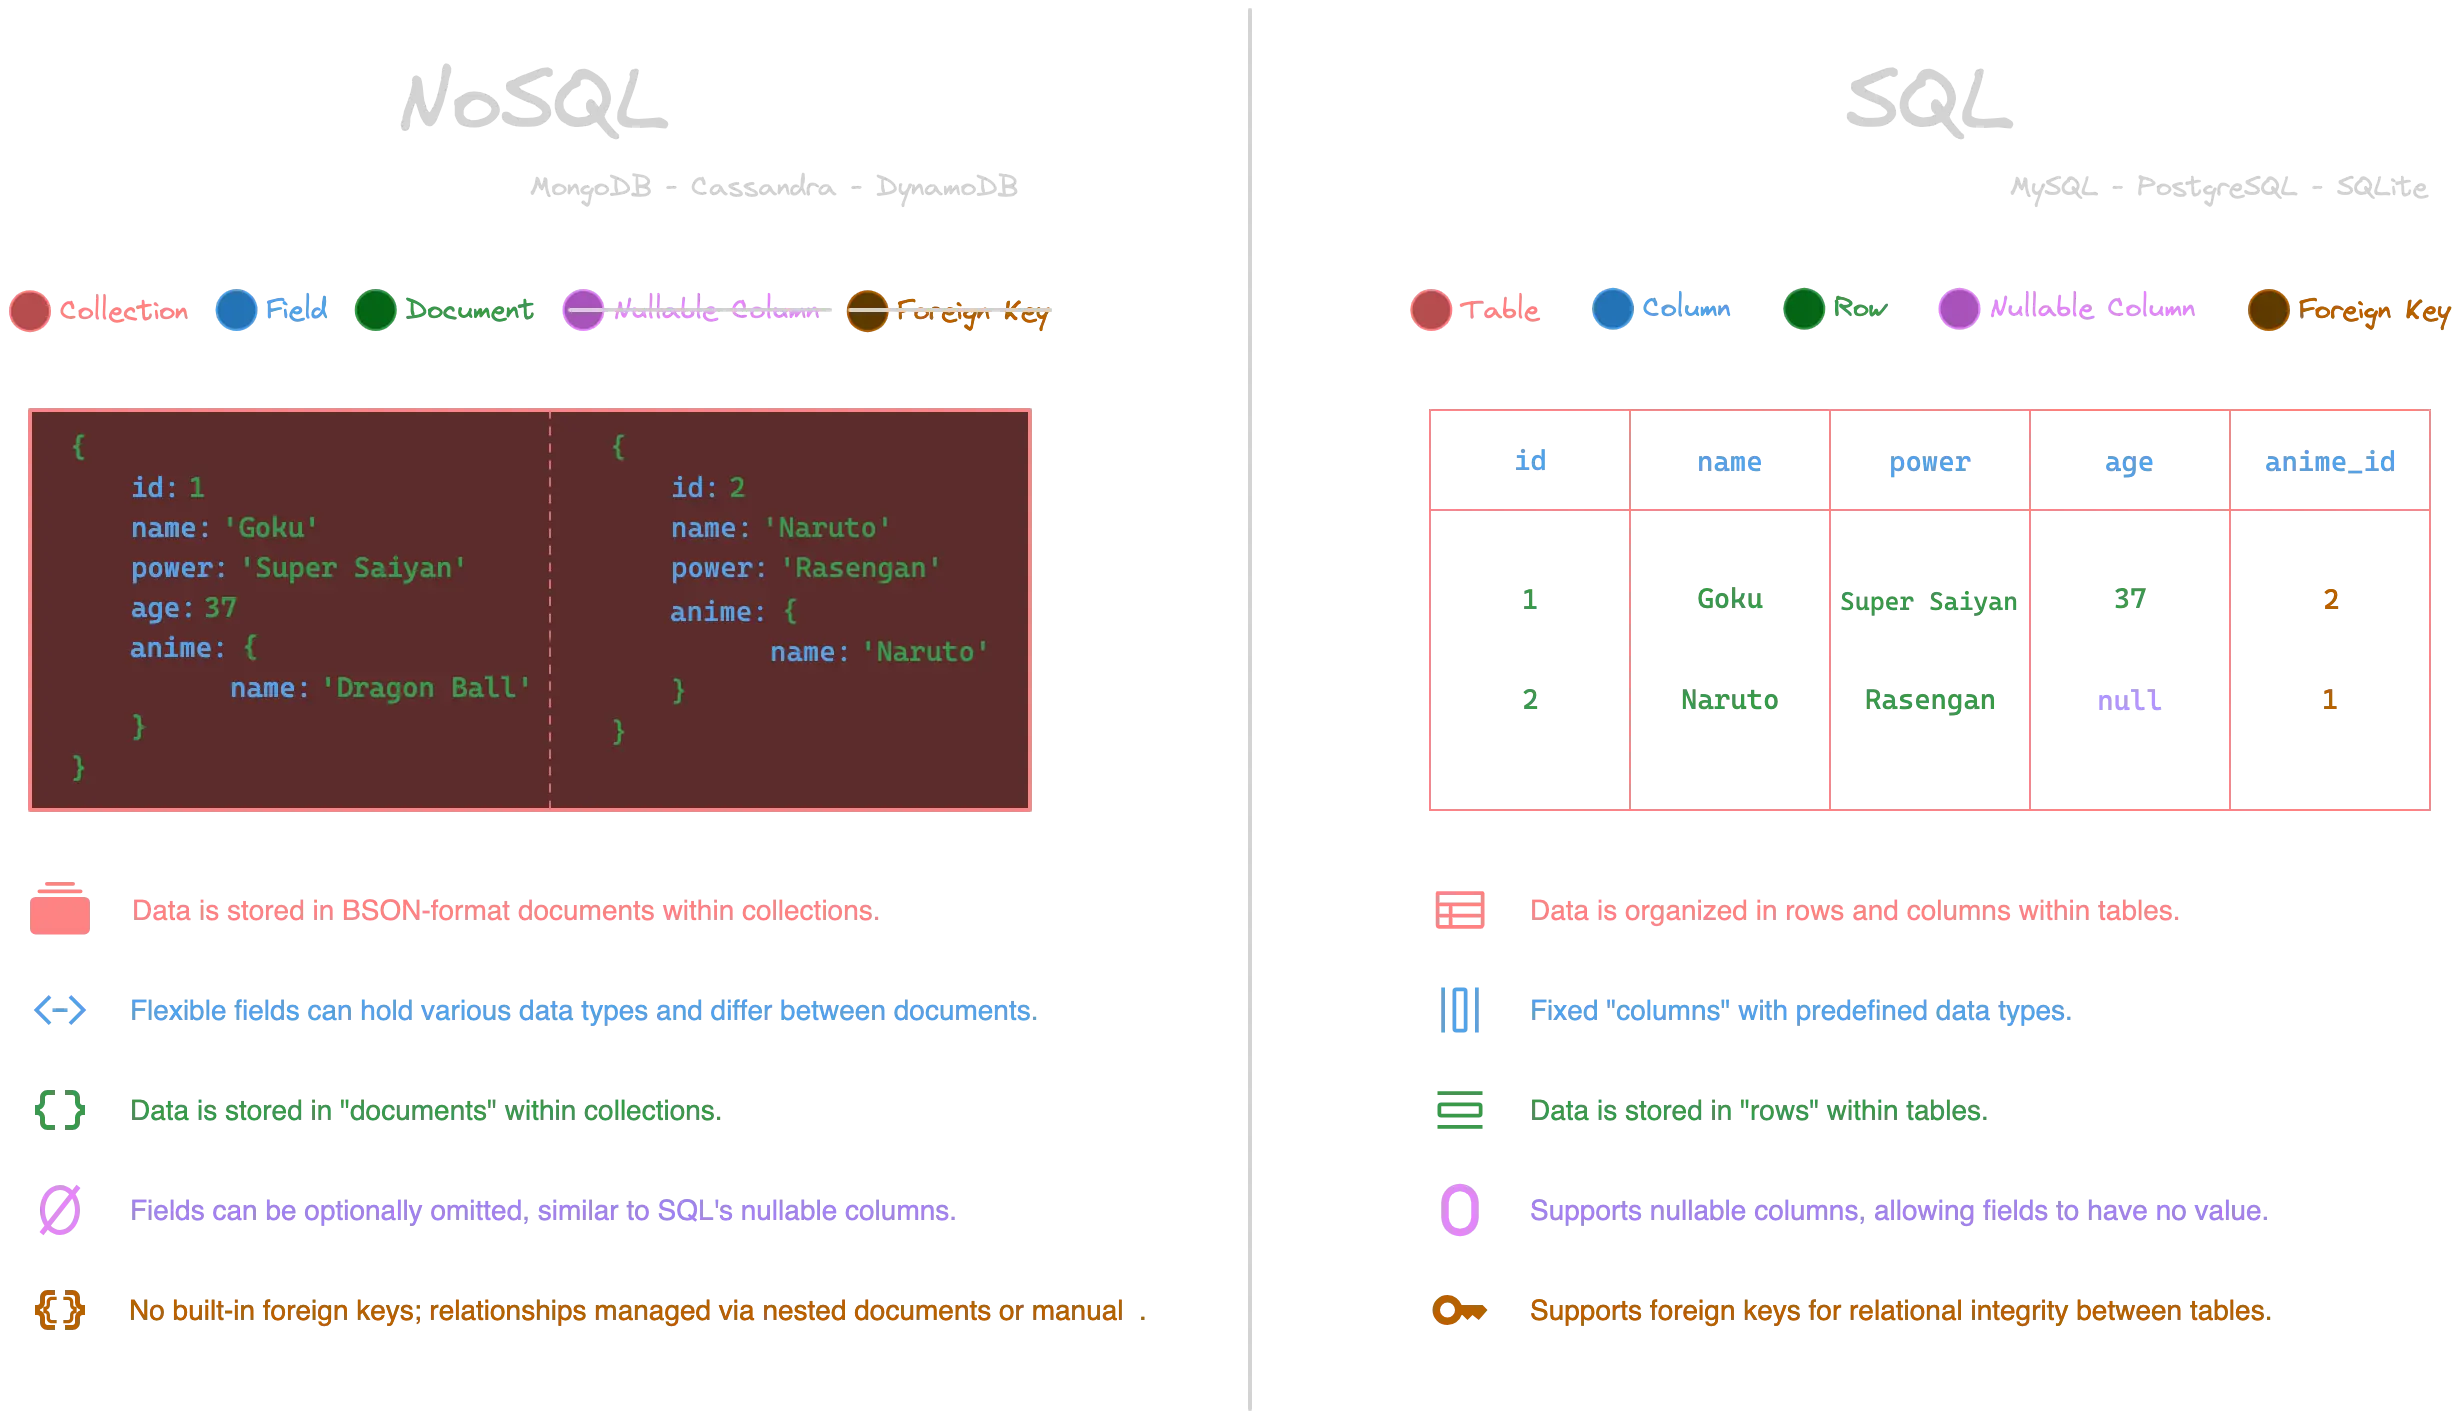
Introduction to MongoDB - A NoSQL Database
MongoDB is a NoSQL database, which means it doesn't rely on the traditional table-based relational database structure. Instead, it uses JSON-like documents with optional schemas. This allows for a more dynamic and flexible data model, well-suited for modern applications where data structures can evolve over time.
MongoDB has several important features, making it a popular choice for storing and managing data:
- Schemaless: No predefined schema is necessary, offering more flexibility to store complex data structures.
- Horizontal Scalability: Easily scales out by adding more machines in the cluster.
- High Performance: Built-in caching and optimized querying through indexing.
- Document-Oriented: A good fit for object-oriented programming models as data records are stored in a document format.
But why We chose MongoDB for our app:
- Complex Queries Made Simple: Tracking issues involve multiple attributes like status, priority, assignee, and more. MongoDB's powerful querying capabilities let you execute complex queries efficiently, making it easier to filter, sort, and manage tasks in real time. You can quickly generate reports and dashboards that offer insights into project health, work progress, and team productivity.
- Scalability: As your projects grow, so do your data storage needs. MongoDB's horizontal scalability can effortlessly handle an increase in workload by adding more nodes to the existing cluster. This ensures that your issue-tracking system remains responsive and capable, regardless of the project's size.
- Real-time Collaboration: MongoDB supports real-time data synchronization, essential for a collaborative environment. Team members can see updates, comments, and status changes in real-time, enhancing the responsiveness and effectiveness of the issue-tracking system.
- Data Aggregation and Analytics: MongoDB's aggregation framework is potent, allowing for the analysis of data right within the database. This is beneficial for creating complex analytical queries that help evaluate project timelines, team performance, and other critical KPIs for project management.
- Integration with Existing Technologies: Since MongoDB works well with JavaScript and JSON-like documents, it easily integrates with frontend and backend technologies commonly used in issue-tracking applications, such as Node.js and Express. This seamless integration ensures you can focus more on building functionalities than worrying about data translation and transfer.
MongoDB's flexibility, scalability, and performance make it an exceptional choice for our issue-tracking application. Combined with Node.js and Express, it forms a streamlined, efficient tech stack where each component amplifies the others' strengths. This synergy simplifies development and yields robust, scalable, high-performing web applications.
Mongoose, an ODM for MongoDB
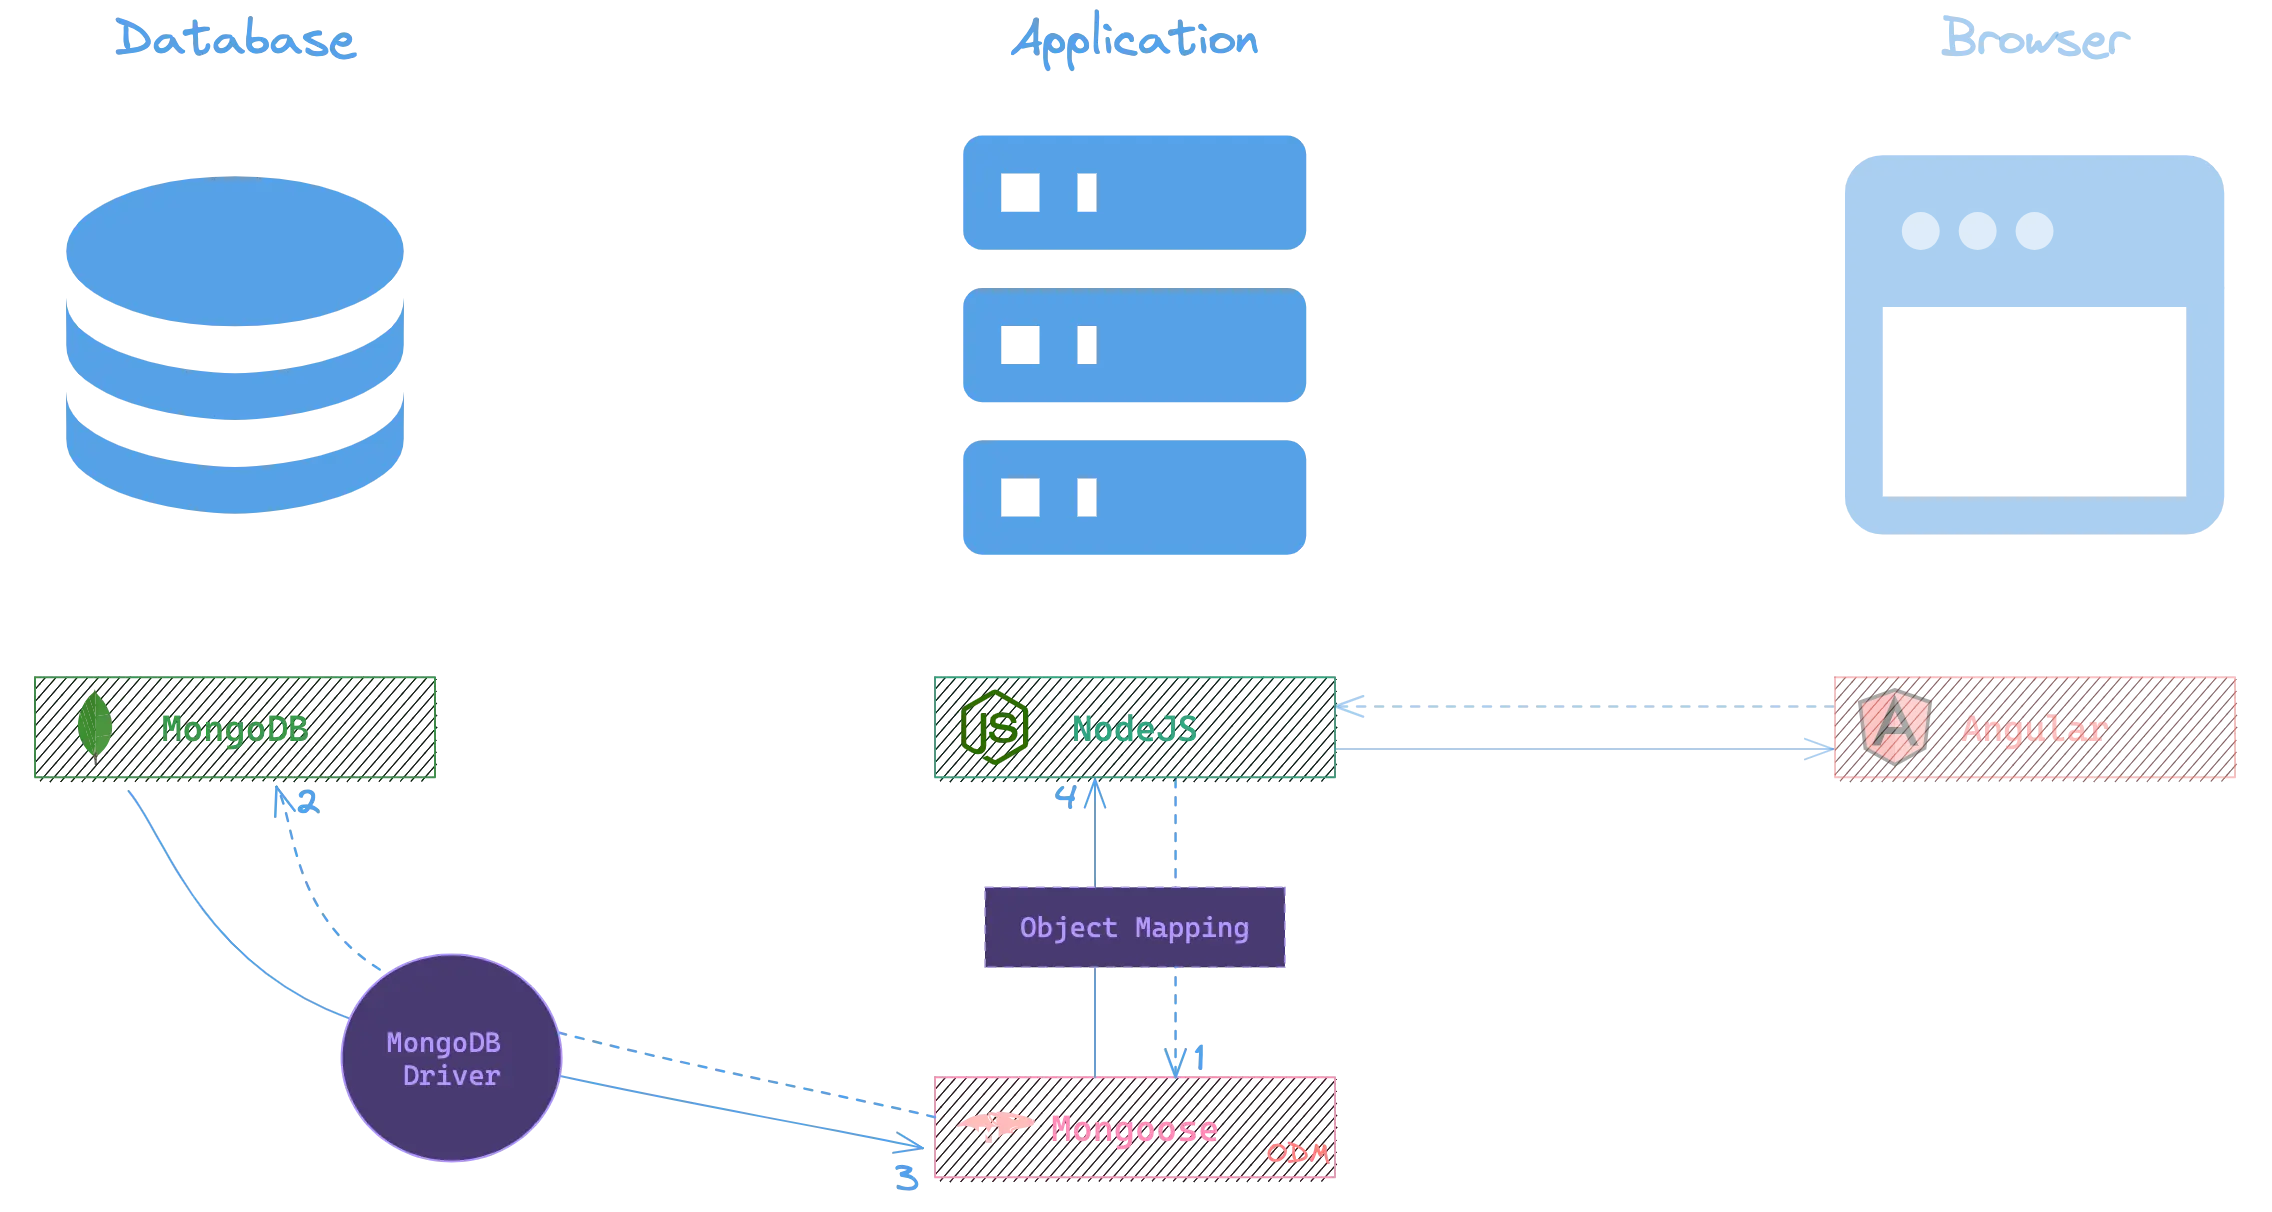
Mongoose is an Object Data Modeling (ODM) library for MongoDB and Node.js. Think of it as a layer on top of the native MongoDB driver, providing a neat abstraction and a set of features to work with your MongoDB collections. With Mongoose, you can define a strongly typed schema for your collections, thereby enforcing a structure on your data. It translates data in the MongoDB database to JavaScript objects for your application.
You may wonder, with MongoDB's native driver already so powerful, why add an additional layer like Mongoose? Well, Mongoose does more than act as a bridge between your application and MongoDB. Below are some compelling reasons why you might want to use Mongoose in your Node.js application:
- Schema Validation: Imagine creating a system where you manually validate the data types, structure, and nested objects each time you insert or update a document. Not only is it time-consuming, but it's also prone to errors. Mongoose alleviates this issue by allowing you to define a strongly-typed schema for your collections. This ensures data consistency and helps you catch bugs early in development. You can extend this validation with custom logic to meet specific business requirements.
const UserSchema = new Schema({
	username: { type: String, required: true },
	email: { type: String, unique: true, required: true },
	password: { type: String, minlength: 8 }
});
const UserSchema = new Schema({
username: { type: String, required: true },
email: { type: String, unique: true, required: true },
password: { type: String, minlength: 8 }
});- Type Casting: Data can come in various forms and types. Mongoose excels at automatically casting data to fit your schema. Suppose you define a field as a number in your schema. In that case, Mongoose will attempt to convert a string that looks like a number into an actual number type, saving you the headache of manual data transformation.
const user = new UserModel({ username: 'ayoubkhial', age: '28' });
// The age registred in the user is converted to number
console.log(typeof user.age); // output: Number
const user = new UserModel({ username: 'ayoubkhial', age: '28' });
// The age registred in the user is converted to number
console.log(typeof user.age); // output: Number- Middleware and Hooks: One of the most potent features of Mongoose is its middleware capabilities, allowing you to hook into various stages of a document's lifecycle. These hooks, also known as pre and post-middleware, enable you to run asynchronous functions before or after certain events. For example, you can hash a password before storing it or update related records after a document is deleted.
UserSchema.pre('save', async function() {
	this.password = await hashPassword(this.password);
});UserSchema.pre('save', async function() {
this.password = await hashPassword(this.password);
});- Expressive Query API: The Mongoose query API is expressive and easy to use. It provides a chainable interface to build complex queries without sacrificing readability. The API is designed to be intuitive, making it easier to perform queries like finding, updating, or deleting records. Additionally, it offers built-in utilities for pagination, sorting, and field selection.
const users = await User.find().sort({ createdAt: -1 }).limit(10).exec();const users = await User.find().sort({ createdAt: -1 }).limit(10).exec();- Extensibility through Plugins: Mongoose has a vibrant ecosystem of plugins that you can incorporate to extend its functionality. From full-text search capabilities to pagination helpers, the Mongoose plugin allows you to add features without modifying the core codebase. You can even create your own plugins to solve unique challenges.
import autopopulate from 'mongoose-autopopulate';
UserSchema.plugin(autopopulate);
import autopopulate from 'mongoose-autopopulate';
UserSchema.plugin(autopopulate);- Strong TypeScript Support: Mongoose offers excellent type support. You can easily define interfaces for your models, providing all the benefits of type checking and IntelliSense code completion. This enhances code quality, readability, and maintainability, making your development process more efficient and enjoyable.
interface IUser extends Document {
    username: string;
    email: string;
    password: string;
}

const User: Model<IUser> = mongoose.model('User', UserSchema);
interface IUser extends Document {
username: string;
email: string;
password: string;
}
const User: Model<IUser> = mongoose.model('User', UserSchema);In summary, Mongoose offers a robust set of features that go beyond basic database interaction. It provides a structured framework for your MongoDB database operations, making writing secure, readable, and maintainable code easier, letting you focus on writing business logic rather than boilerplate code.
Host your database on the cloud with MongoDB Atlas
While there are several options for hosting MongoDB, MongoDB Atlas stands out as the go-to cloud-based solution. This service offers a hassle-free setup and features like automated backups, scaling, and security measures right out of the box.
MongoDB Atlas is designed to run on major cloud providers like AWS, Azure, and GCP, ensuring your data is readily available and distributed across multiple geographical locations. This geographic distribution not only enhances performance but also provides high availability.
Below are some key features and aspects that make MongoDB Atlas a popular choice for businesses and developers.
- Scalability: Automatic scaling features mean your database can grow alongside your application. You can focus on building out features without worrying about database limitations.
- Fully-Managed Service: MongoDB Atlas provides automated backups, monitoring, and upgrades. You don't need to worry about maintenance tasks, freeing your team to focus on development.
- Security: With features like IP Whitelisting, data encryption, and automated backups, MongoDB Atlas ensures your data is secure and accessible only to authorized personnel.
- Global Distribution: MongoDB Atlas allows you to deploy your database instances in data centers worldwide, ensuring low latency and high availability for your application.
- Integration with Modern Development Stacks: Being a cloud-native platform, MongoDB Atlas offers a RESTful API and integrates well with other cloud services and containerization platforms like Kubernetes. For Node.js developers, it offers native support for Mongoose, the object data modeling (ODM) library, making it easier to use MongoDB Atlas in Node.js applications.
A cluster in MongoDB Atlas is a managed set of servers that work together to provide a unified data storage and processing service. A single cluster can host multiple databases and their respective collections and documents.
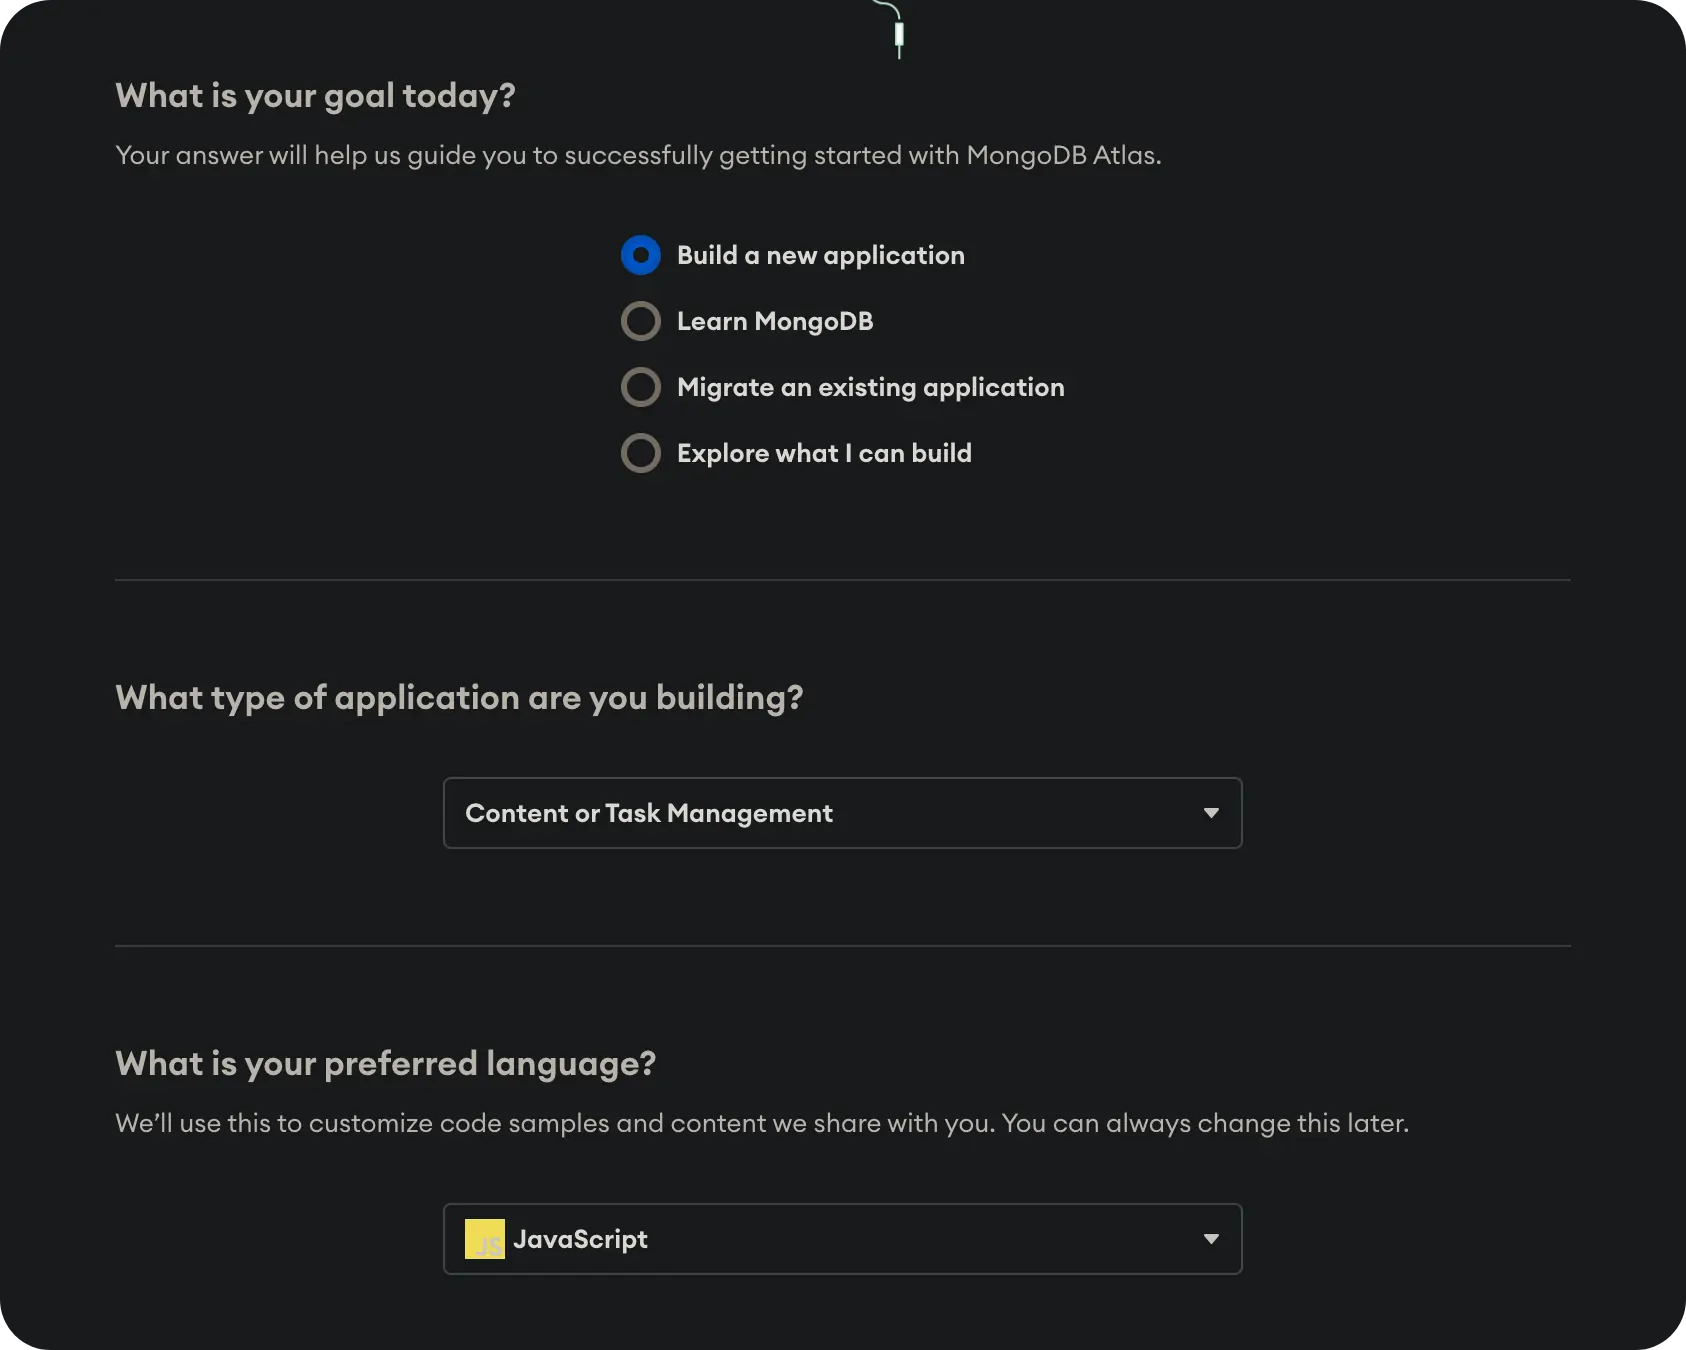
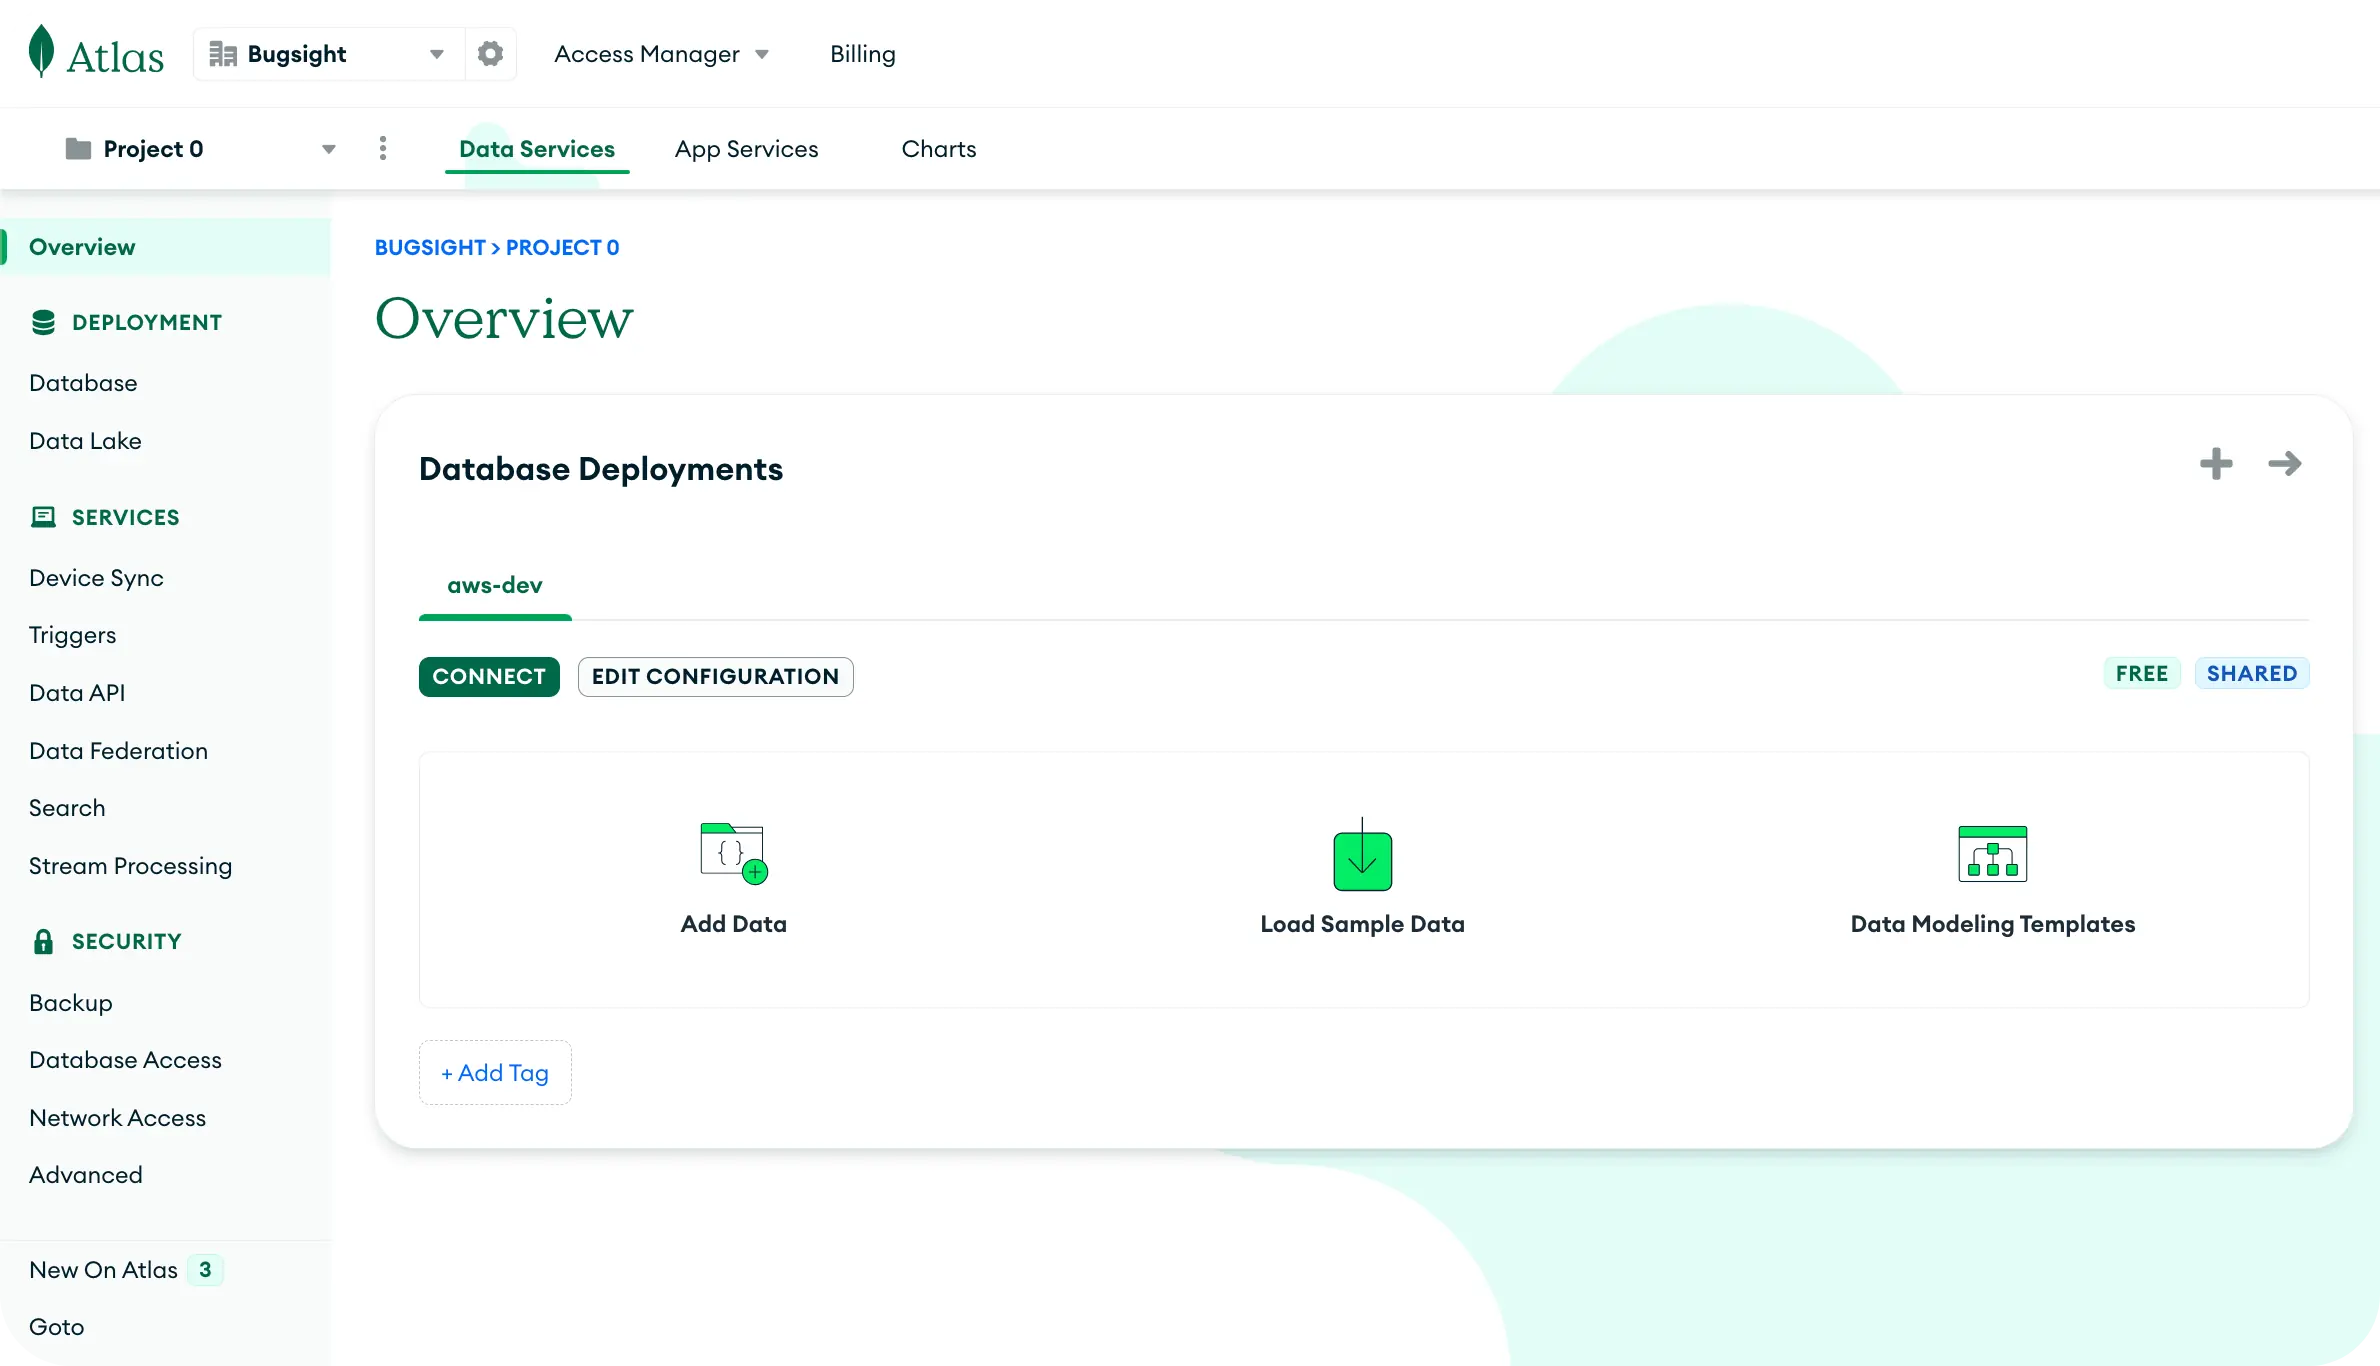
To set up a cluster on MongoDB Atlas, create an account on their website if you haven't already. After completing the sign-up, you'll encounter a pop-up that will guide you through some questions about your application.
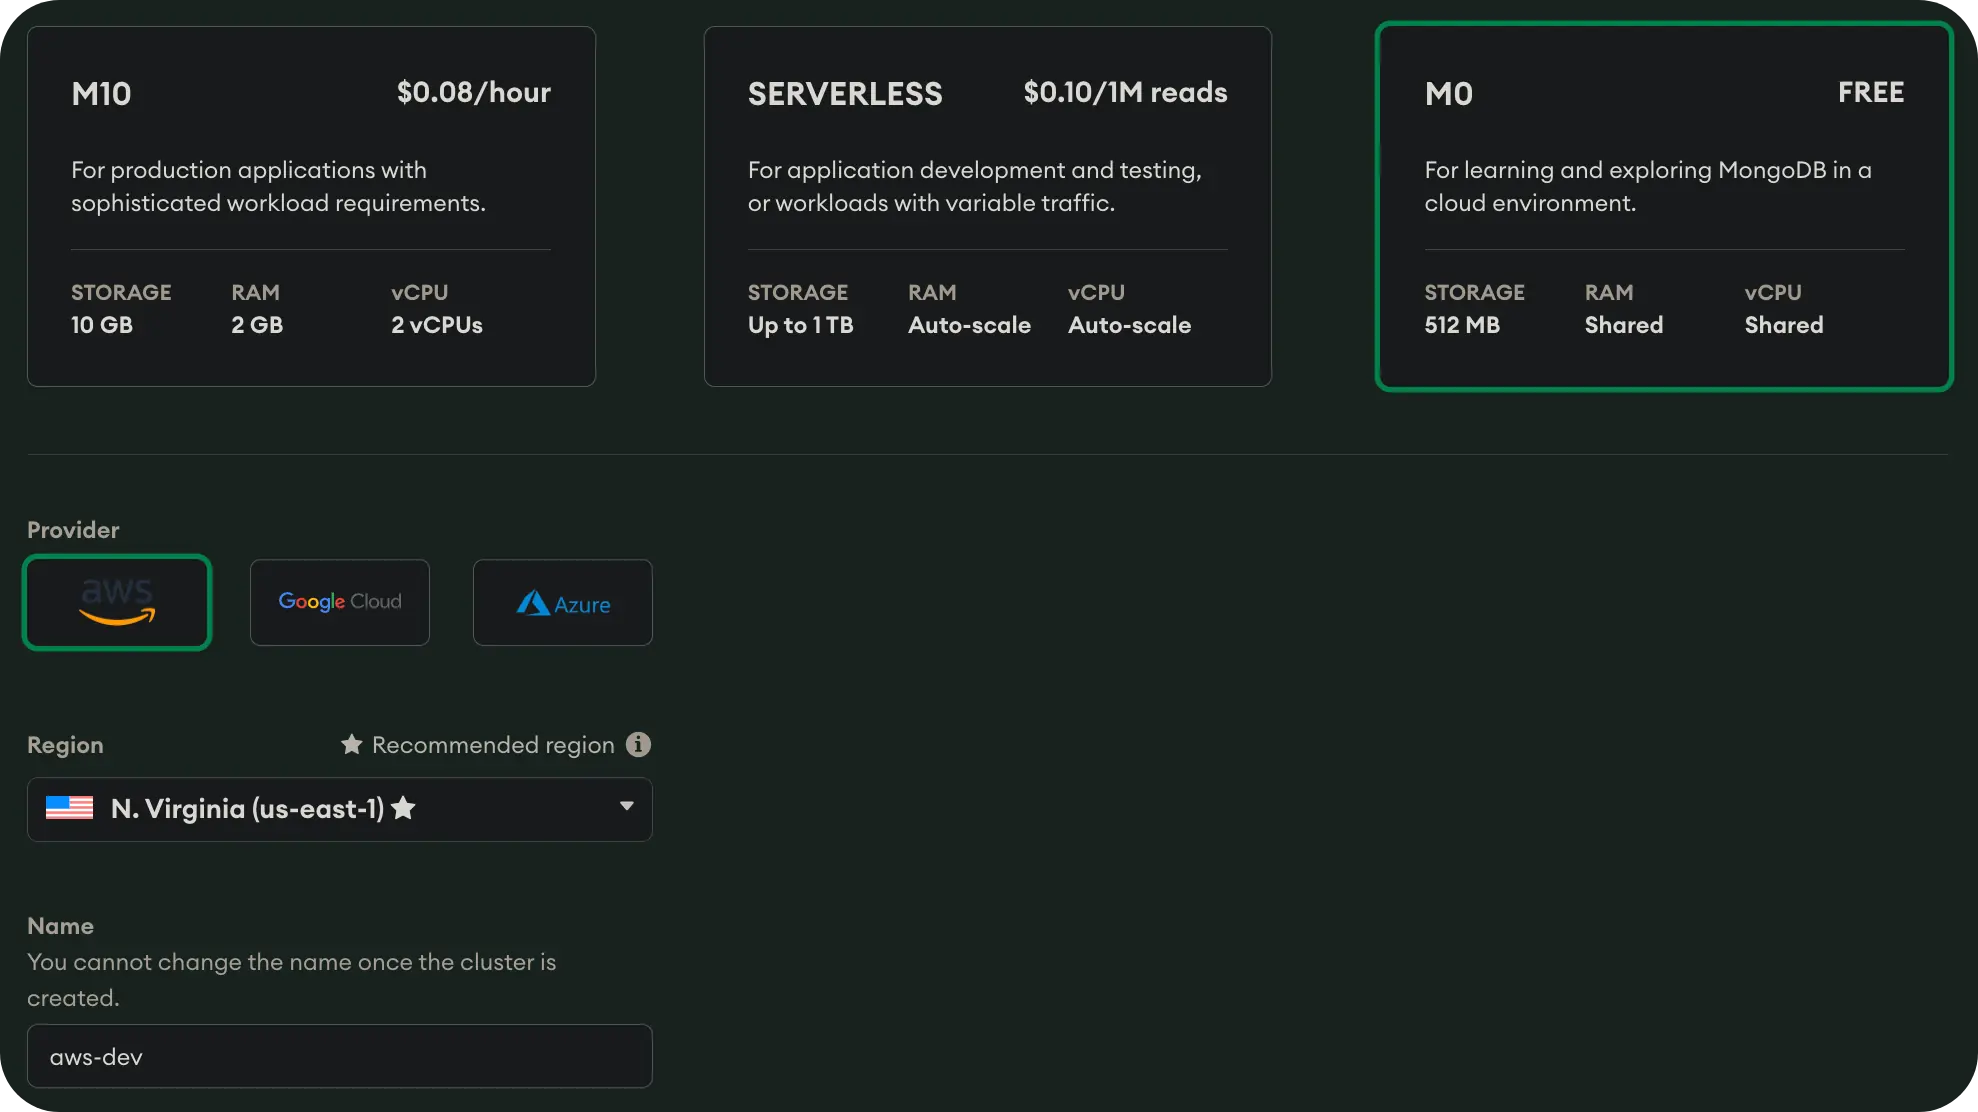
Make sure to select the Free tier, as this plan offers a robust set of resources and features that perfectly meet the requirements of our ongoing project (See more about plans). Next, choose your preferred cloud service provider—either AWS, Azure, or GCP—and select the geographical location where your cluster will be hosted. If you're unsure about any settings, feel free to stick with the default configurations, as these can be modified later. Lastly, assign a name to your cluster, such as 'aws-dev', to help you quickly identify it within your MongoDB Atlas dashboard.
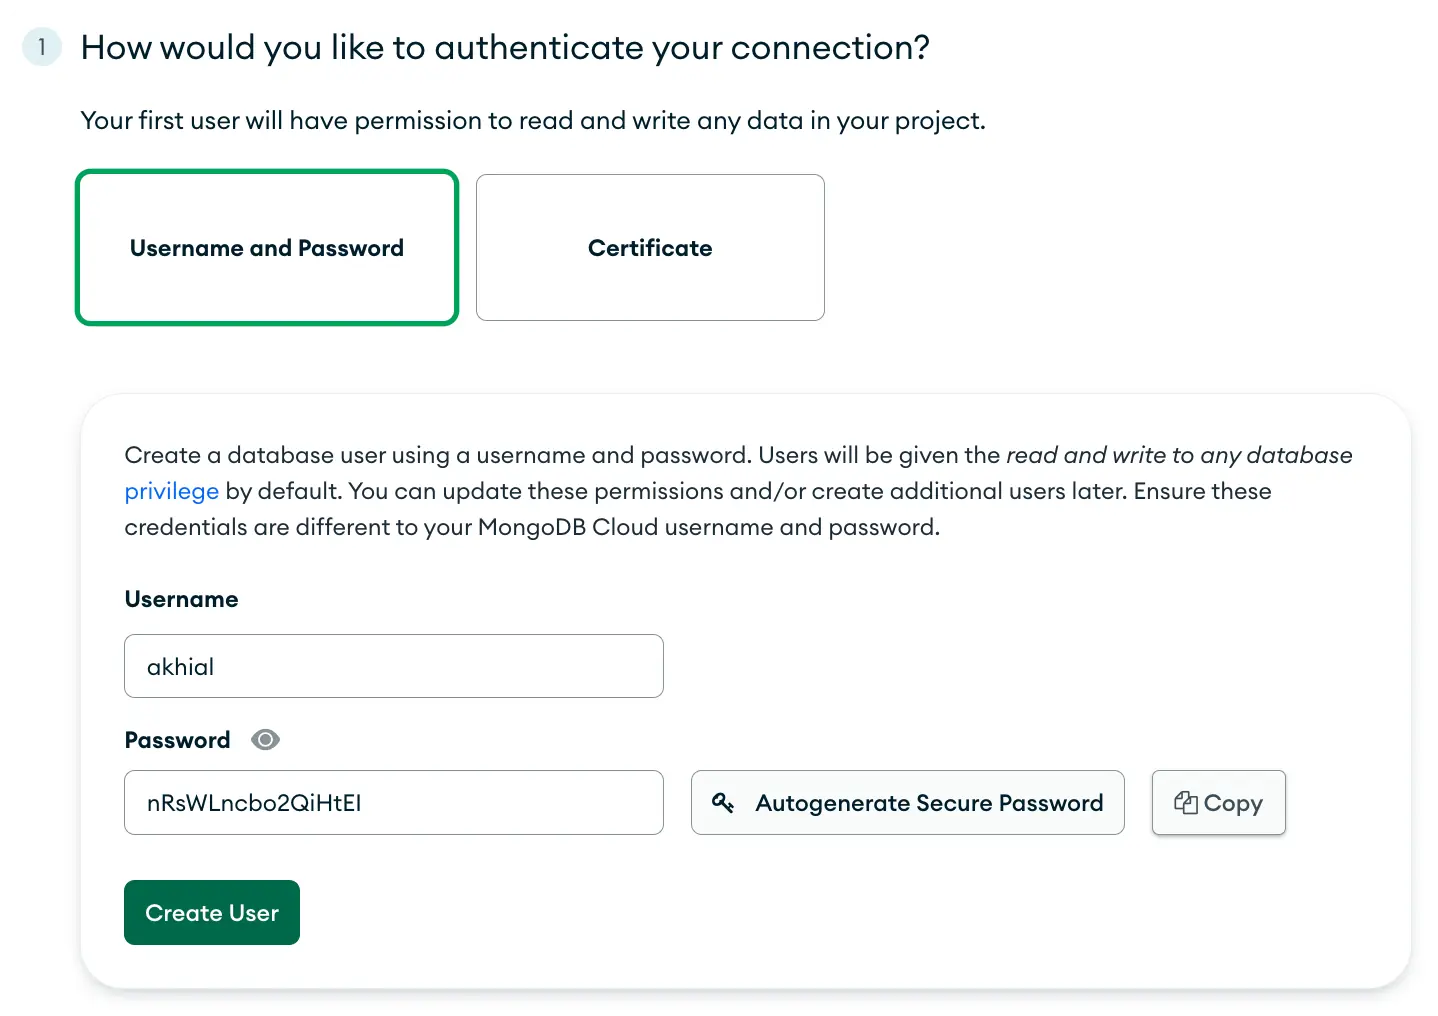
Now, you need to create your first user. By default, this initial user will have read and write access to all databases, serving a role similar to that of a root user. It's worth noting that these permissions are flexible and can be adjusted later.

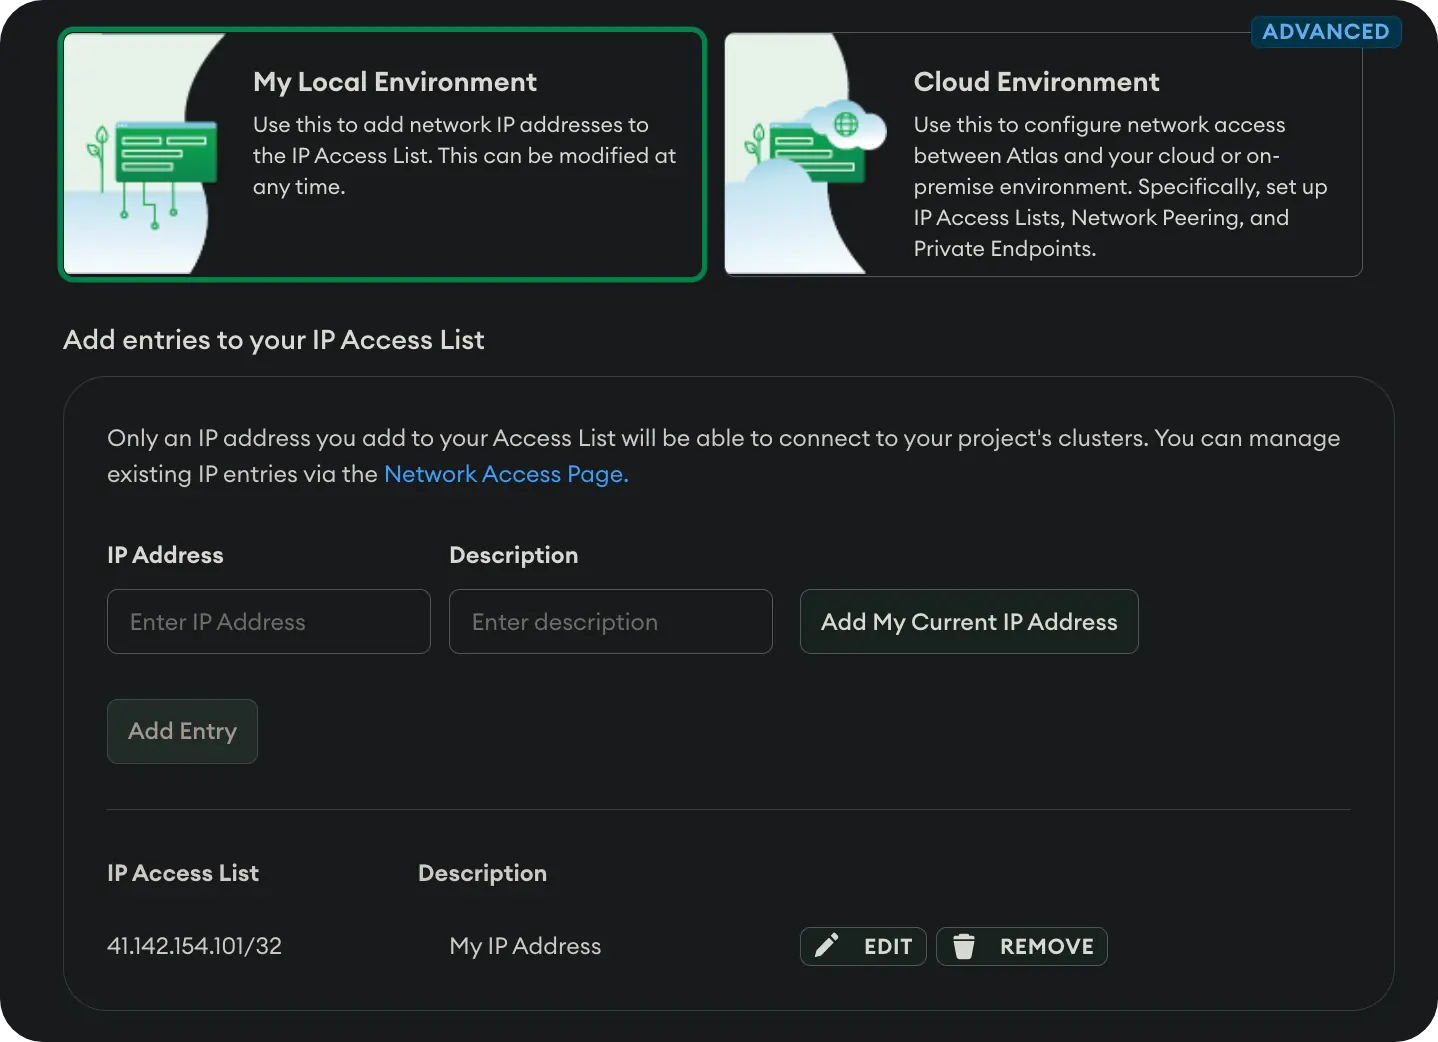
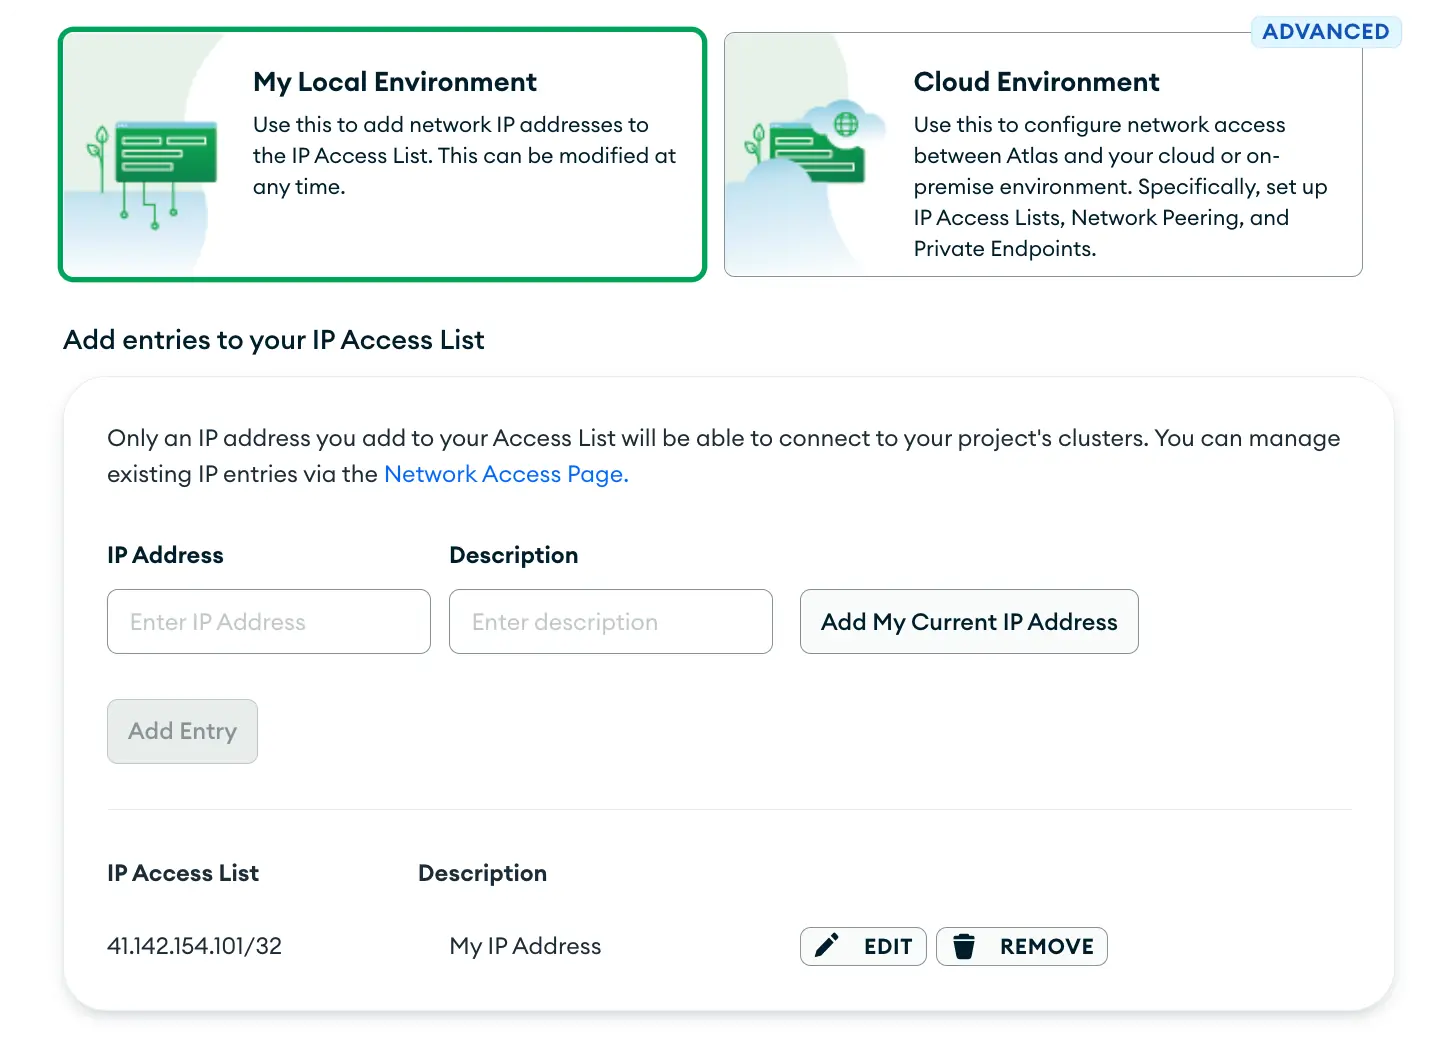
Finally, you can grant access to specific API addresses as you see fit. Note that your current IP address will be included by default, but this setting can be customized later.
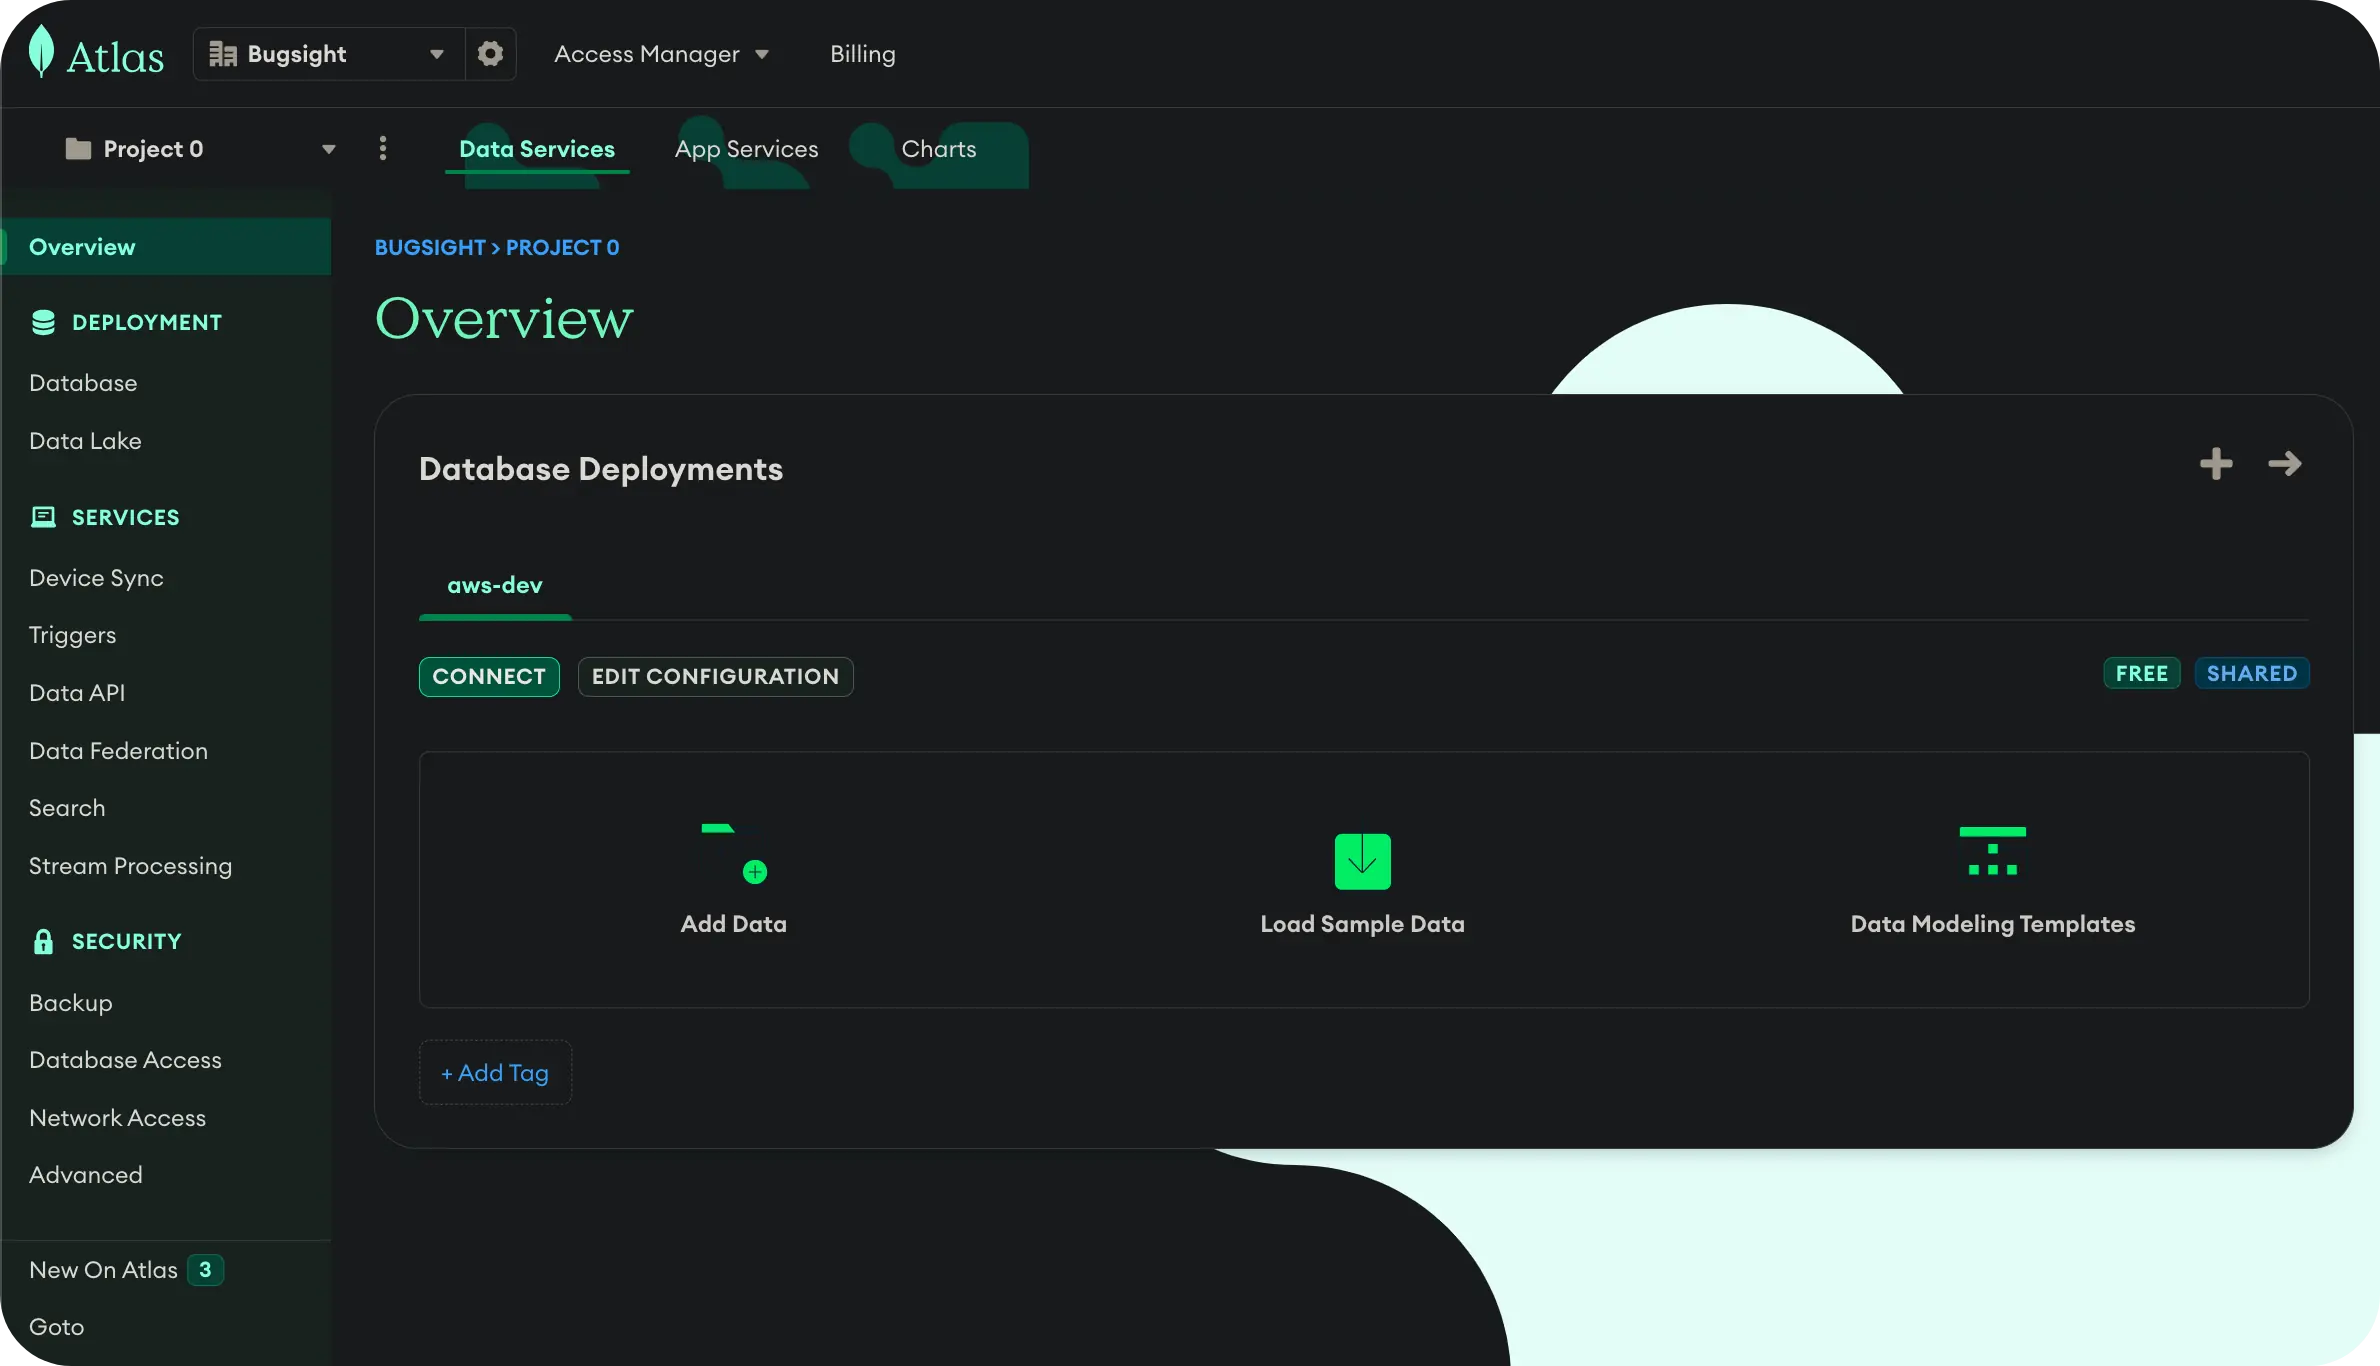
You should now be able to view the overview page of your cluster, where you'll find essential details and configurations related to your MongoDB Atlas setup. This dashboard will be your central hub for managing, monitoring, and interacting with your cluster.
Connecting MongoDB Cluster to Node.js Application
Establishing a connection between a MongoDB Atlas cluster and a Node.js application involves several steps. First, you'll need to configure your cluster on MongoDB Atlas. Next, install the necessary Node.js packages for the database connection. Finally, you'll integrate this connection into your app's codebase.
To obtain your connection string, navigate to your cluster's overview page and click the 'Connect' button. You'll then be guided through various connection options—choose the 'Connect your application using Drivers' method.
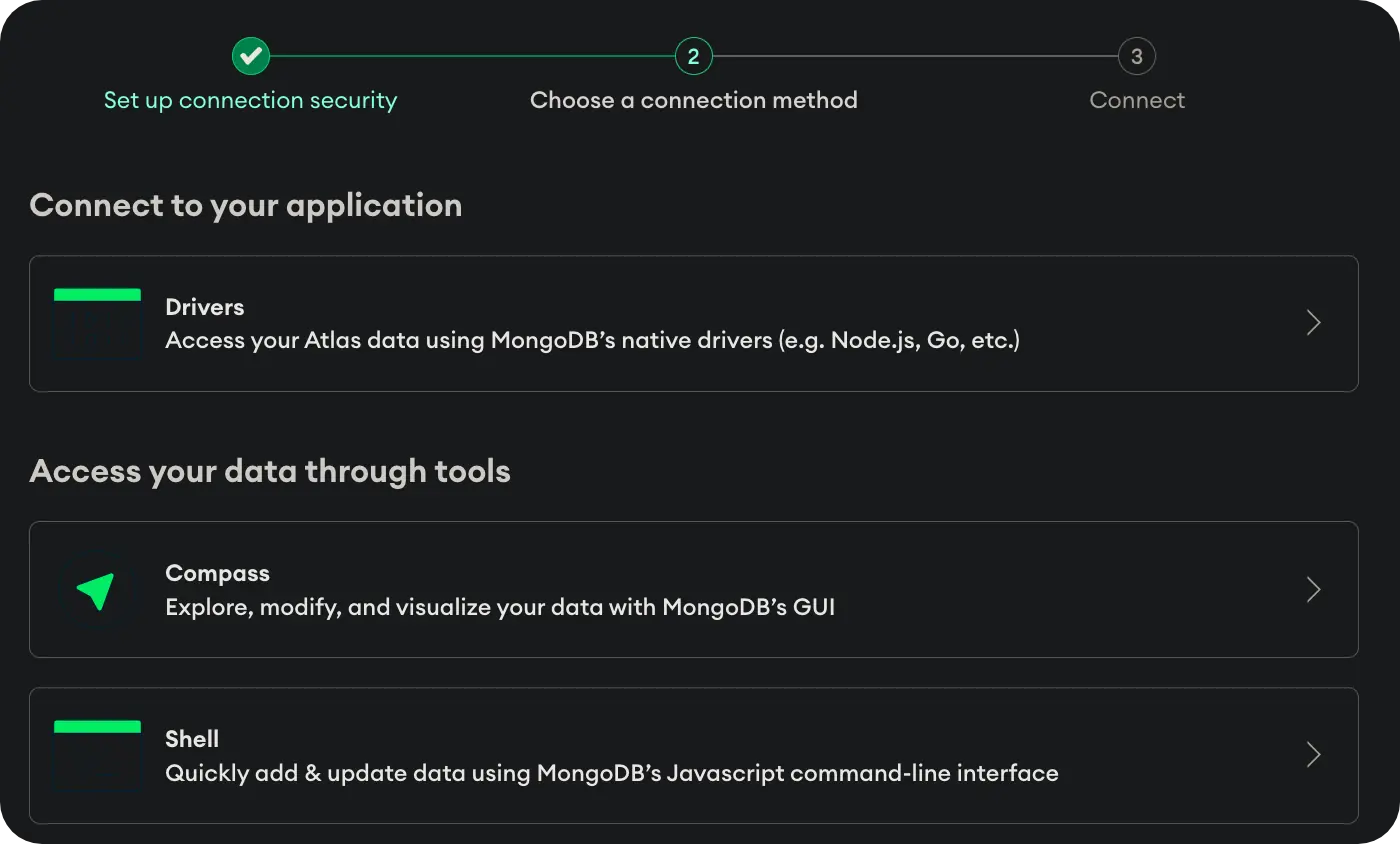
Select Node.js as your preferred driver and copy the ensuing connection string, which will resemble the following format:
mongodb+srv://<username>:<password>@<cluster-name>.xxxxxxx.mongodb.net/<database-name>?retryWrites=true&w=majoritymongodb+srv://<username>:<password>@<cluster-name>.xxxxxxx.mongodb.net/<database-name>?retryWrites=true&w=majority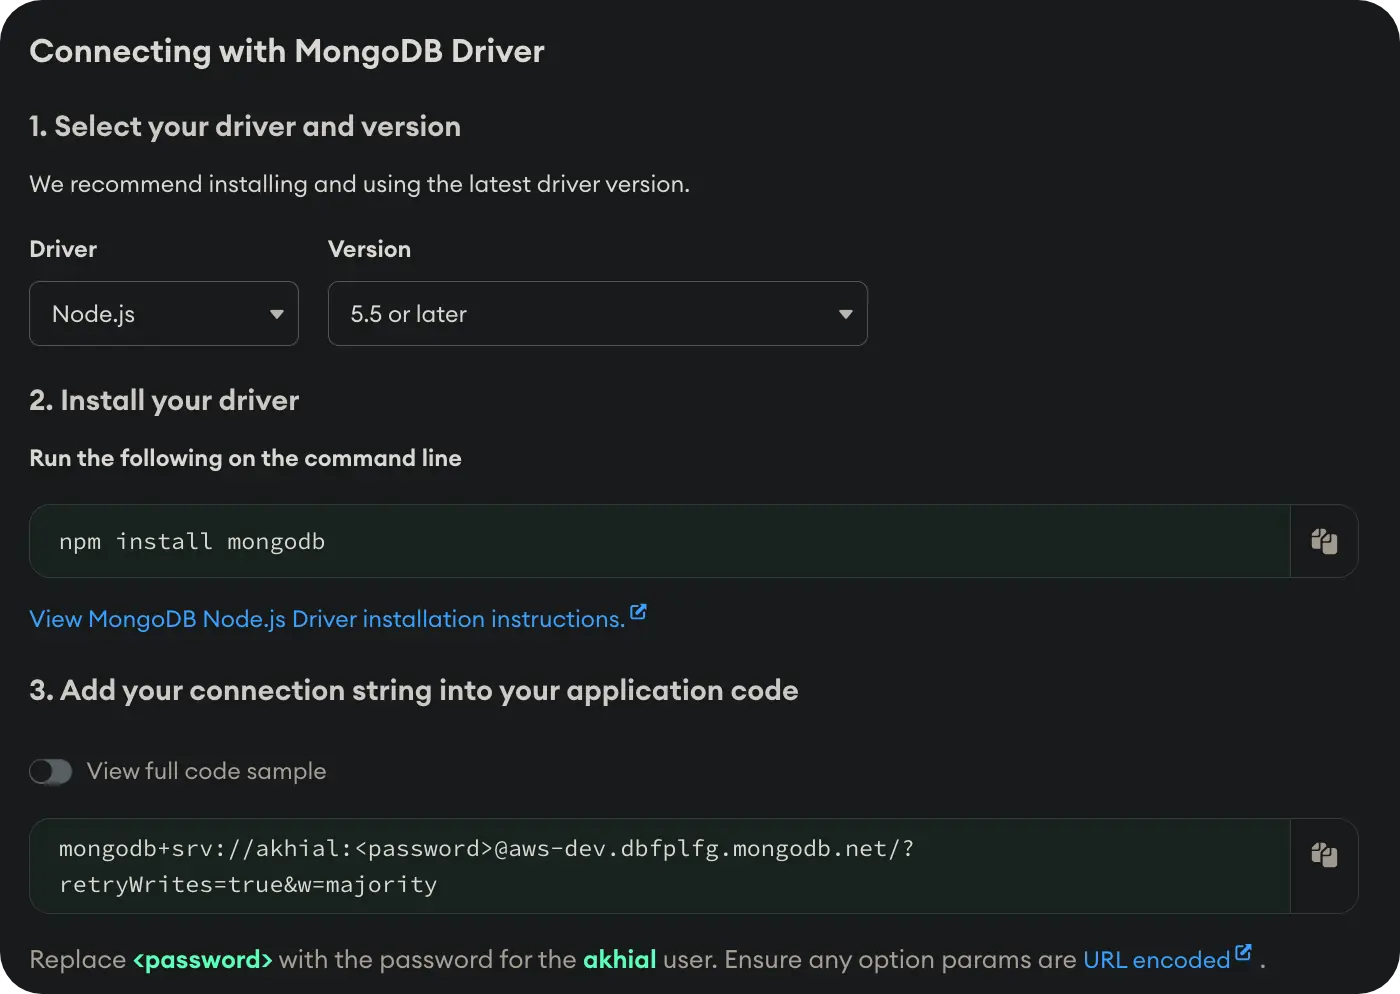
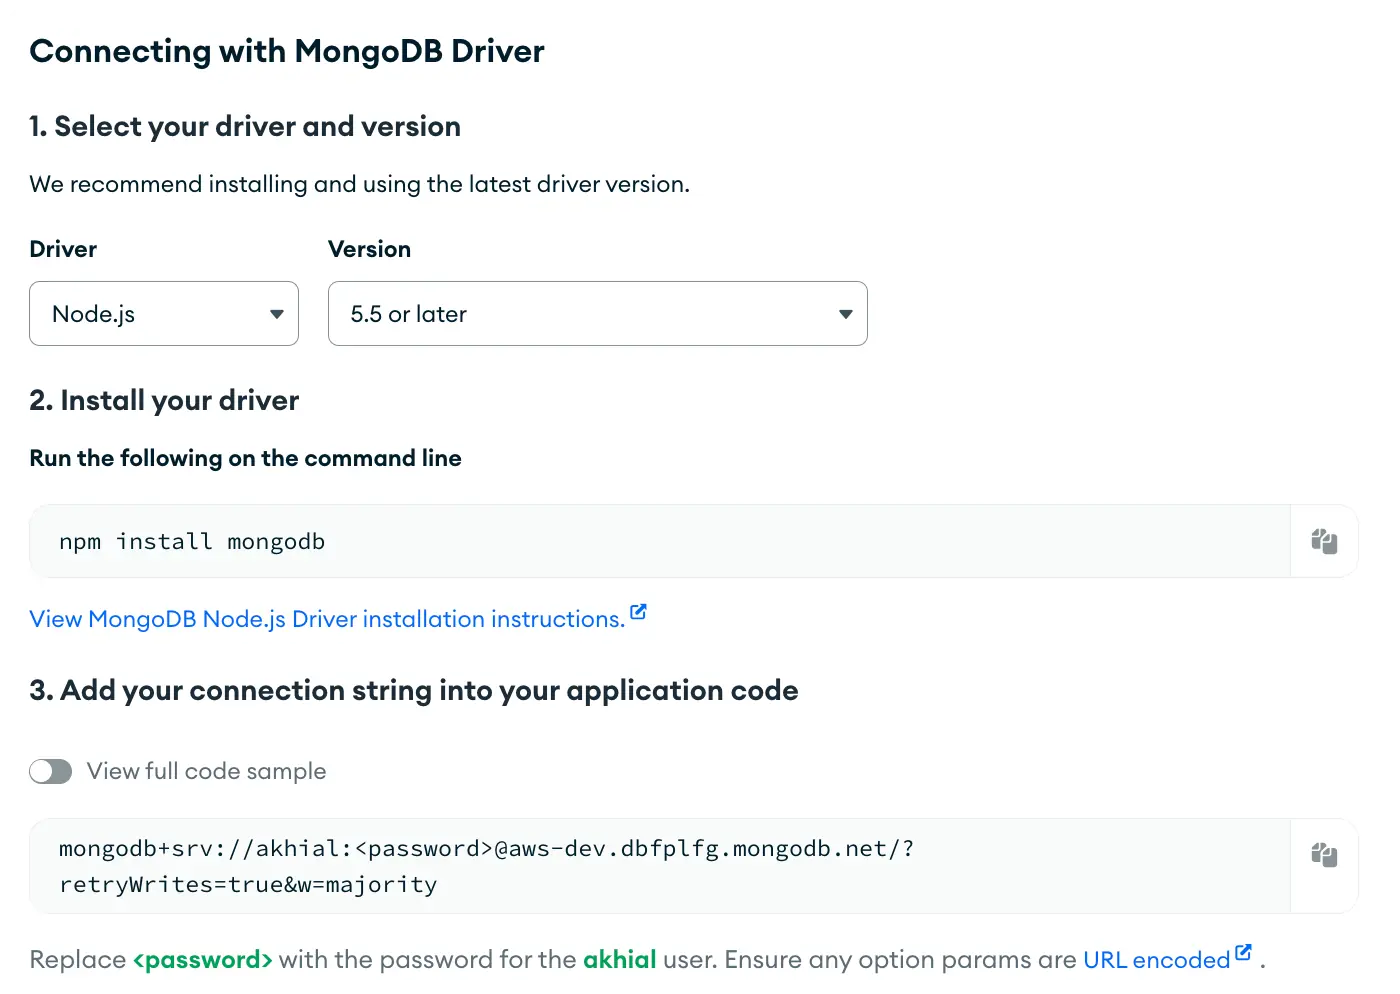
Remember to swap out <password> with the password you assigned to your MongoDB user.
As discussed earlier, we'll utilize Mongoose as our go-to Object Document Mapper (ODM) to facilitate smooth interactions with MongoDB. To get started, run the following installation command:
pnpm add mongoose --filter serverpnpm add mongoose --filter serverIn the providers directory, create a new folder named database that will serve as the central location for all database-related operations, such as establishing connections, handling errors, and implementing customizations.
Create an index.ts file inside your newly established database folder. This file will function as the gateway to your database module, coordinating everything from connections to other database-specific operations.
import { connect as mongoConnect } from 'mongoose';

const connect = async (): Promise<void> => {
	const URI = `mongodb+srv://akhial:nRsWLncbo2QiHtEl@$aws-dev.dbfplfg.mongodb.net/bugsight?retryWrites=true&w=majority`;
	try {
		const connection = await mongoConnect(URI);
		console.log(`MongoDB connected: ${connection.connection.name}`);
	} catch (error) {
		if (error instanceof Error) {
			console.log(error);
		}
	}
};

export { connect };import { connect as mongoConnect } from 'mongoose';
const connect = async (): Promise<void> => {
const URI = `mongodb+srv://akhial:nRsWLncbo2QiHtEl@$aws-dev.dbfplfg.mongodb.net/bugsight?retryWrites=true&w=majority`;
try {
const connection = await mongoConnect(URI);
console.log(`MongoDB connected: ${connection.connection.name}`);
} catch (error) {
if (error instanceof Error) {
console.log(error);
}
}
};
export { connect };Here, we are hardcoding the Connection String directly in the code; this is generally discouraged for several reasons. The most significant issue is its security risk; if the codebase is ever exposed or compromised, so are your sensitive database credentials. This can lead to unauthorized access and potential data breaches. Also, hardcoded strings make managing changes or updates to your database credentials or configurations difficult, especially in multi-environment applications. Whenever you need to change the connection details, you'd have to manually update the code and redeploy the application, which is cumbersome and error-prone.
Instead, we can use environment variables for storing database connection string; keeping sensitive data like credentials outside the codebase minimizes the risk of accidental exposure and data breaches.
You have the option to store your connection string in a single variable:
...
DB_URI=mongodb+srv://akhial:nRsWLncbo2QiHtEl@$aws-dev.dbfplfg.mongodb.net/bugsight?retryWrites=true&w=majority...
DB_URI=mongodb+srv://akhial:nRsWLncbo2QiHtEl@$aws-dev.dbfplfg.mongodb.net/bugsight?retryWrites=true&w=majorityAlternatively, you can split the connection string into individual environment variables for enhanced security and manageability.
...
DB_USERNAME=akhial
DB_PASSWORD=nRsWLncbo2QiHtEl
DB_CLUSTER=aws-dev
DB_NAME=bugsight...
DB_USERNAME=akhial
DB_PASSWORD=nRsWLncbo2QiHtEl
DB_CLUSTER=aws-dev
DB_NAME=bugsightThis approach offers greater flexibility, allowing you to manage each variable independently without impacting the others, making it easier to update or secure specific parts of your connection settings.
In your index.ts file within the env folder, include these variables. This ensures TypeScript is aware of them, which aids in type-checking and autocompletion.
interface NodeEnvironment {
	...
	db: {
		username: string;
		password: string;
		cluster: string;
		name: string;
	};
}

const env = process.env;

const environment: NodeEnvironment = {
	...
	db: {
		username: env.DB_USERNAME!,
		password: env.DB_PASSWORD!,
		cluster: env.DB_CLUSTER!,
		name: env.DB_NAME
	}
};interface NodeEnvironment {
...
db: {
username: string;
password: string;
cluster: string;
name: string;
};
}
const env = process.env;
const environment: NodeEnvironment = {
...
db: {
username: env.DB_USERNAME!,
password: env.DB_PASSWORD!,
cluster: env.DB_CLUSTER!,
name: env.DB_NAME
}
};Adjust the connect function to make use of the newly established environment variables.
import environment from '../../env';
import { connect as mongoConnect } from 'mongoose';

const connect = async (): Promise<void> => {
	const { db: { username, password, cluster, name } } = environment;
	const URI = `mongodb+srv://${username}:${password}@${cluster}.dbfplfg.mongodb.net/${name}?retryWrites=true&w=majority`;
	// The rest of the code remains the same
};

export { connect };import environment from '../../env';
import { connect as mongoConnect } from 'mongoose';
const connect = async (): Promise<void> => {
const { db: { username, password, cluster, name } } = environment;
const URI = `mongodb+srv://${username}:${password}@${cluster}.dbfplfg.mongodb.net/${name}?retryWrites=true&w=majority`;
// The rest of the code remains the same
};
export { connect };We can enhance our connection monitoring by leveraging Mongoose's connection events. These events offer real-time updates on the connection's status, delivering benefits like more precise error handling and optimal connection management.
const connect = async (): Promise<void> => {
	const { db: { username, password, cluster, name } } = environment;
	const URI = `mongodb+srv://${username}:${password}@${cluster}.dbfplfg.mongodb.net/${name}?retryWrites=true&w=majority`;

	mongoose.connection.on('connected', () => {
		console.log(`MongoDB connected: ${name}`);
	});

	mongoose.connection.on('error', (err) => {
		console.log(`Mongoose connection error: ${err?.message}`);
	});

	mongoose.connection.on('disconnected', () => {
		console.log('Mongoose disconnected');
	});

	try {
		await mongoConnect(URI);
	} catch (error) {
		if (error instanceof Error) {
			console.log(error);
		}
	}
};const connect = async (): Promise<void> => {
const { db: { username, password, cluster, name } } = environment;
const URI = `mongodb+srv://${username}:${password}@${cluster}.dbfplfg.mongodb.net/${name}?retryWrites=true&w=majority`;
mongoose.connection.on('connected', () => {
console.log(`MongoDB connected: ${name}`);
});
mongoose.connection.on('error', (err) => {
console.log(`Mongoose connection error: ${err?.message}`);
});
mongoose.connection.on('disconnected', () => {
console.log('Mongoose disconnected');
});
try {
await mongoConnect(URI);
} catch (error) {
if (error instanceof Error) {
console.log(error);
}
}
};Using events for managing database connections offers several advantages. It grants finer control by triggering actions based on the connection's status, whether established, encounters an error, or is terminated. This leads to more graceful error handling, enabling actions like retries or detailed logging.
Another key aspect to discuss is connection options. While a single connection string can suffice for basic MongoDB connections, more complex scenarios may require customization for improved performance, security, or reliability. Using a connection options object offers greater control in these situations.
You may have noticed that we're embedding connection options directly within the URI (?retryWrites=true&w=majority). Let's refactor this by using an options object instead.
import mongoose, { ConnectOptions, connect as mongoConnect } from 'mongoose';

const connect = async (): Promise<void> => {
	const { db: { username, password, cluster, name } } = environment;
	const URI = `mongodb+srv://${username}:${password}@${cluster}.dbfplfg.mongodb.net/${name}?retryWrites=true&w=majority`;
	const options: ConnectOptions = {
		writeConcern: { w: 'majority' },
		retryWrites: true
	};

	...

	try {
		await mongoConnect(URI, options);
	} catch (error) {
		if (error instanceof Error) {
			console.log(error);
		}
	}
};import mongoose, { ConnectOptions, connect as mongoConnect } from 'mongoose';
const connect = async (): Promise<void> => {
const { db: { username, password, cluster, name } } = environment;
const URI = `mongodb+srv://${username}:${password}@${cluster}.dbfplfg.mongodb.net/${name}?retryWrites=true&w=majority`;
const options: ConnectOptions = {
writeConcern: { w: 'majority' },
retryWrites: true
};
...
try {
await mongoConnect(URI, options);
} catch (error) {
if (error instanceof Error) {
console.log(error);
}
}
};Using a connection options object in a MongoDB connection enhances code robustness through TypeScript's type safety, catching errors at compile-time and simplifying updates.
Finally, let's call this method from the main index.ts file to establish our database connection.
import * as server from './providers/server';
import * as database from './providers/database';

(async () => {
	await Promise.all([database.connect(), server.start()]);
})();import * as server from './providers/server';
import * as database from './providers/database';
(async () => {
await Promise.all([database.connect(), server.start()]);
})();Run your server, and if everything is set up correctly, you should see the message 'MongoDB connected: bugsight' displayed in your terminal.
Visualize your MongoDB Data
Visualizing your MongoDB data can provide invaluable insights into your application's performance and streamline debugging and query optimization.
But first, let's create some dummy data; below your connection, we'll create a new model(collection) named character with one document.
import mongoose, { ConnectOptions, connect as mongoConnect } from 'mongoose';

const connect = async (): Promise<void> => {
	...
	try {
		await mongoConnect(URI, options);
		const characterSchema = new mongoose.Schema({}, { strict: false });
		const CharacterModel = mongoose.model('character', characterSchema);
		const character = new CharacterModel({
			name: 'Goku',
			power: 'Kamehameha'
		});
		await character.save();
	} catch (error) {
		if (error instanceof Error) {
			console.log(error);
		}
	}
};import mongoose, { ConnectOptions, connect as mongoConnect } from 'mongoose';
const connect = async (): Promise<void> => {
...
try {
await mongoConnect(URI, options);
const characterSchema = new mongoose.Schema({}, { strict: false });
const CharacterModel = mongoose.model('character', characterSchema);
const character = new CharacterModel({
name: 'Goku',
power: 'Kamehameha'
});
await character.save();
} catch (error) {
if (error instanceof Error) {
console.log(error);
}
}
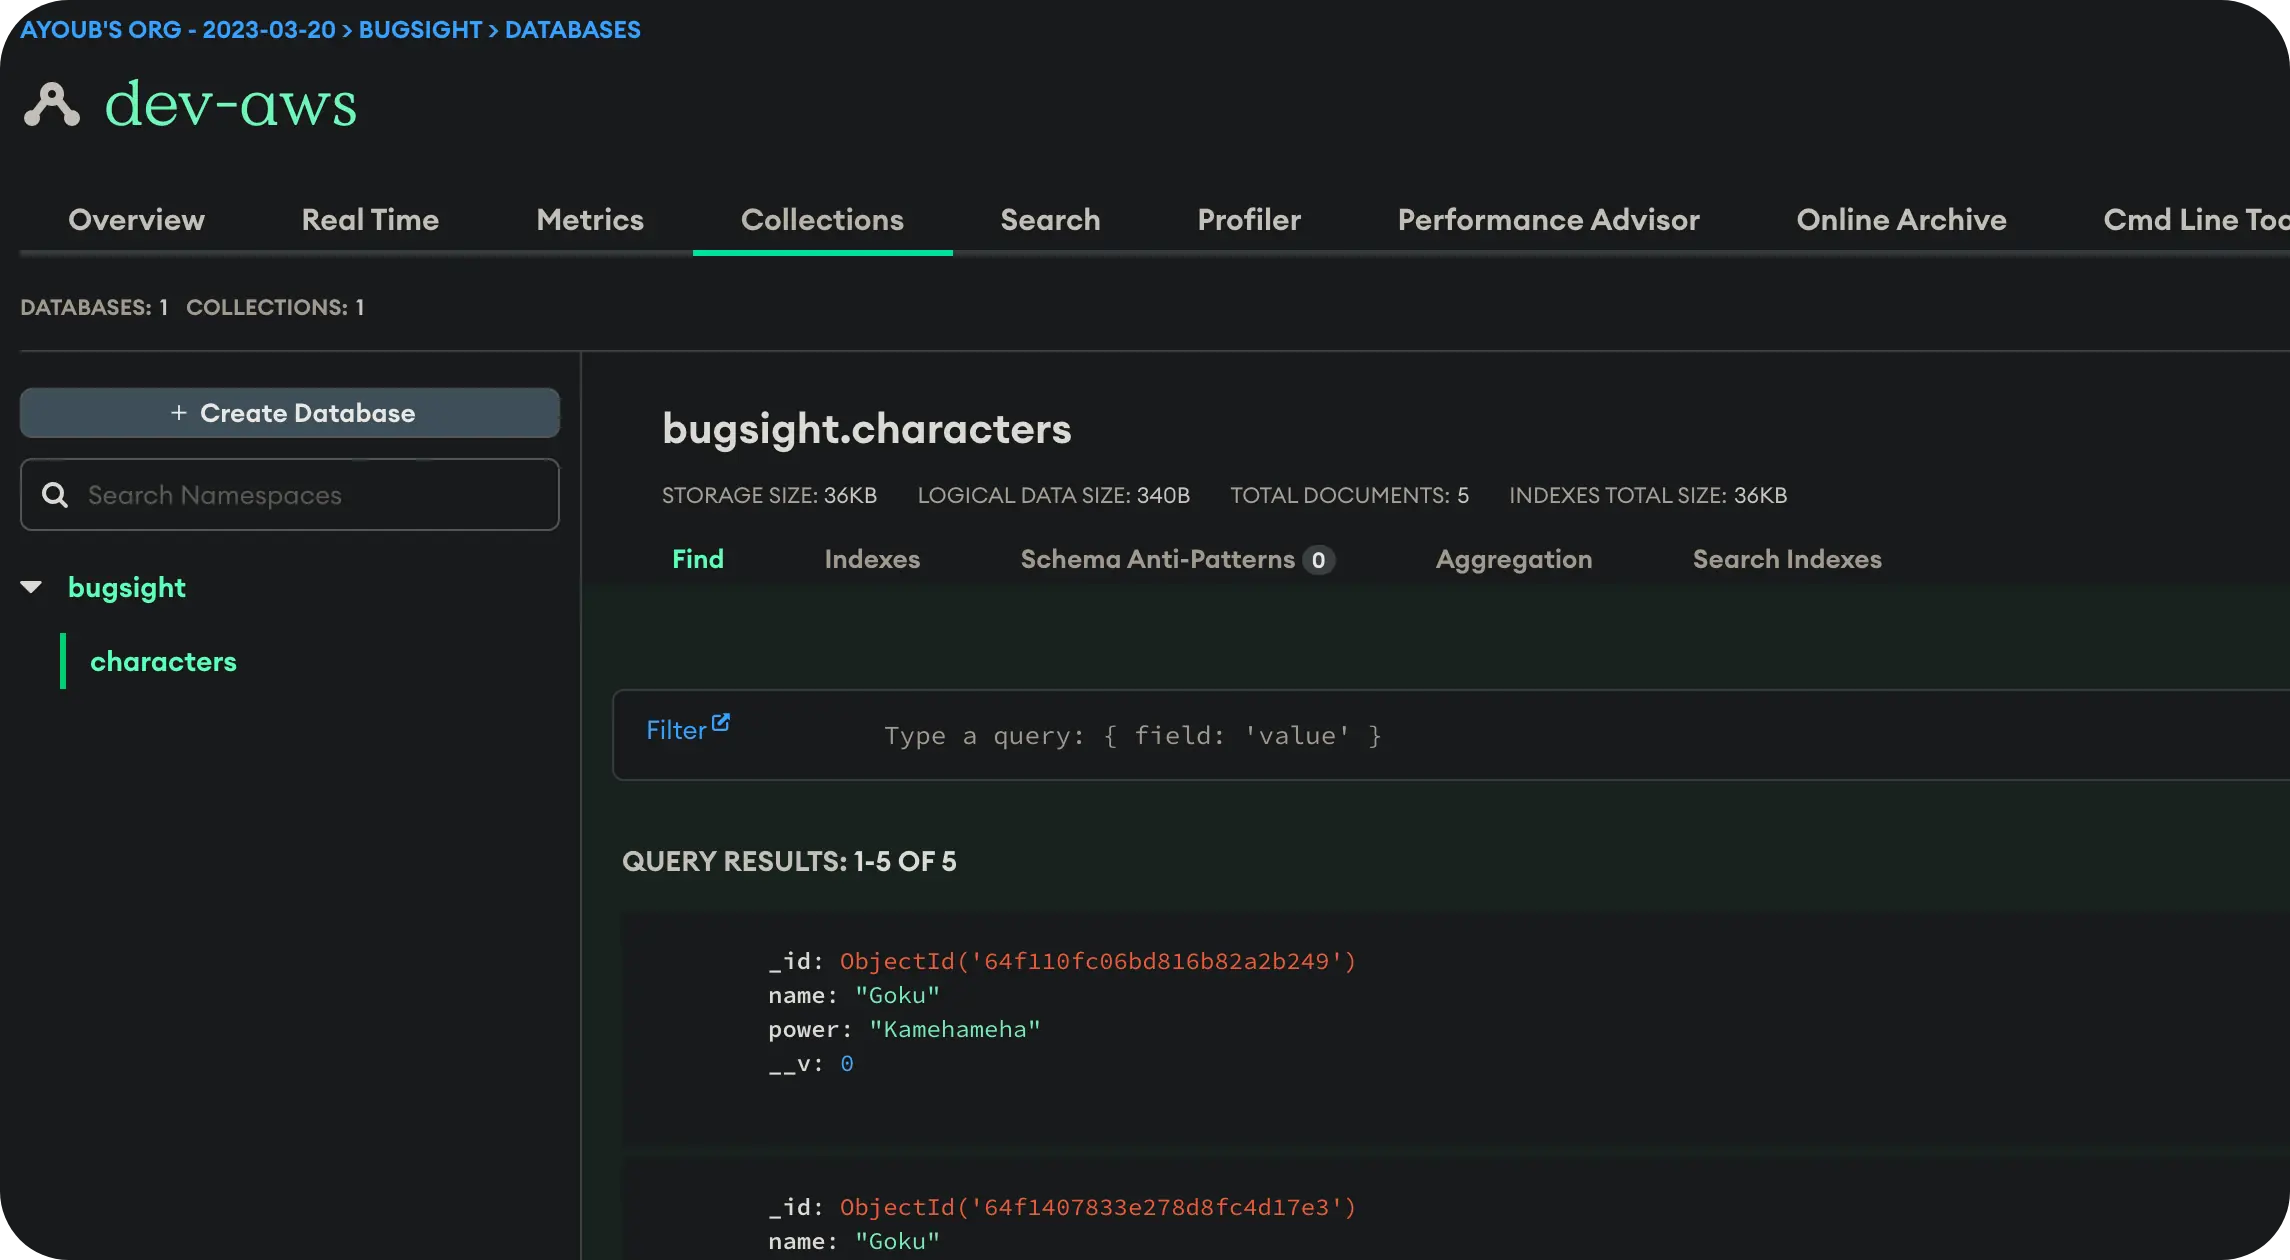
};If you restart the server, a new collection named characters(Mongoose automatically pluralizes the model name) should be created, containing a single document.
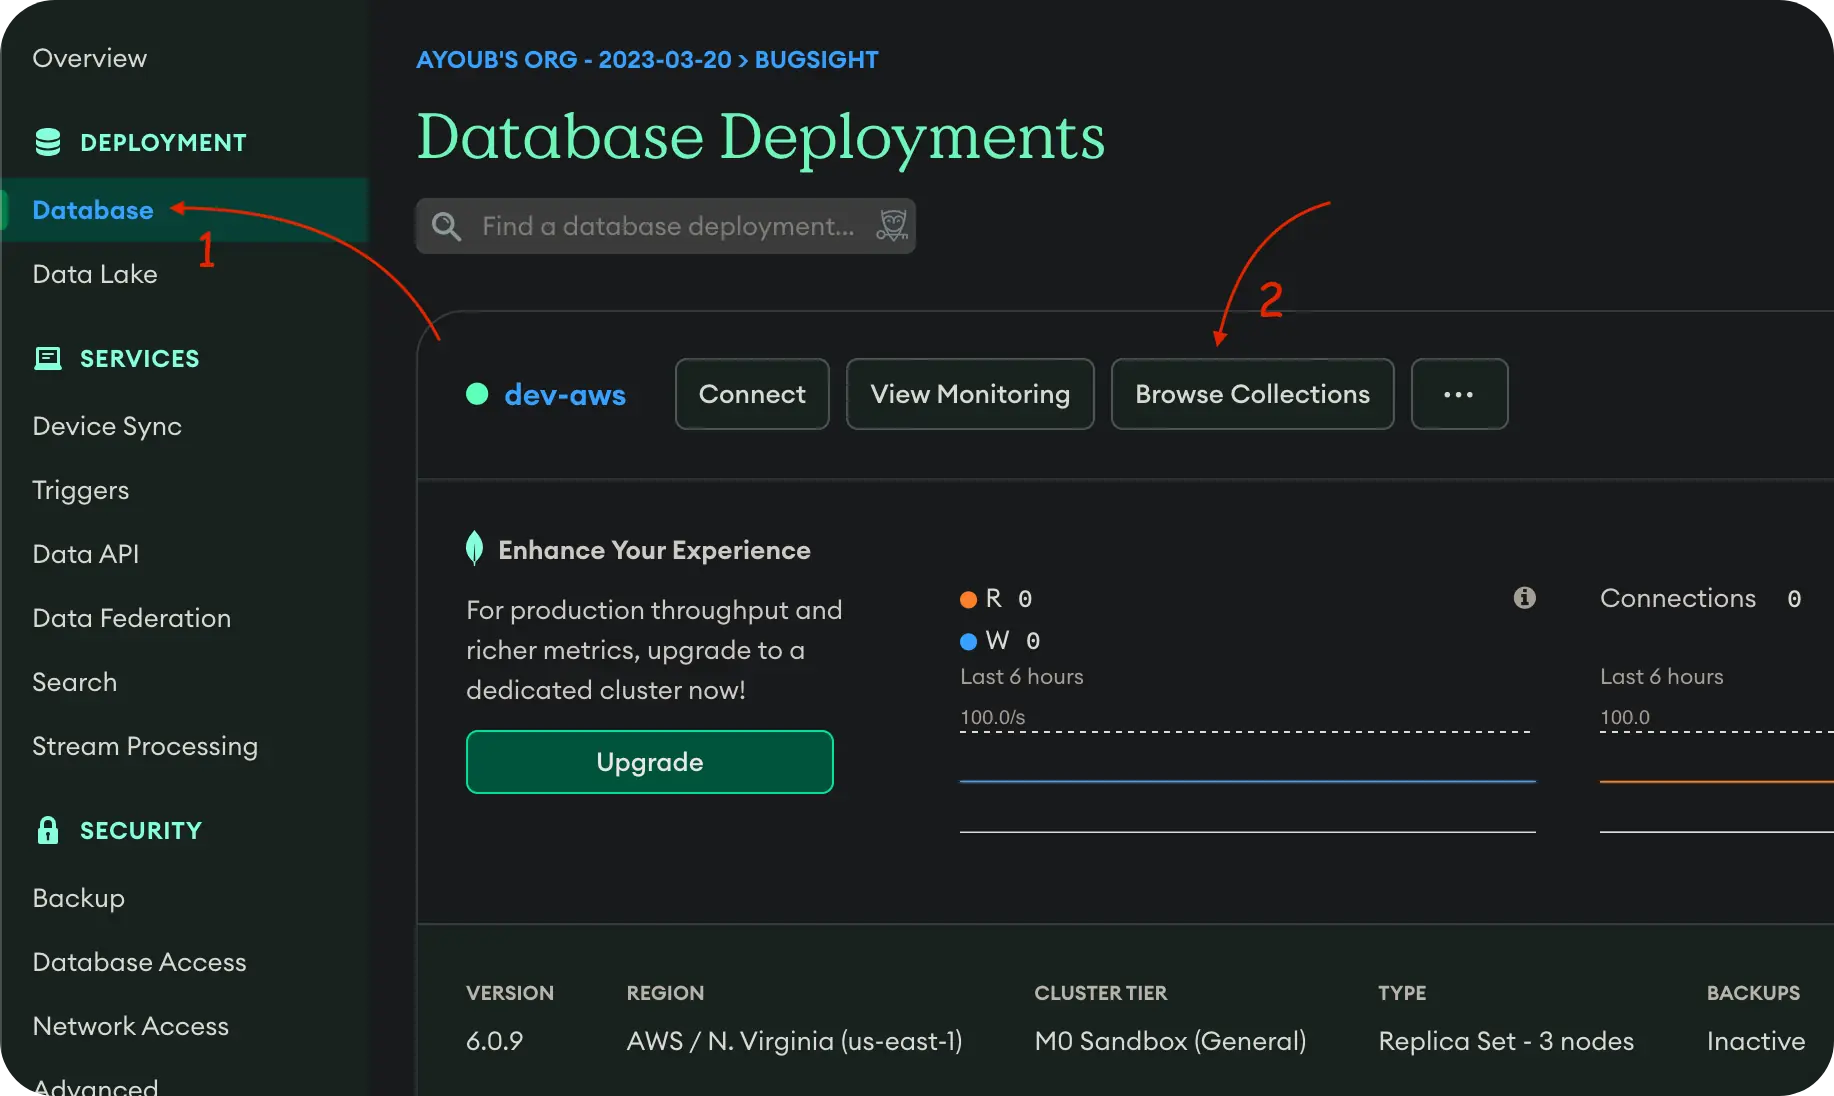
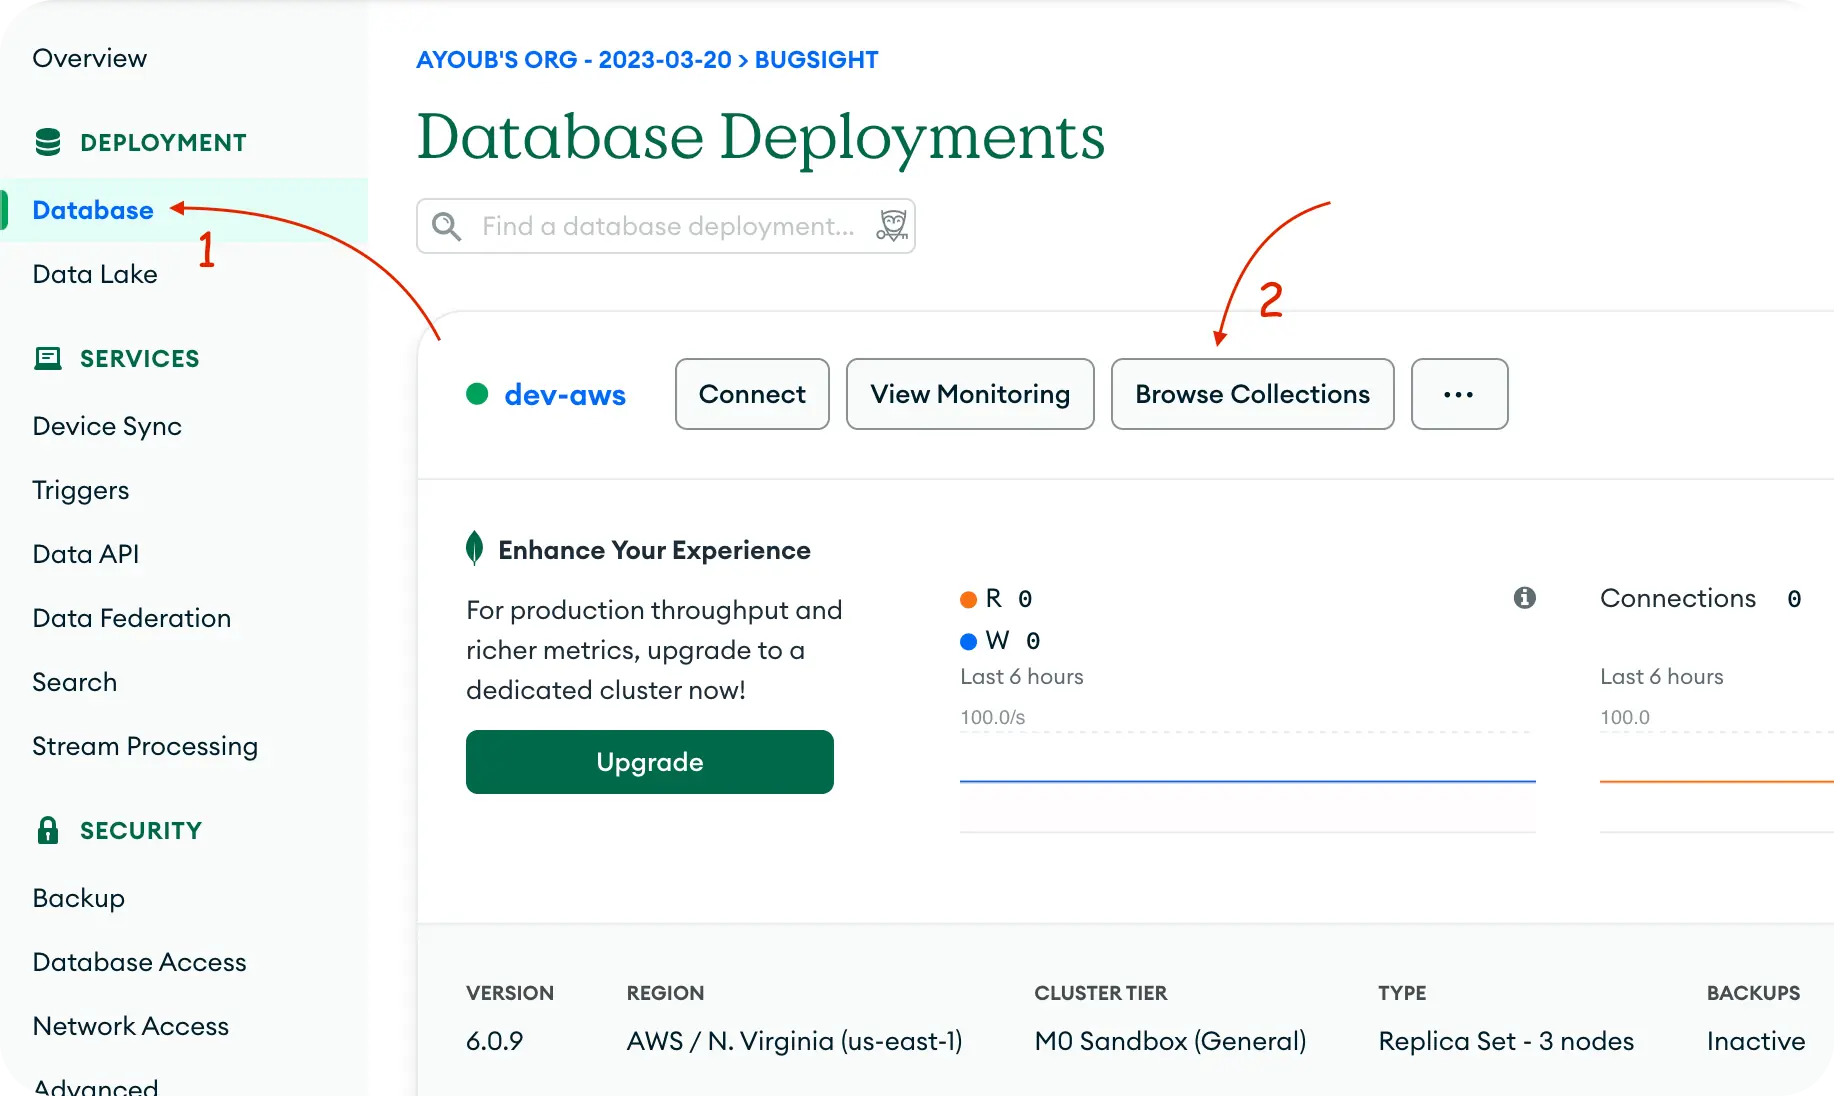
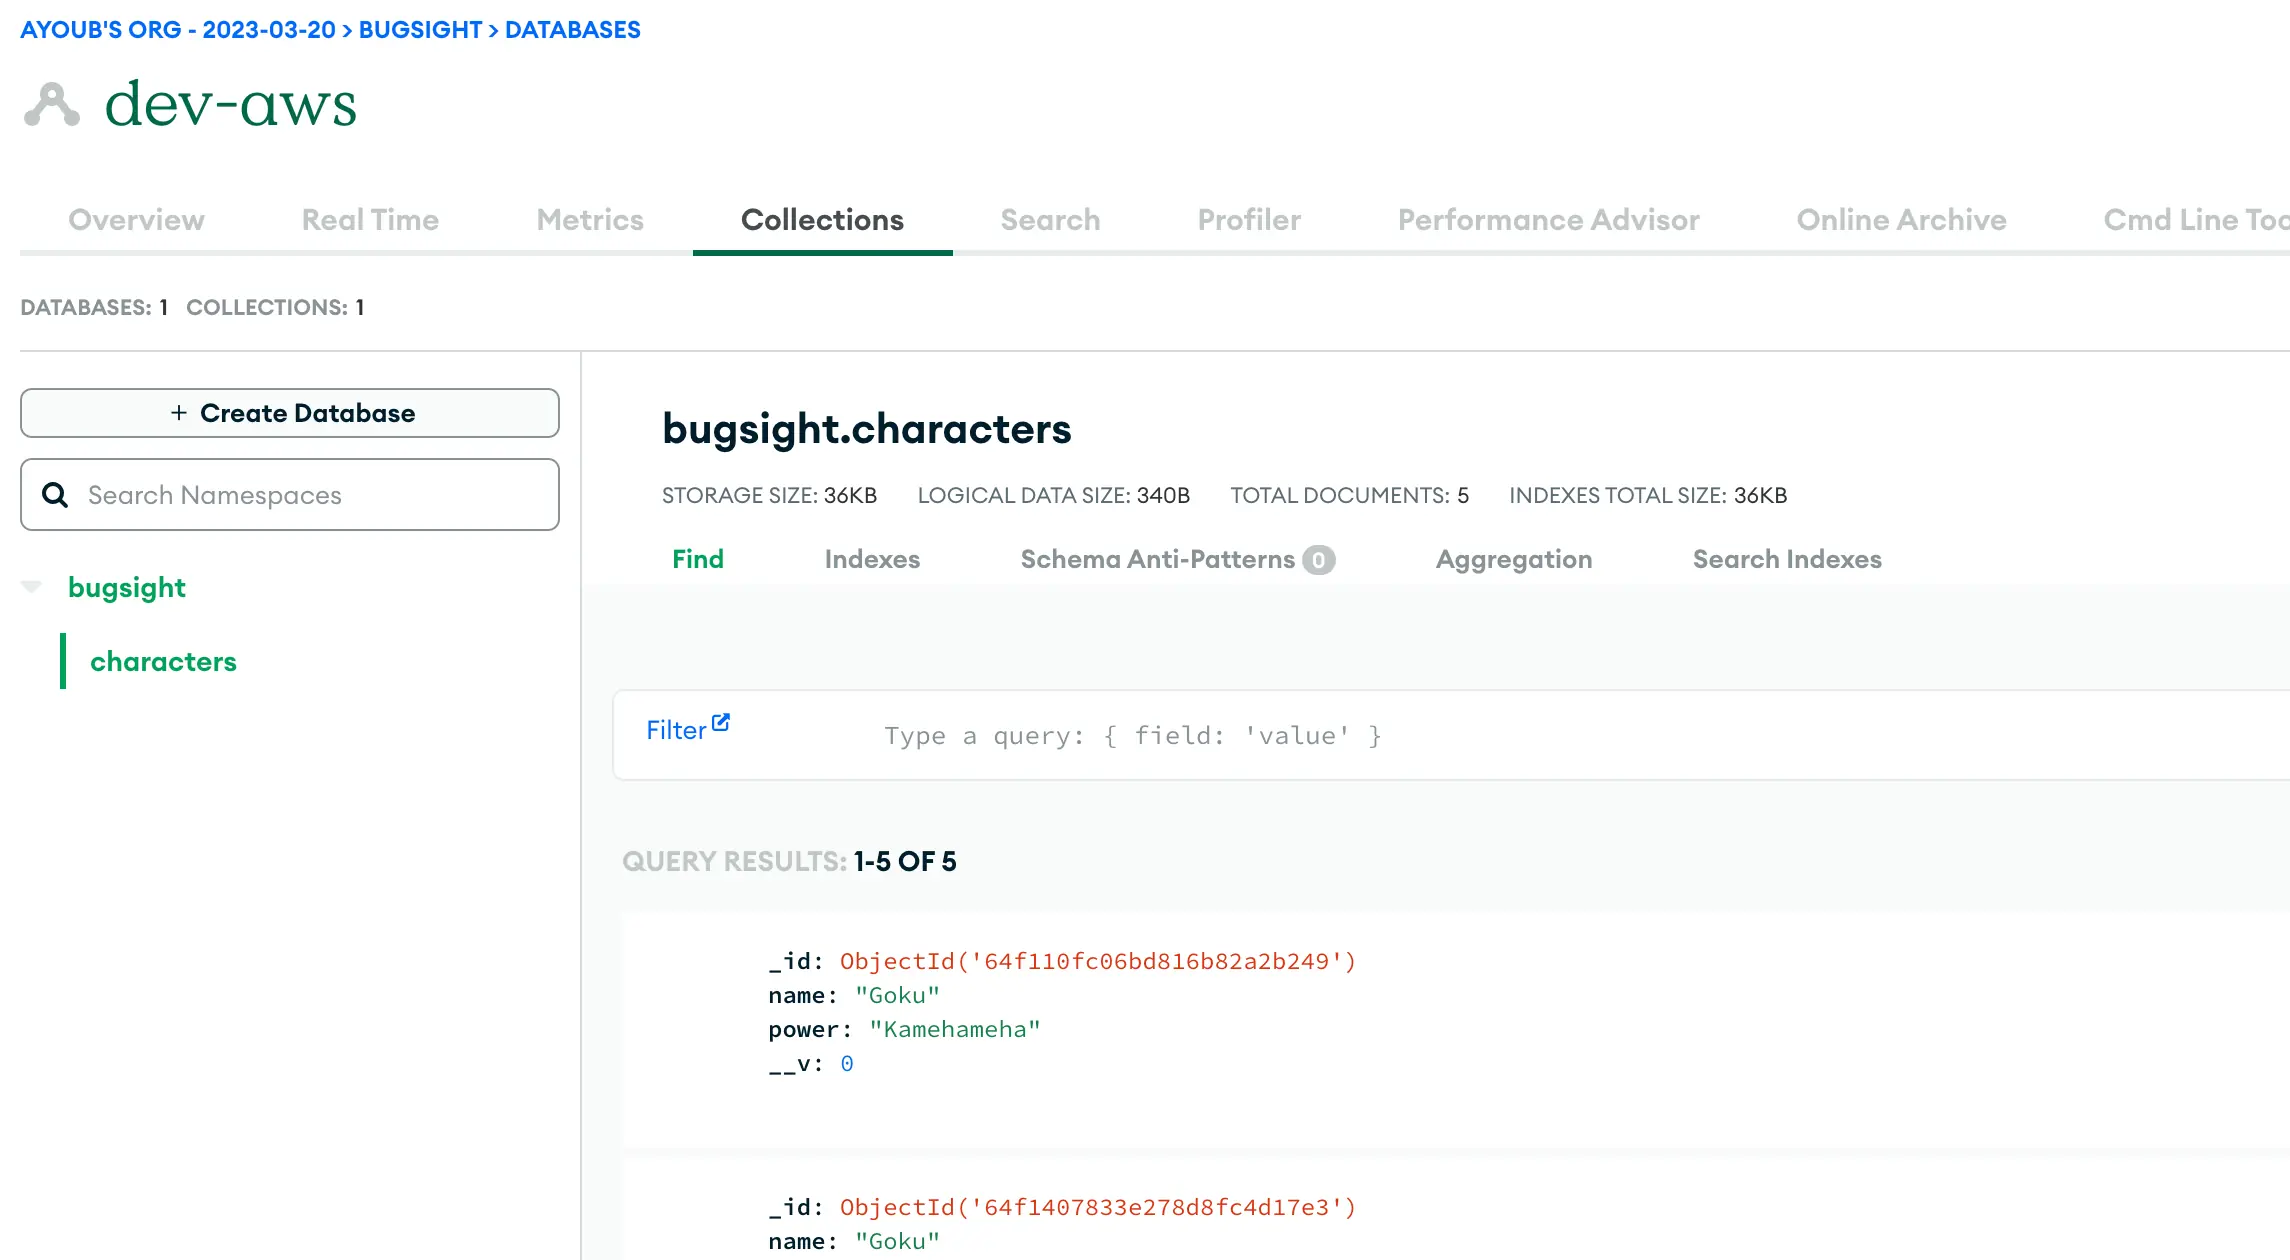
Please navigate to the MongoDB Atlas dashboard for a visual overview of our data. Once there, go to the Deployment section and click Database. Next, click Browse Collections to explore the newly created collection and examine its associated document.
You'll notice the 'characters' collection is created. You'll find a document in this collection that mirrors the object we've saved (actually, there are 5 documents since I restarted the server multiple times!), along with some additional fields. We'll explore these extra attributes in more detail in a future article.
Conclusion
In conclusion, MongoDB offers a flexible and robust solution for database management, especially when paired with Node.js. Through the course of this article, we've explored how to set up a MongoDB database with MongoDB Atlas, leverage the power of Mongoose as an ODM, connect it to a Node.js application, and visualize the stored data. Whether you're building a small project or an enterprise-grade application, these tools provide a solid foundation for your backend infrastructure. Keep an eye out for future articles, where we'll delve deeper into optimizing your MongoDB setup, error handling, and more advanced features.
You can find the complete code source in this repository; feel free to give it a star ⭐️.
If you want to keep up with this series, consider subscribing to my newsletter to receive updates as soon as I publish an article.