Introduction
In nearly all software applications, the data layer often acts as the cornerstone that underpins an application's business logic, user experience, and overall functionality. Effective database modeling is crucial for your application's scalability and long-term maintainability, whether you're developing a social media platform, designing a real-time analytics dashboard, or creating a bug-tracking system.
While SQL databases have long offered a rich set of features to design complex relational models, the increasing popularity of NoSQL databases like MongoDB has necessitated different strategies for establishing relationships and enforcing data integrity.
In our previous article, we learned how to connect your Node.js application to MongoDB using Mongoose ODM. With that foundation laid, it's time to dig deeper into one of the most crucial aspects of any application: Database Modeling. This article will focus solely on using Mongoose's robust schema features to shape your database effectively.
So why is getting your database design right so important? Picture trying to build a house without any plans. You could start stacking bricks, but you'll likely end up with a shaky building. Just like that, a well-planned database is essential for a successful app. It helps it run smoothly and makes it easier to manage in the long run.
Before diving into Mongoose, establishing a well-designed MongoDB schema is essential. In the next section, we'll focus on the differences between SQL and MongoDB in database design, along with some best practices and pitfalls to avoid.
MongoDB Schema Design
A carefully planned database schema is crucial when developing an application, particularly a complex one. The schema shapes your data, which impacts how you query that data and the kind of insights you can extract from it.
If you come from an SQL background, you'll know that schema design focuses on normalization. This approach aims to reduce repeated data by spreading it across separate tables. Doing so keeps the data organized, minimizes duplication, and avoids issues when adding, changing, or deleting data. Reaching these organized stages, known as normal forms, is crucial for data integrity in SQL.
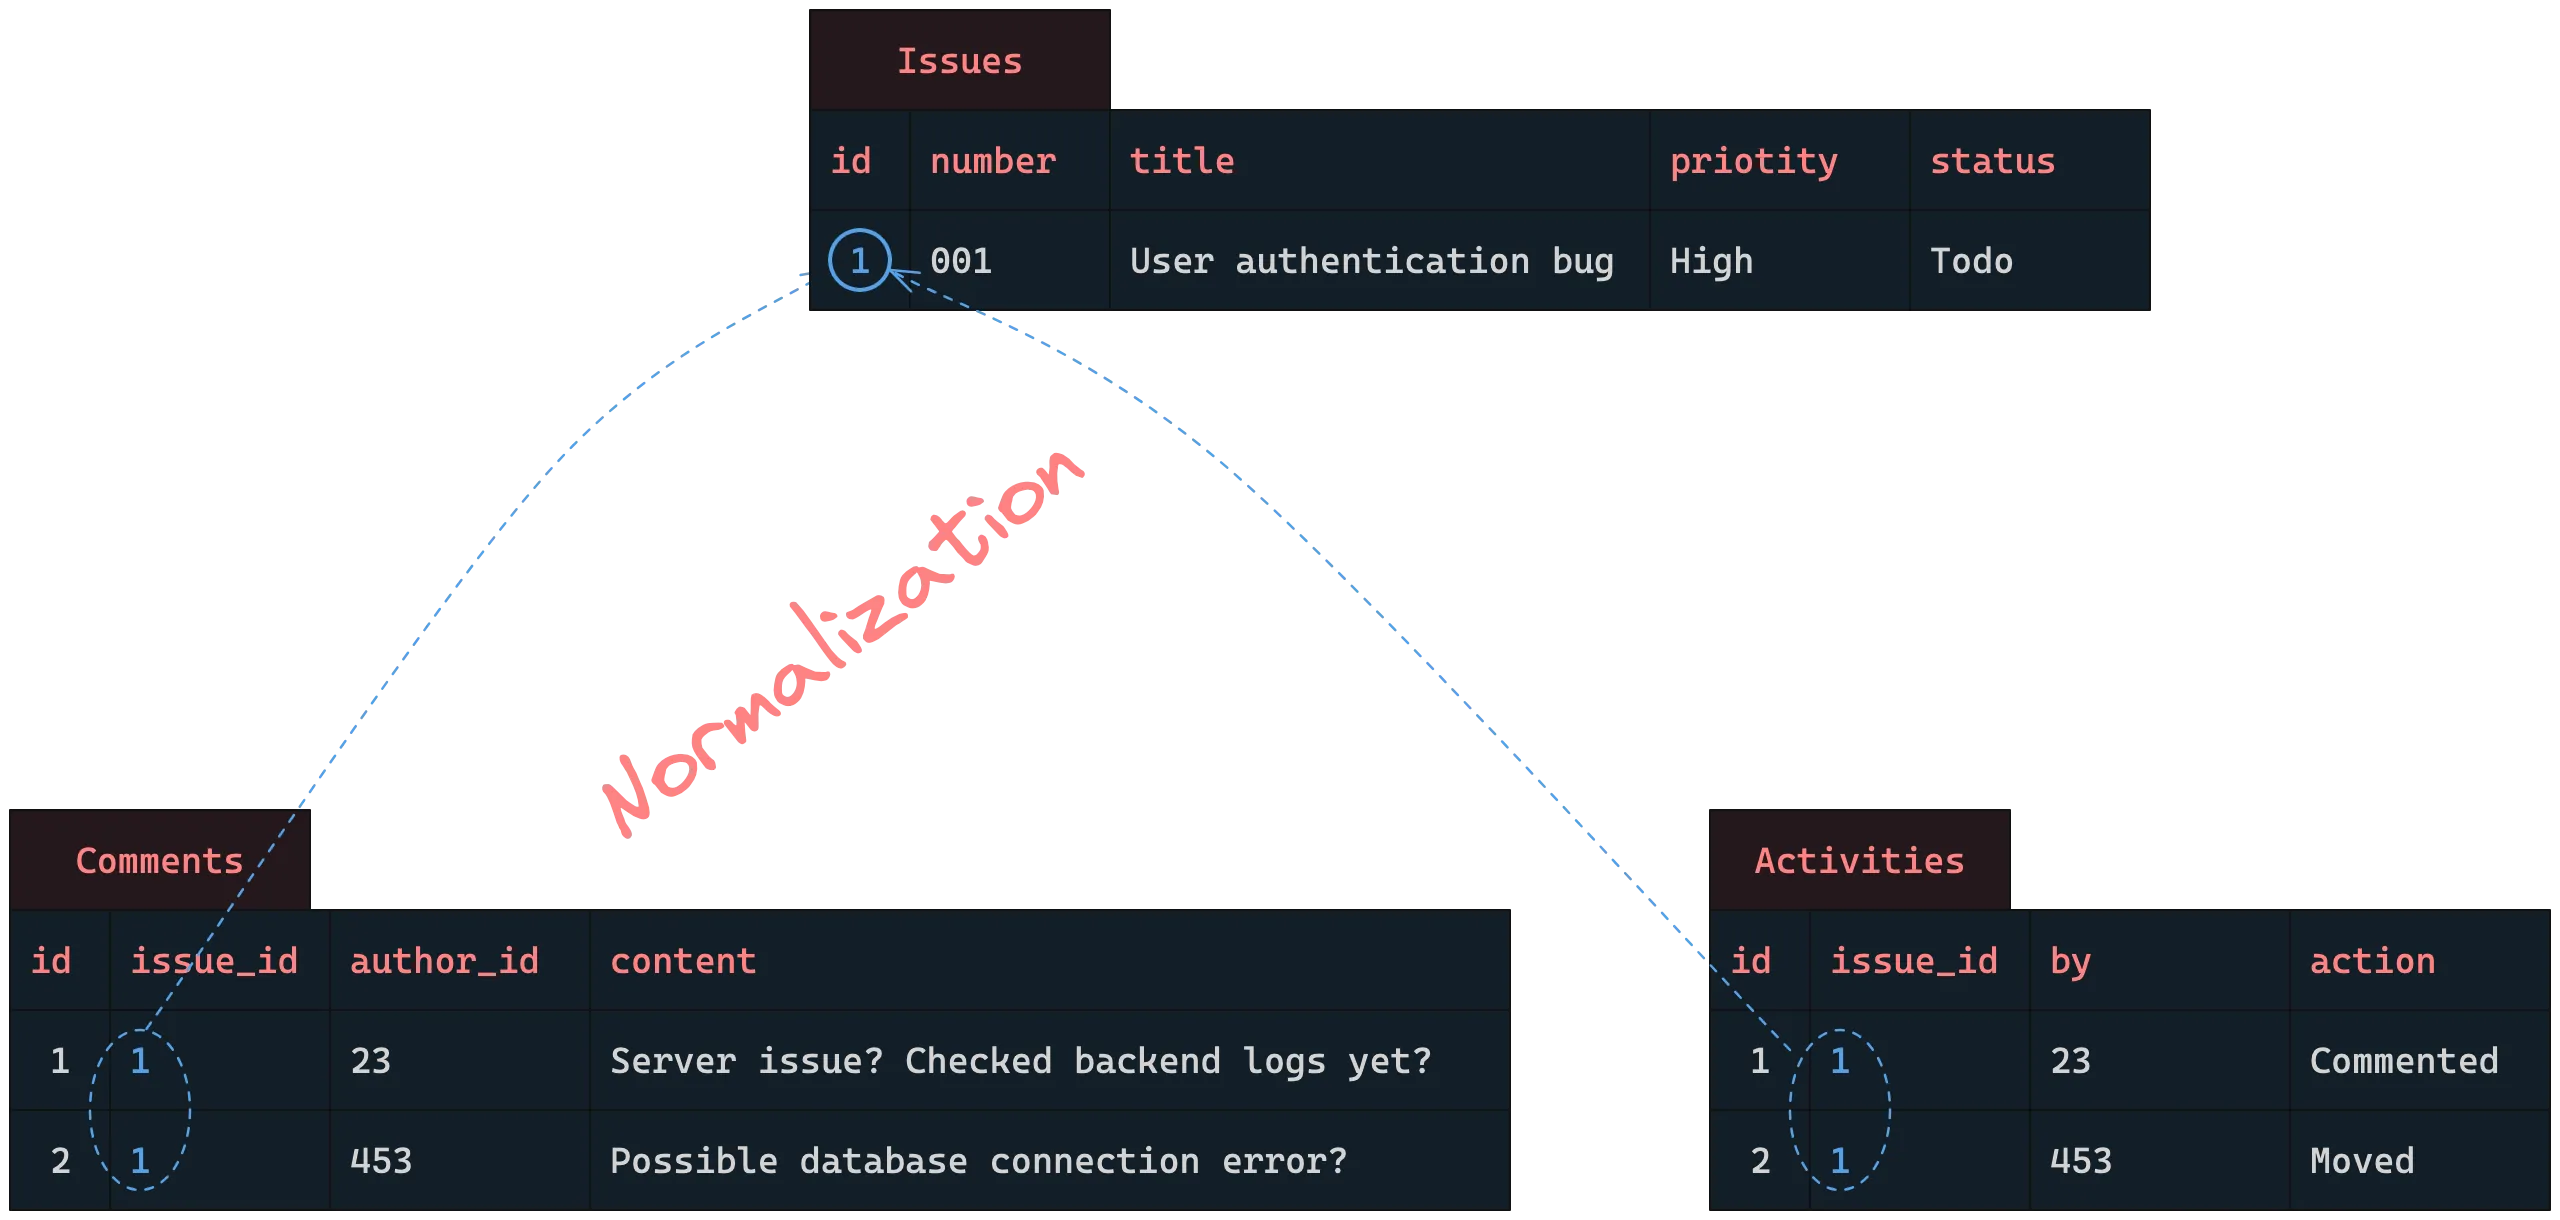

In NoSQL, especially in MongoDB, schema design takes a unique route. Here, your design decisions should align closely with your application's requirements. How the data is displayed in the application naturally guides how you should store it.
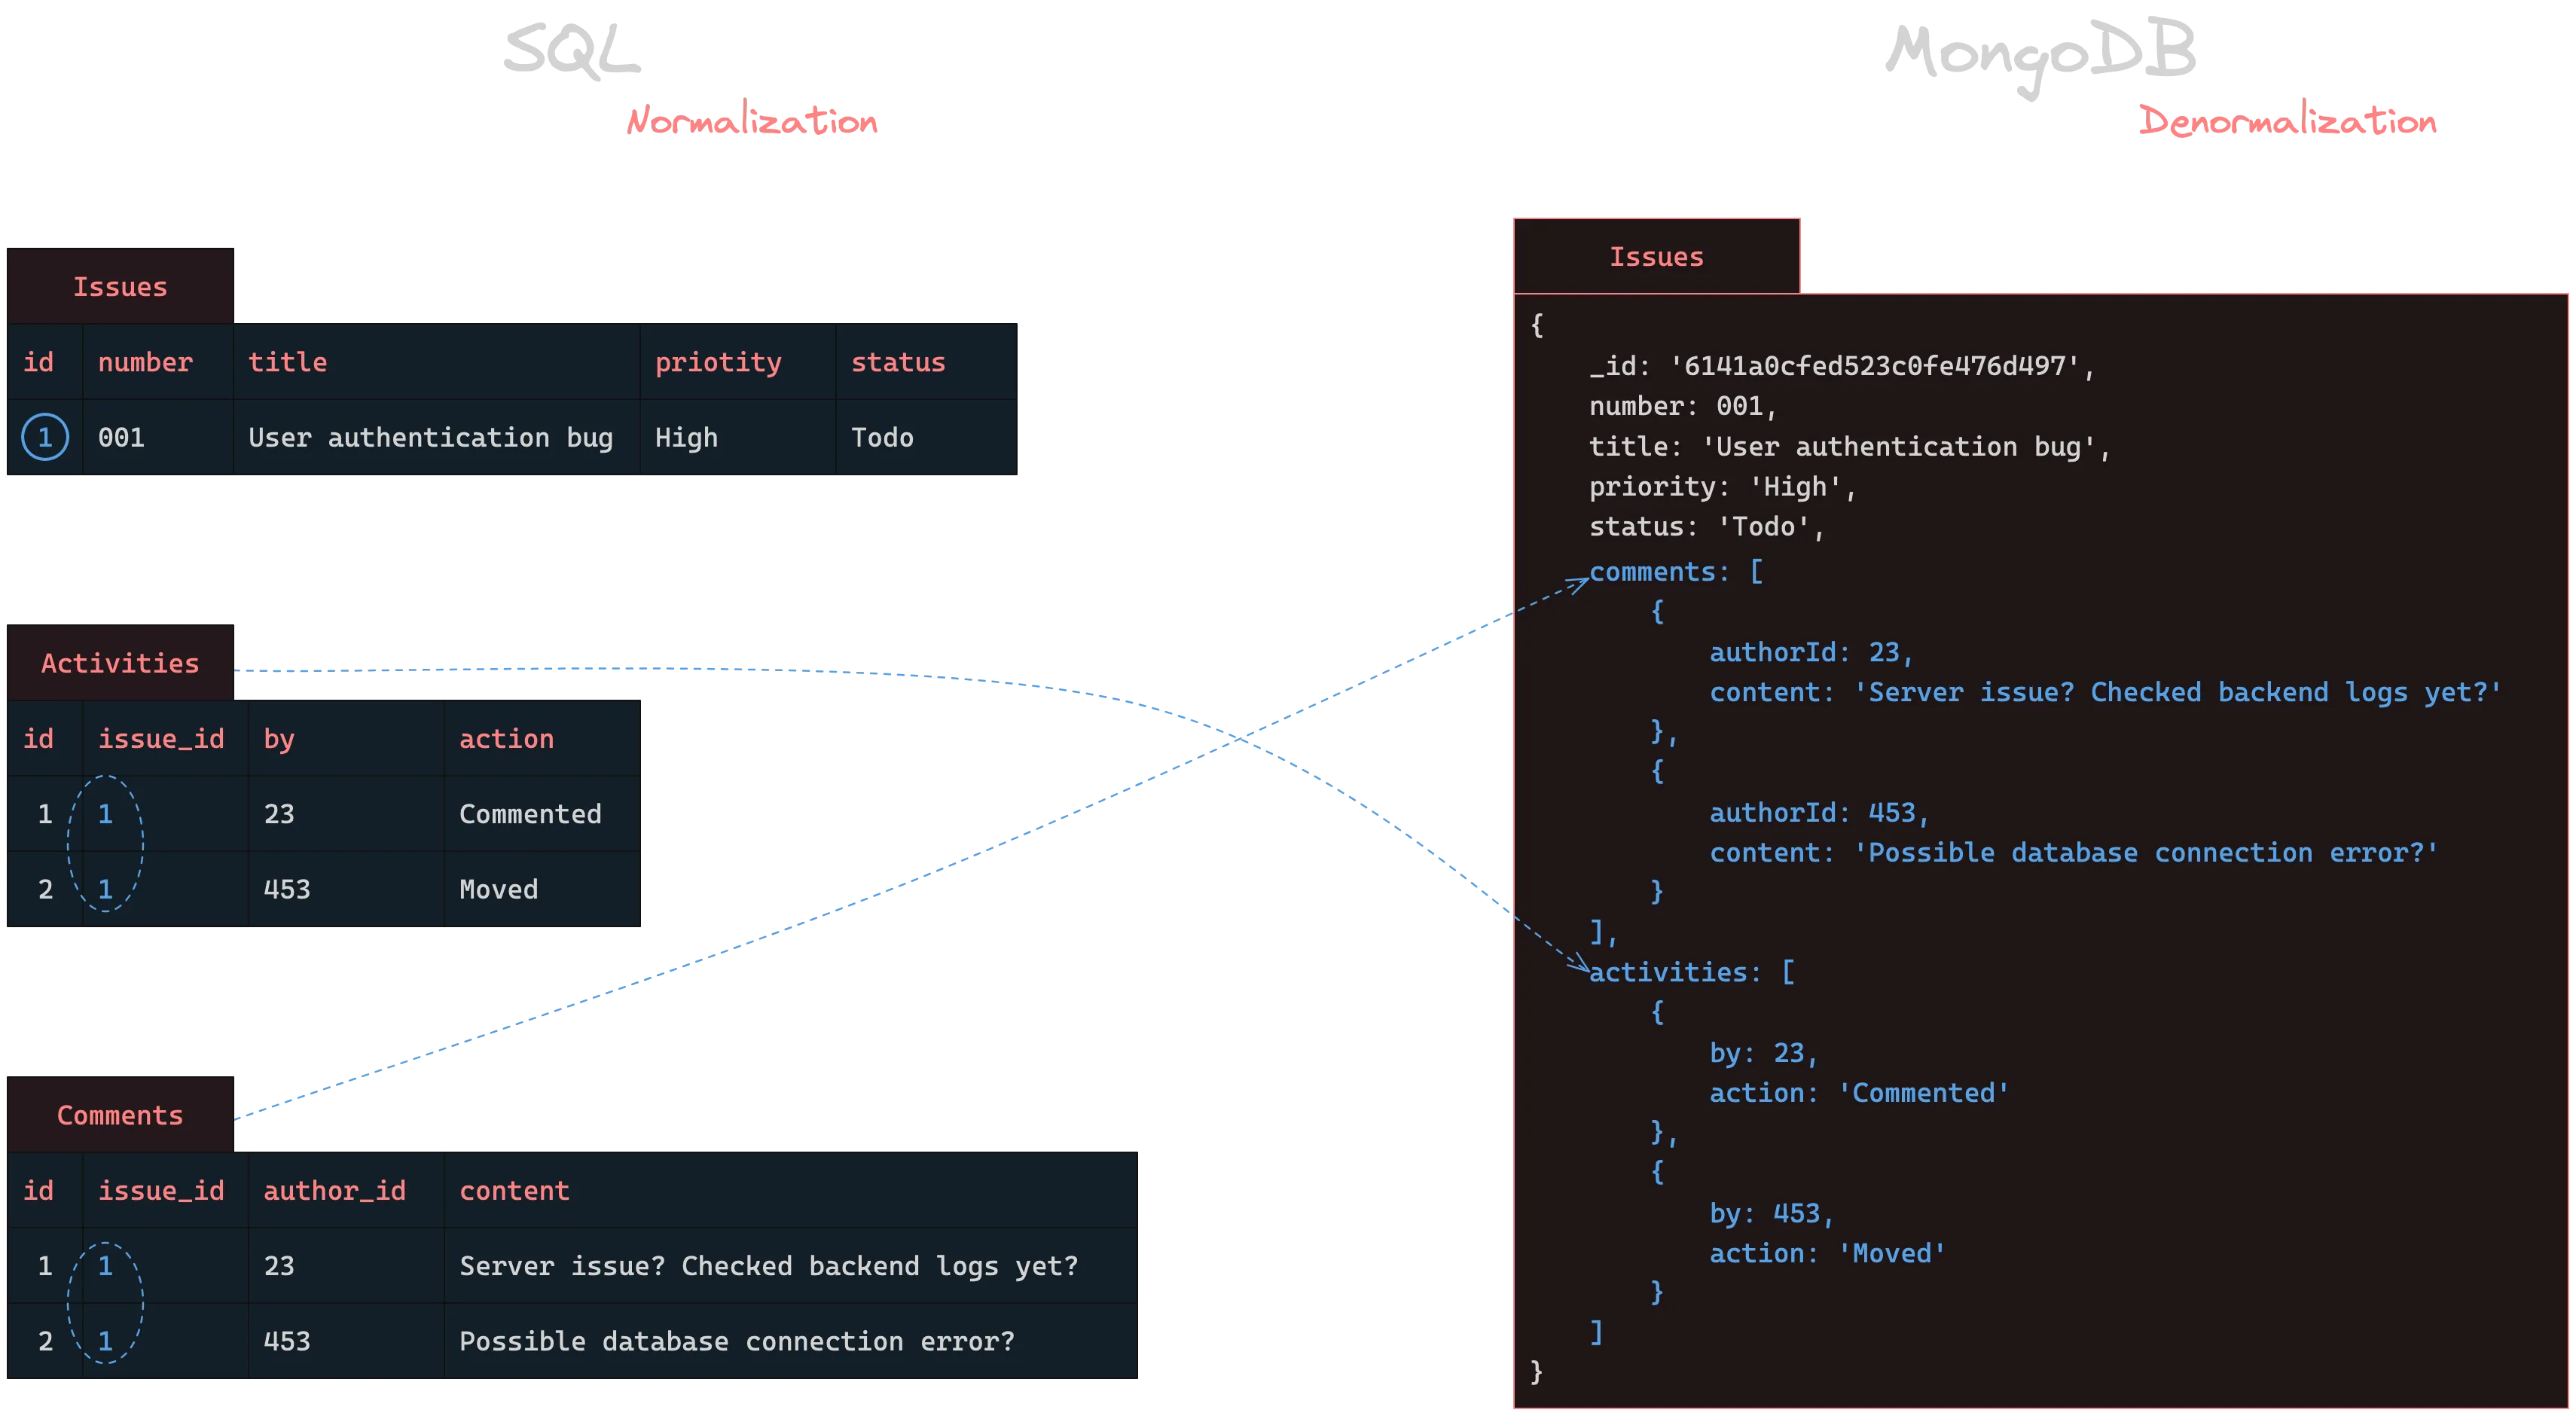
Our system's Issues are closely linked to their related Comments and Activities. This means that when you display an Issue, you usually show its Comments and Activities right next to it. Instead of spreading this data across various MongoDB collections, it's wiser to include Comments and Activities directly in the Issue document. This approach makes fetching and displaying data easier, taking full advantage of what MongoDB offers.
HOWEVER, if your application's use case doesn't require displaying Comments and Activities alongside Issues, separating them into distinct collections could be a wiser choice. For instance, if Comments are often accessed independently of Issues for analytics or reporting, keeping them in their own collection can improve data retrieval speed and manageability. The right design depends on your needs and how you intend to interact with the data.
The main reason you should be cautious is all about speed, or rather, the lack of it. When your data is spread across several collections, MongoDB uses the $lookup operator to stitch it together. On the Mongoose side, you've got the populate method doing the same job. Sounds great, but hold up, both these methods can slow you down big time, particularly as your data grows and gets more complex.
Here's what an Issue document might look like in MongoDB compared to SQL:
Although MongoDB provides design flexibility, some pitfalls should be avoided, especially when embedding documents. It's not always best to store all data in a single collection.
Take a bug-tracking system as an example. Typically, you'd manage multiple Projects, each containing several related Issues. Each Issue falls under just one Project, creating a One-to-Many relationship.
Building upon our earlier example, you might consider embedding Issues details directly within the Project documents. In such a design, the Project document would have an Issues array containing various issue subdocuments.
{
	name: 'Bugsight',
	description: 'An Open Source issue tracker',
	status: 'Active',
	issues: [
		{
			number: 1,
			title: 'User authentication bug',
			priority: 'High',
			status: 'In progress',
			//... more fields
		},
		{
			number: 2,
			title: 'Database connection error',
			priority: 'Urgent',
			status: 'Todo',
			//... more fields
		}
	]
}
{
name: 'Bugsight',
description: 'An Open Source issue tracker',
status: 'Active',
issues: [
{
number: 1,
title: 'User authentication bug',
priority: 'High',
status: 'In progress',
//... more fields
},
{
number: 2,
title: 'Database connection error',
priority: 'Urgent',
status: 'Todo',
//... more fields
}
]
}While this embedded approach simplifies your queries, it's important to be cautious. Packing too much data into one collection comes with risks. For instance, you could run into MongoDB's 16MB document size limit, especially if your issues array keeps expanding. Additionally, if we were to establish an index on the issues array —say, based on the issue number— its performance would degrade over time as more issues are added.
Another point to consider is how Issues operate independently. You might need to display, filter, sort, or edit them without tying them back to their respective Projects.
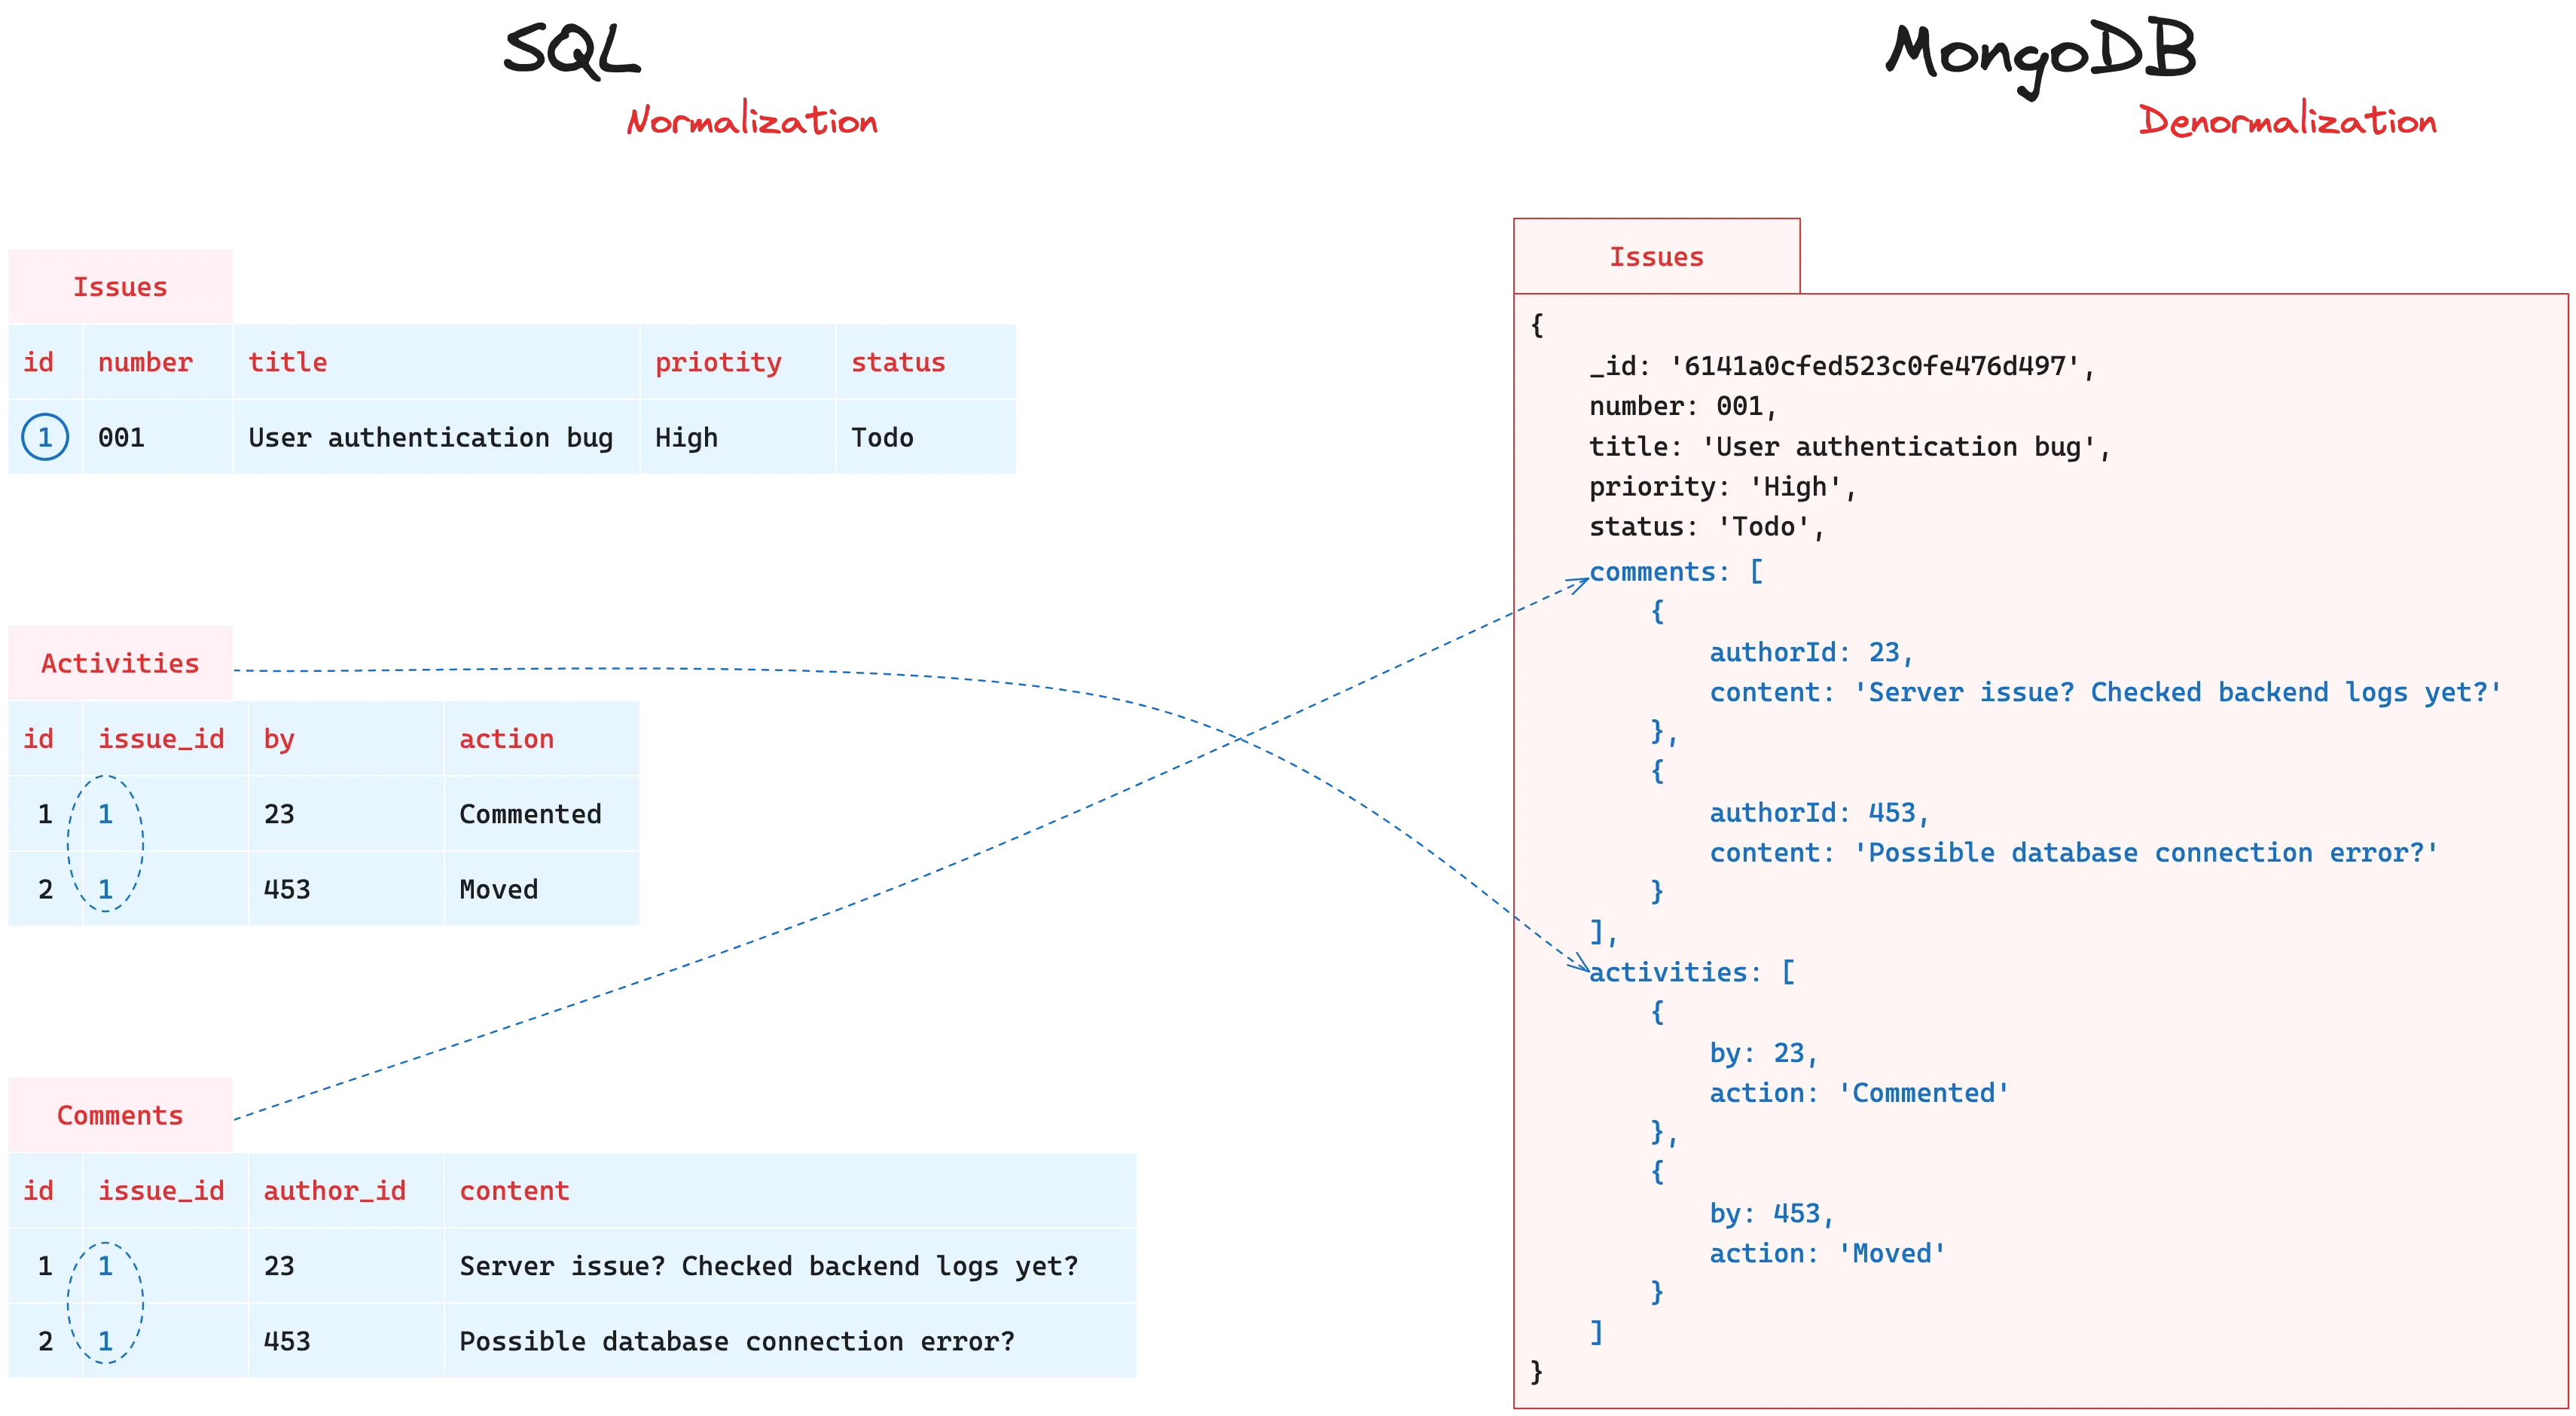
A solution to these challenges is to form a distinct issues collection, allowing for more granular querying. We could also flip the model and embed the project detail in the issues documents instead.
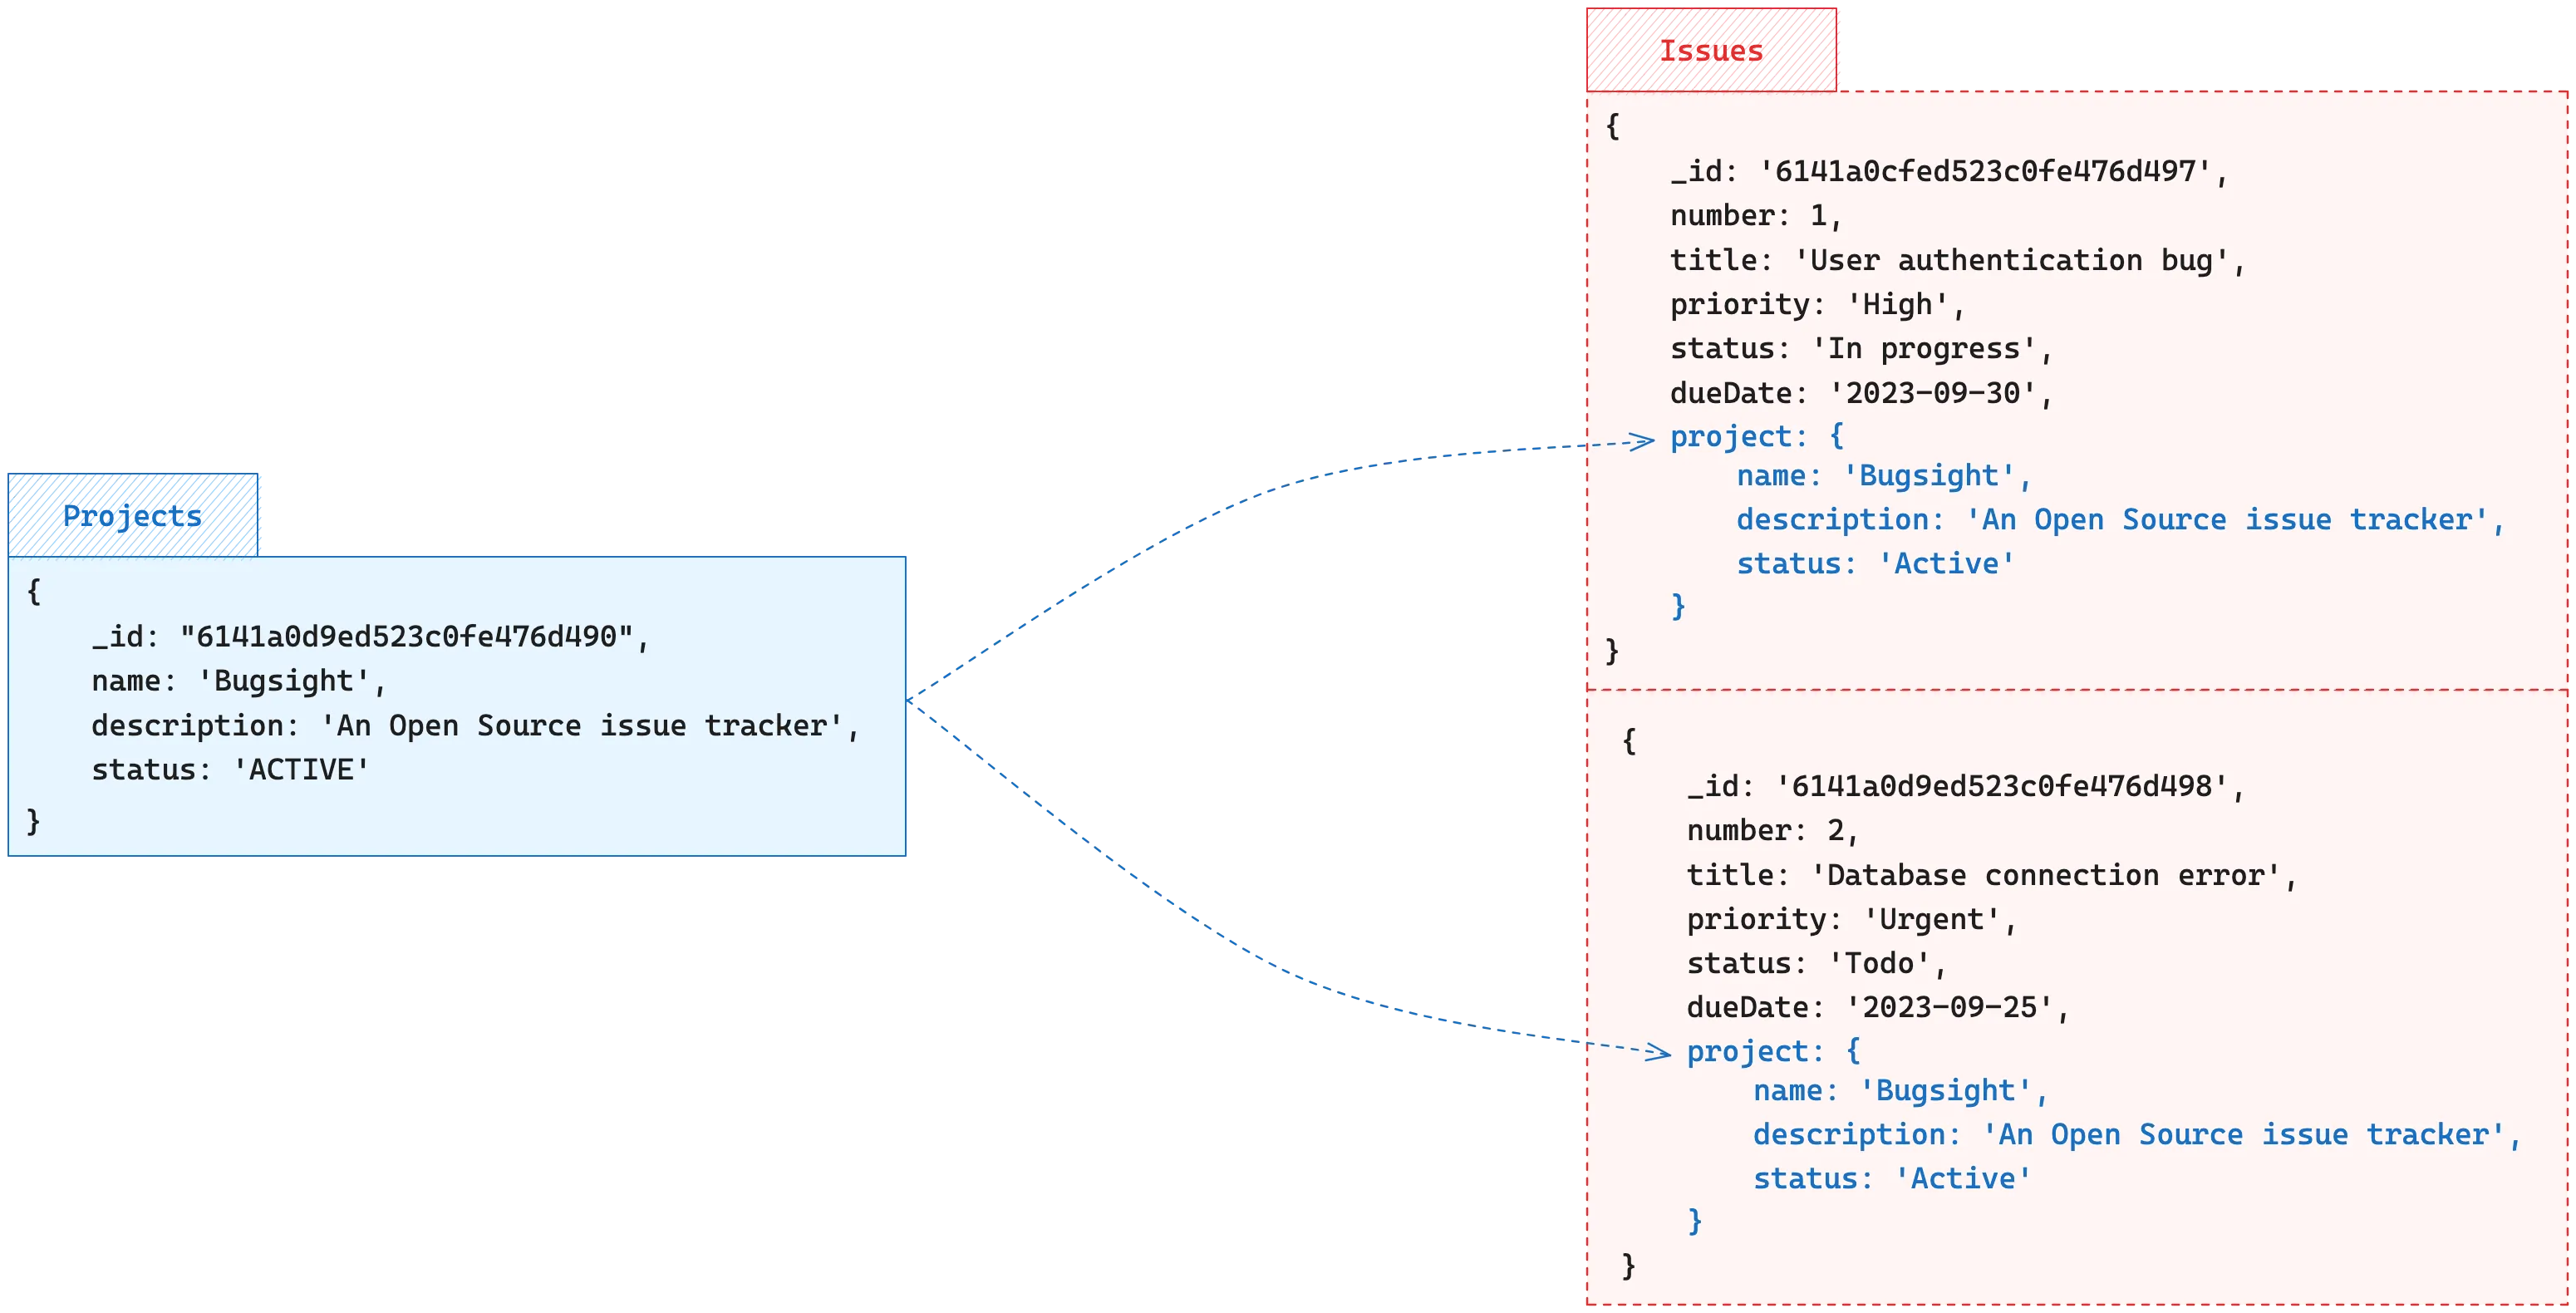
In this design, each Issue would carry basic project information, ideal for scenarios where Issues and their associated Projects are frequently accessed together and where the Project details are unlikely to change. However, this approach could result in considerable data duplication.
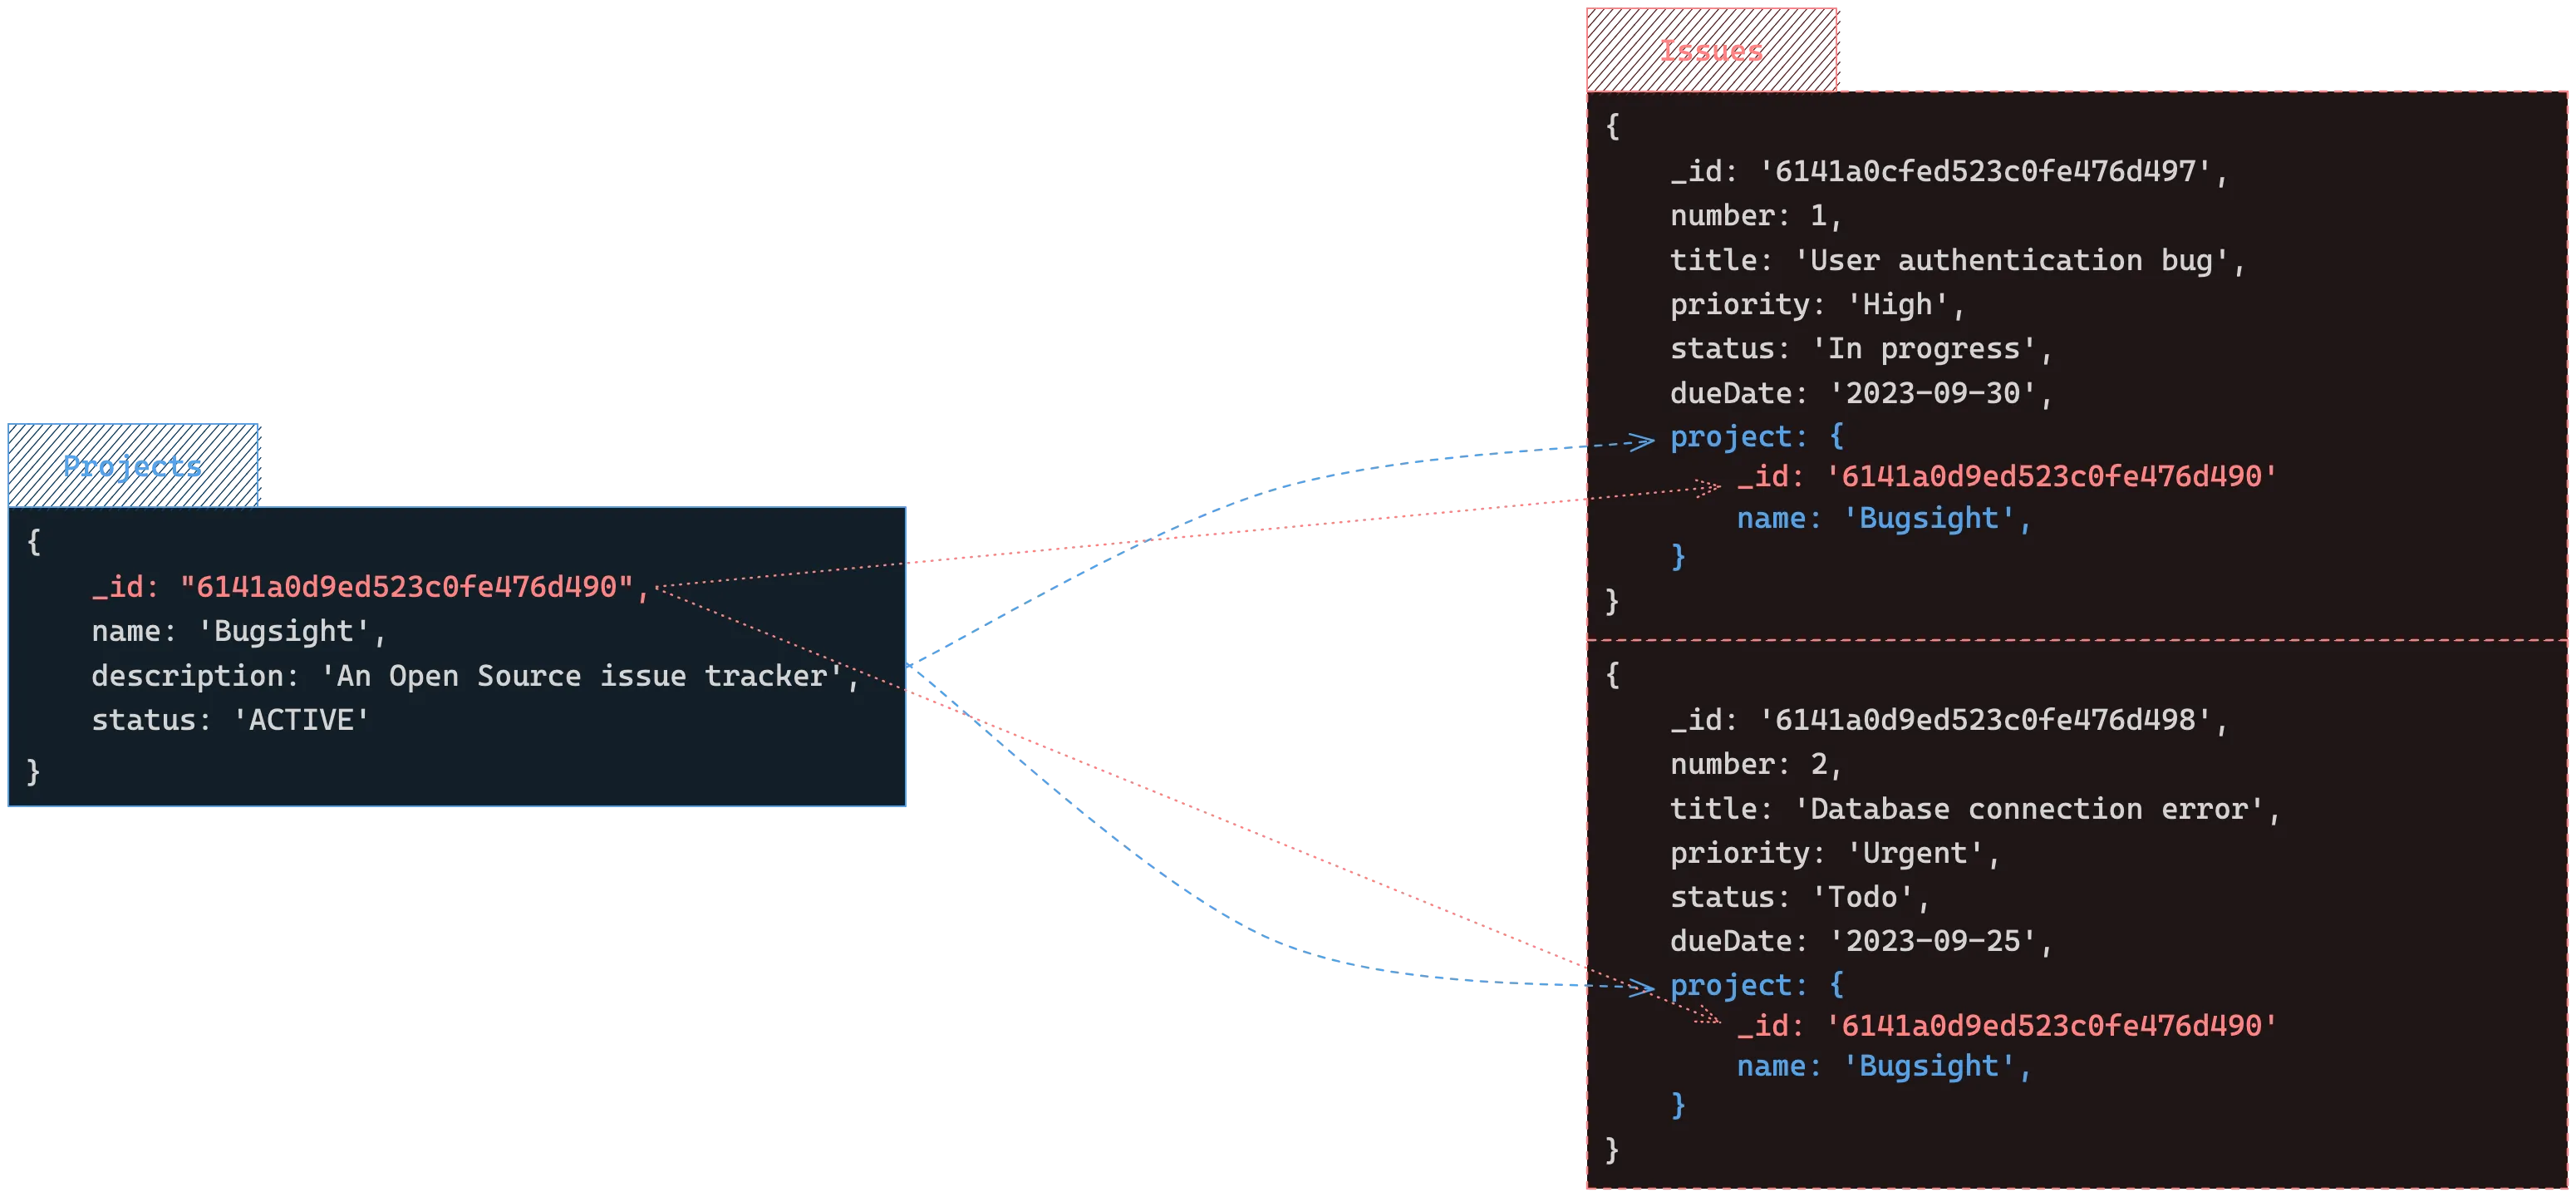
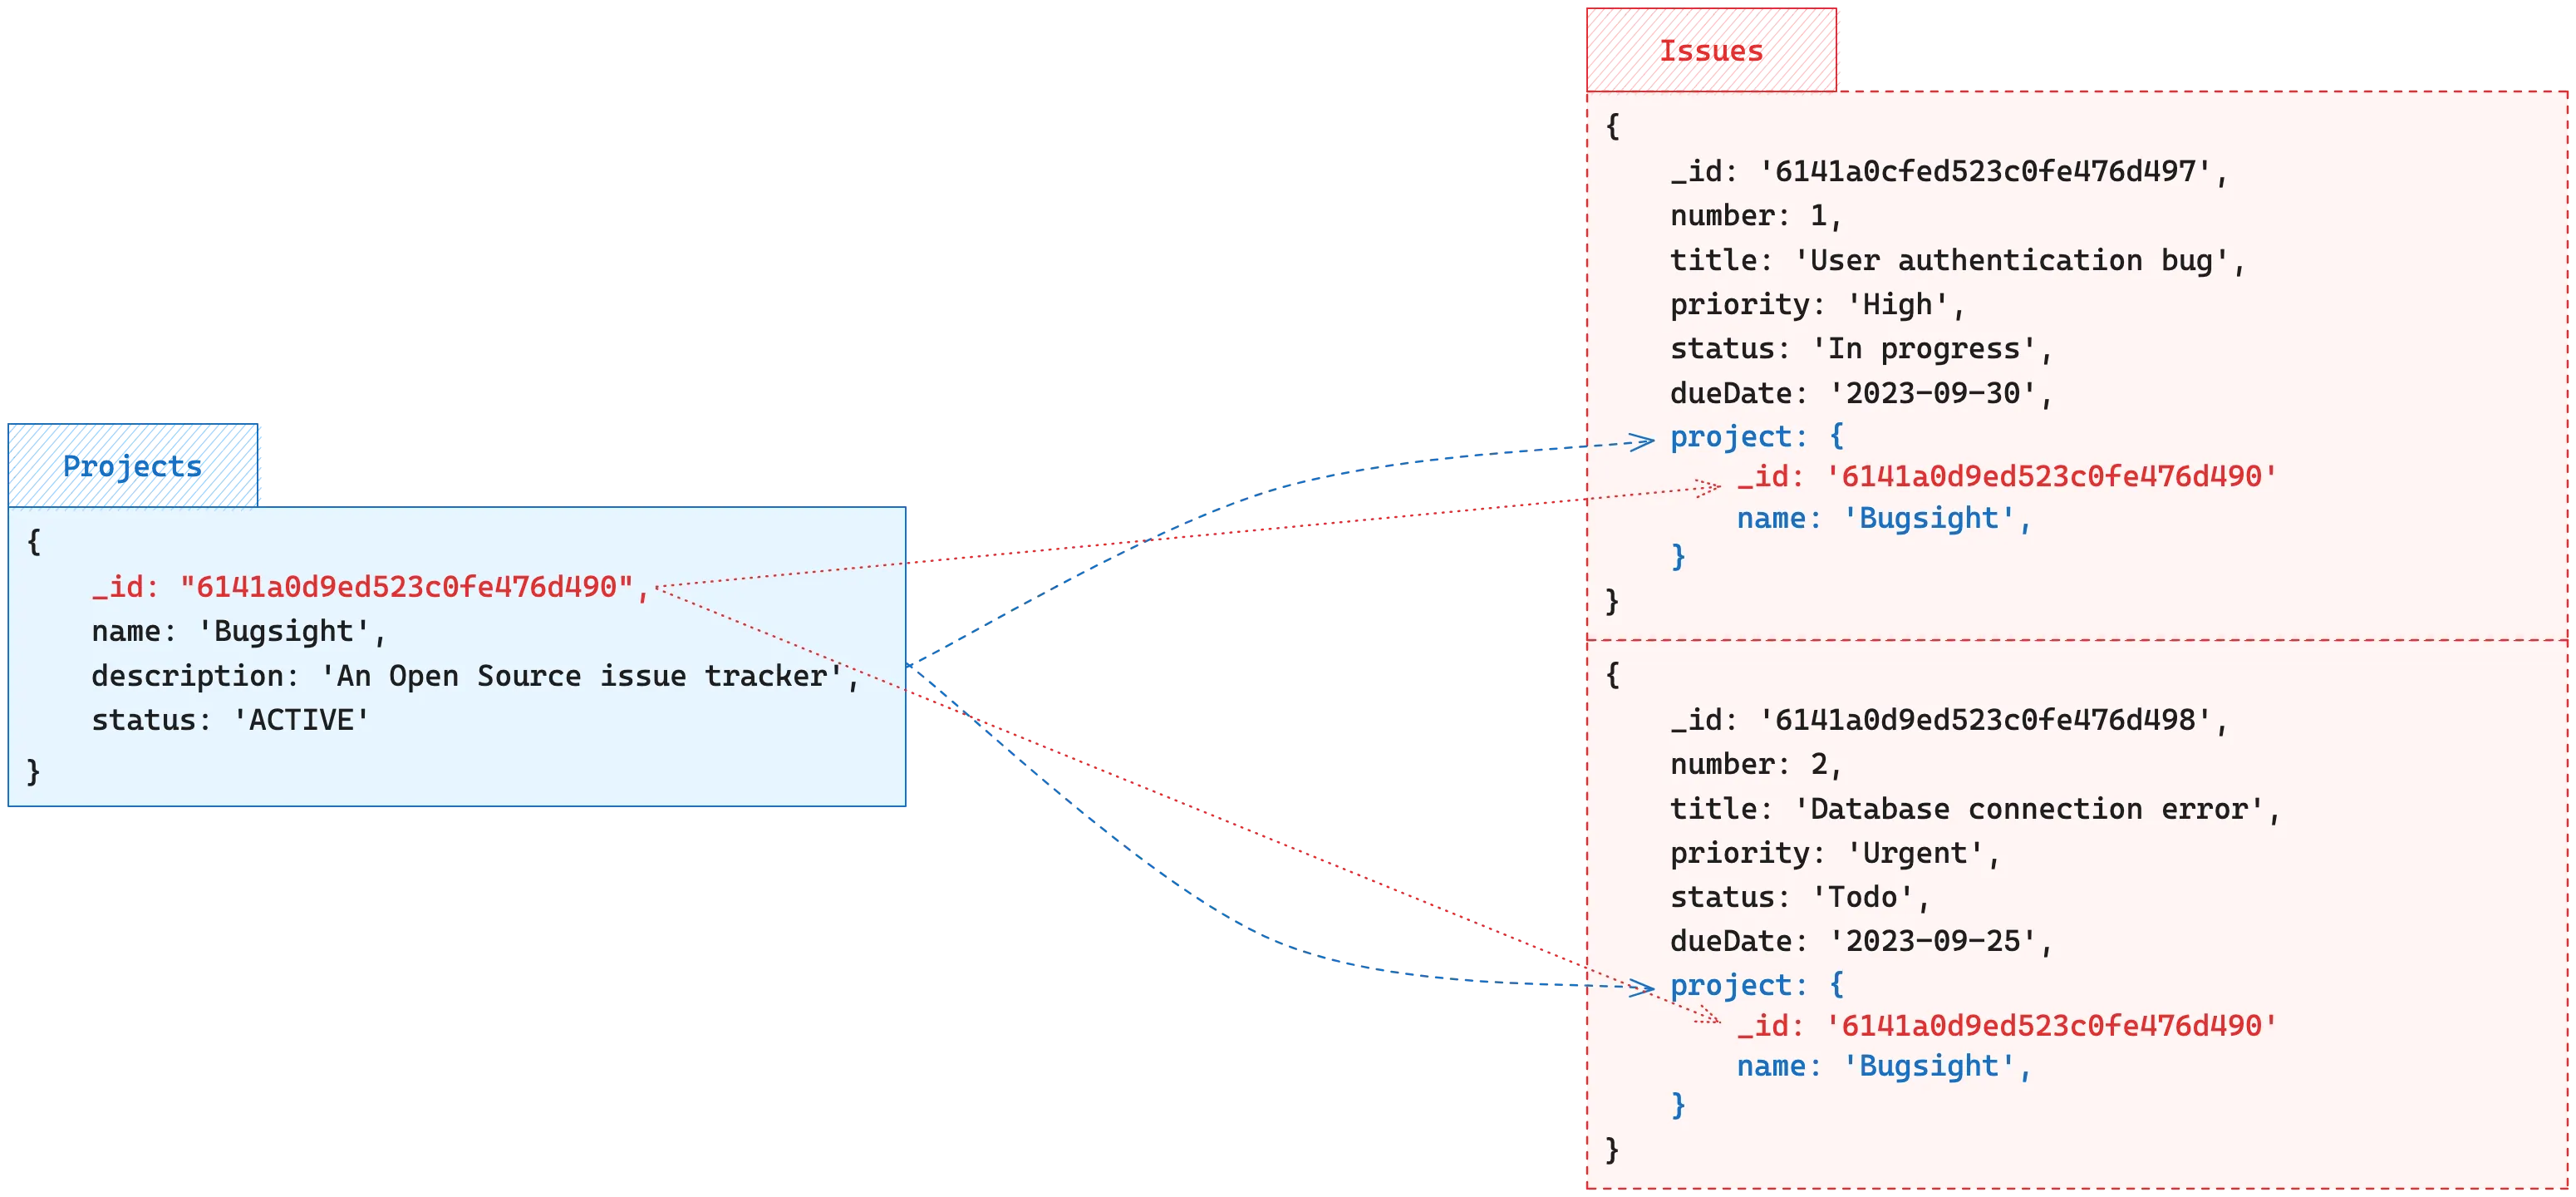
To minimize data duplication, include only essential project details in each Issue and use a reference for complete project data when necessary. For instance, simply displaying the project's name alongside an issue might suffice. This strategy is called The Extended Reference Pattern.
To completely understand our database, I have created a diagram displaying each collection and its corresponding fields and data types. To illustrate the relationships between collections, I have included arrows in the diagram. An arrow that ends with '1' indicates a one-to-one relationship, while an arrow that ends with 'n' signifies a one-to-many relationship.

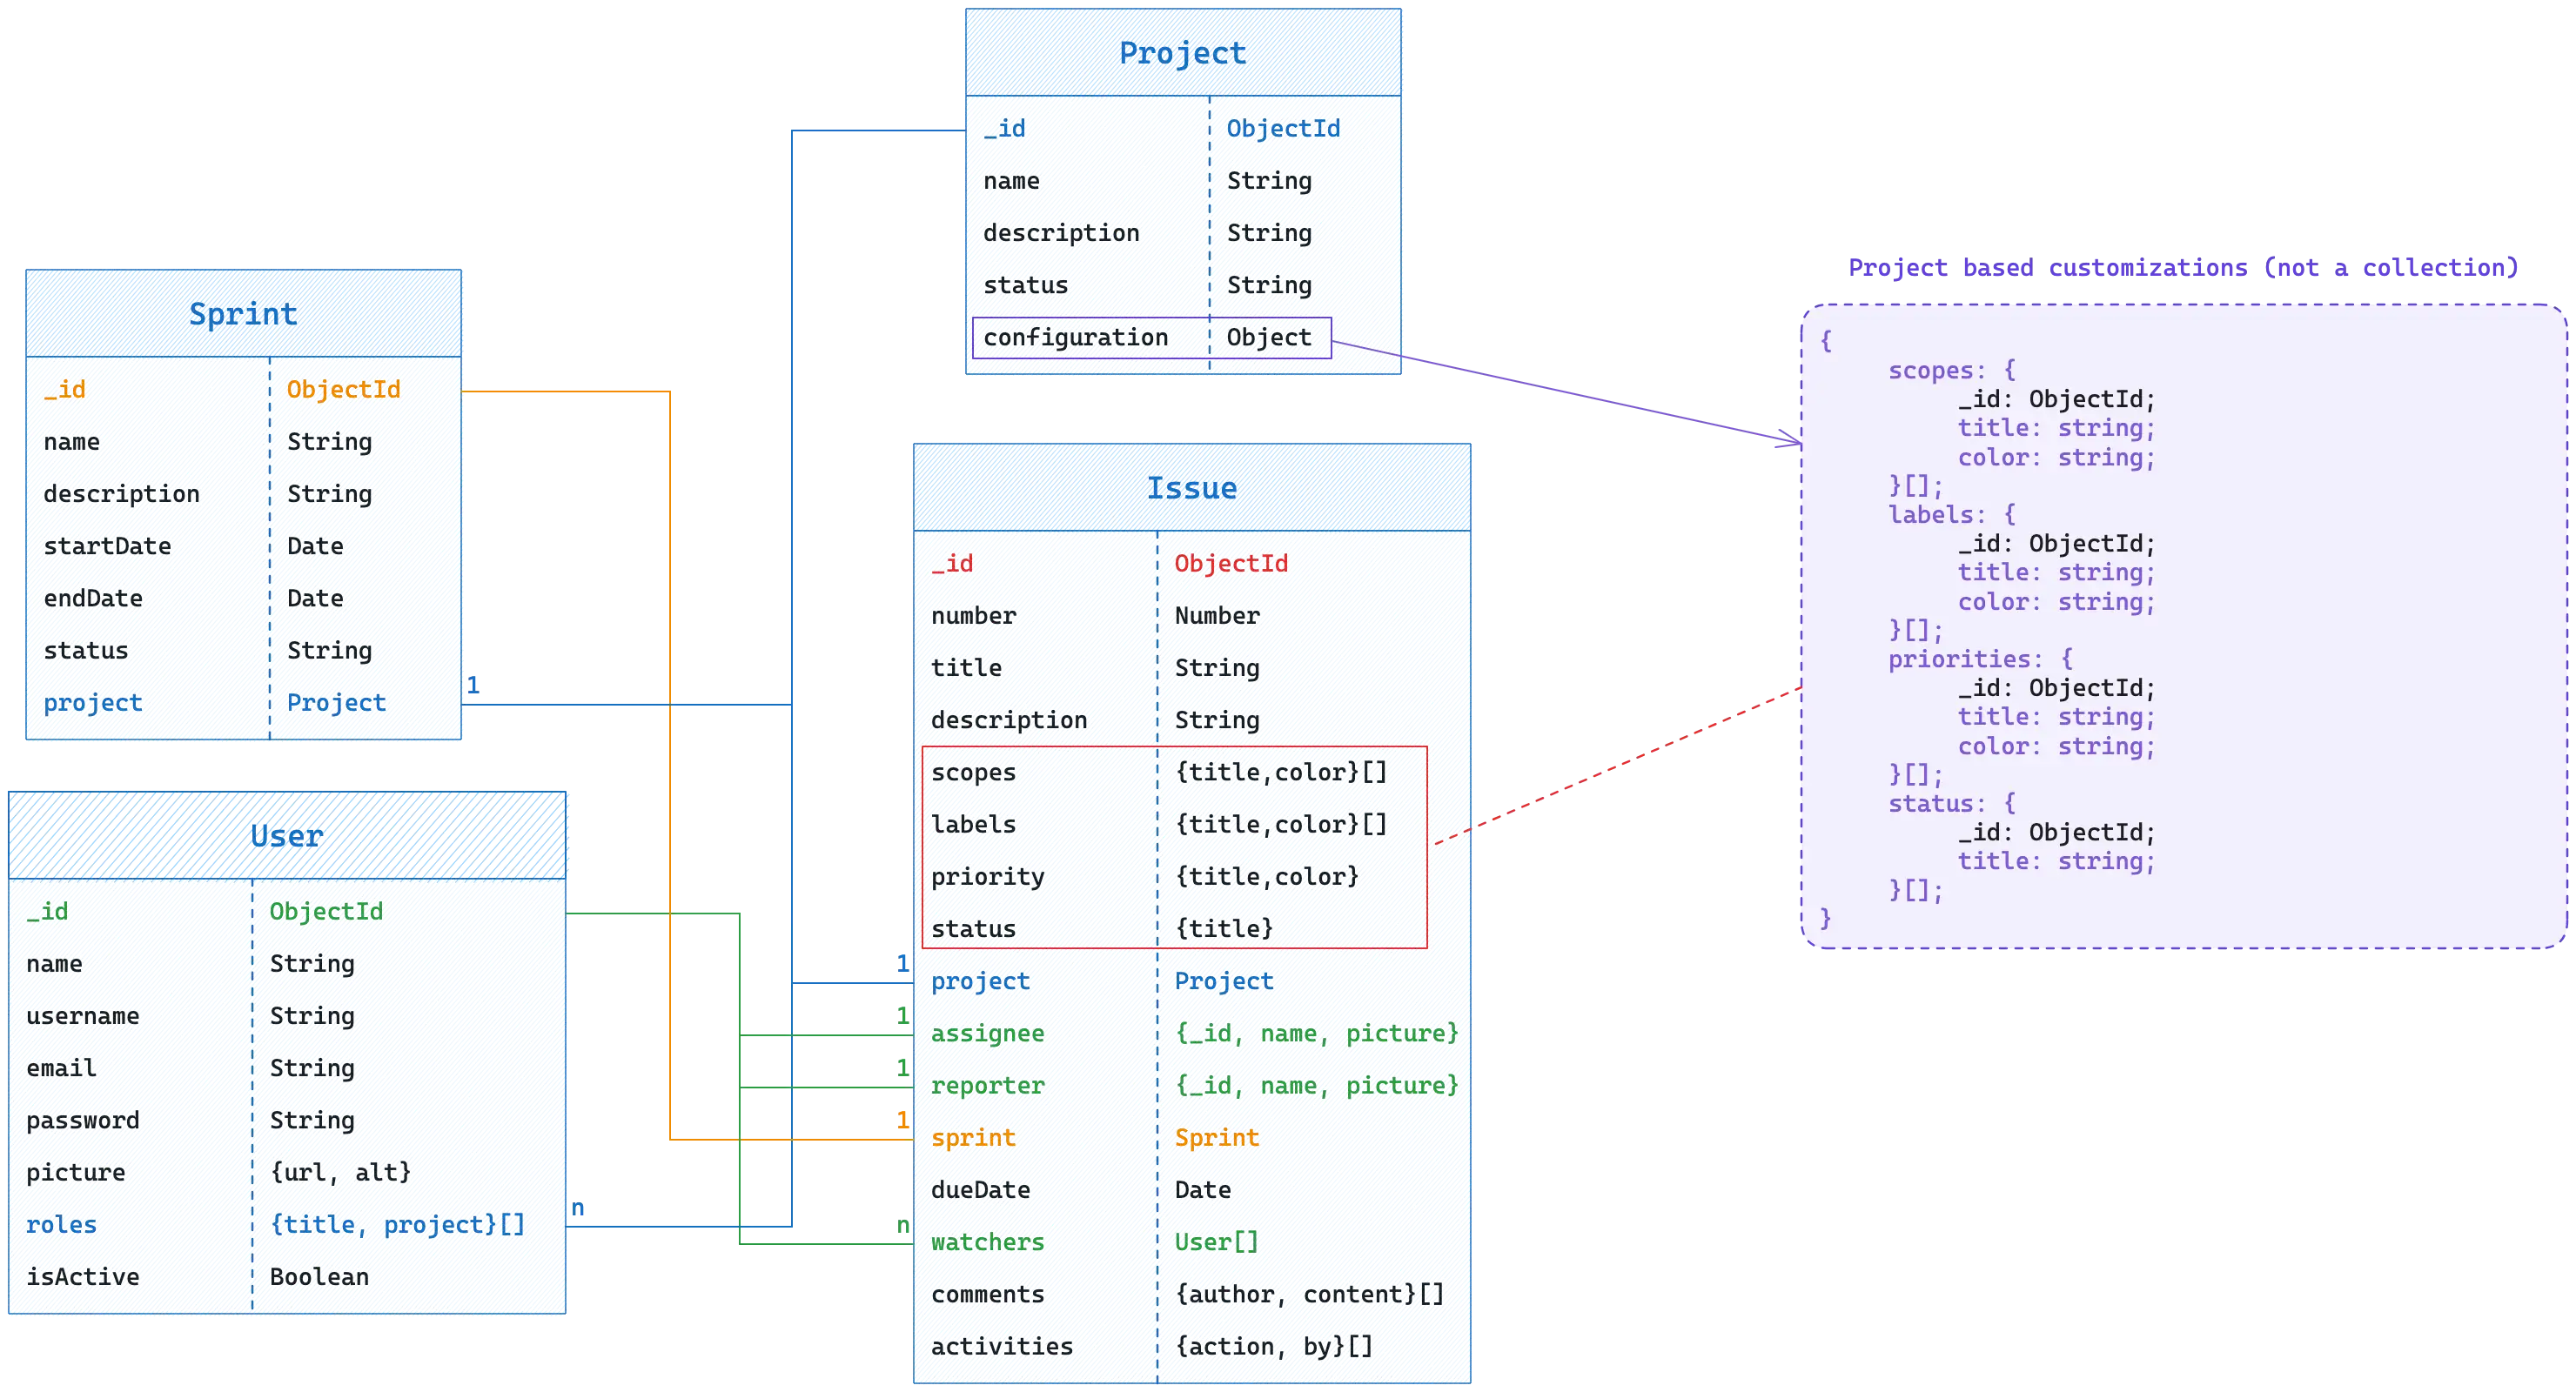
Our current schema might appear minimalistic for a bug-tracking system, but it serves as a solid foundation. Expect to update and enhance it down the line to include new features or make essential changes.
Some considerations:
- Duplication and Update Concerns: certain fields are denormalized to optimize read operations. This makes querying faster but can complicate updates. For instance, if a project's name changes, you'll need to update it in both the Projects collection and every Issue associated with that project. Handle these carefully to avoid data inconsistencies.
- Embedding or Referencing: We've blended both approaches in our schema. This is common in MongoDB, but it's good to consistently evaluate if embedding or referencing is the right choice. For example, if
commentsgrow significantly, consider segregating them into a new collection and linking them to Issue. - Array Growth: MongoDB imposes a document size cap. If arrays like
commentsoractivitiesswell, consider alternative designs before hitting that limit.
Remember that MongoDB schema should align closely with your application's specific needs for optimal performance. And remember, schema evolution is part of the development journey. Be prepared to adjust as your application's requirements shift.
As mentioned, our primary focus in this article is on schema modeling. Accordingly, we'll create two files for each component: index.ts and model.ts. These files lay the groundwork for defining your database schema and exporting the models. However, in a forthcoming article, we'll introduce the dao.ts file. This file will serve as an intermediary layer that facilitates interactions with the database, enabling you to execute queries, perform updates, and more.
|-- api/
|   |-- components/
|   |   |-- issue/
|   |   |   |-- dao.ts
|   |   |   |-- index.ts
|   |   |-- project/
|   |   |   |-- dao.ts
|   |   |   |-- index.ts
|   |   |-- sprint/
|   |   |   |-- dao.ts
|   |   |   |-- index.ts
|   |   |-- user/
|   |   |   |-- dao.ts
|   |   |   |-- index.ts
|-- app.ts
|-- index.ts
|-- api/
| |-- components/
| | |-- issue/
| | | |-- dao.ts
| | | |-- index.ts
| | |-- project/
| | | |-- dao.ts
| | | |-- index.ts
| | |-- sprint/
| | | |-- dao.ts
| | | |-- index.ts
| | |-- user/
| | | |-- dao.ts
| | | |-- index.ts
|-- app.ts
|-- index.tsAnd don't forget to add your components to the components.ts file so they can be recognized and imported by Node.js.
export type Component = string | NestedComponents;

export interface NestedComponents {
	[key: string]: Component;
}

const components: NestedComponents = {
	user: 'user',
	issue: 'issue',
	project: 'project',
	sprint: 'sprint'
};

export default components;export type Component = string | NestedComponents;
export interface NestedComponents {
[key: string]: Component;
}
const components: NestedComponents = {
user: 'user',
issue: 'issue',
project: 'project',
sprint: 'sprint'
};
export default components;Having explored the principles of effective database design, let's now delve into how to model this architecture using Mongoose ODM.
Mongoose Components
Mongoose provides a powerful yet straightforward way to work with MongoDB databases in a Node.js environment. Understanding its core concepts —Model, Schema, and Document— is essential for appreciating how Mongoose streamlines data management and validation.

Schema: The Data Blueprint
In Mongoose, a schema serves as the architectural plan that outlines the format of your data within a MongoDB collection. Every data operation and interaction in Mongoose is centered around this schema.
Each Mongoose schema is tied to a MongoDB collection and defines the documents' shape, type, and characteristics within that collection. Within this schema, you lay out the fields, their data types, any validations, constraints, and even what are often called middleware or hooks.
The Schemaconstructor from the Mongoose library provides an organized way to define the structure of MongoDB documents:
import { Schema } from 'mongoose';

const projectSchema = new Schema({
	name: String,
	description: String,
	status: String,
	configuration: {
		scopes: [
			{
				title: String,
				color: String,
				icon: String
			}
		],
		// ... other fields
	}
});import { Schema } from 'mongoose';
const projectSchema = new Schema({
name: String,
description: String,
status: String,
configuration: {
scopes: [
{
title: String,
color: String,
icon: String
}
],
// ... other fields
}
});According to this schema, each document in the linked MongoDB collection will include fields like name, description, status, and configuration. These fields encapsulate the range of attributes that a project document can possess. Individual documents might feature only a subset of these fields, depending on the situation.
From the MongoDB angle, the Schema functions as a design template for its corresponding Collection, guaranteeing that all documents adhere to the specified structure.
Fields in the schema can vary from simple types like Strings to more complex structures like objects. Moreover, further validation and constraints can be incorporated for each field as required.
Model: Compiled Version of Schema
The concept of a Model goes beyond being merely a compiled Schema. It acts as the object constructor for generating documents and stands as the primary gateway for all operations on the corresponding MongoDB collection. In essence, the Model serves as a complete abstraction of the MongoDB collection it represents.
import { Schema, model } from 'mongoose';

const projectSchema = new Schema({ ... });

export default model('Project', projectSchema);import { Schema, model } from 'mongoose';
const projectSchema = new Schema({ ... });
export default model('Project', projectSchema);Here, we utilize Mongoose's model function to convert our pre-defined projectSchema into a functional Model. This resulting Model comes packed with various methods, allowing extensive interactions with its corresponding MongoDB collection.
Document: The Data Instances
Think of a Document as an individual entry or record within your database. It's born from a Model and embodies all the attributes outlined in the Schema. In practical terms, a Document functions as a live instance of your data that you can create, read, update, or delete directly within the application.
To illustrate, let's create a new Document using the Project model:
const project = {
	name: 'Bugsight',
	description: 'Self-hosted, Node.js based issue tracker',
	status: 'Active',
	configuration: {
		scopes: [{ title: 'UI' }, { title: 'UX' }],
		labels: [{ title: 'Bug' }, { title: 'Feature' }, { title: 'Discussion' }]
	}
};

const result = await Project.create(project);
console.log(result);

/*
// OUTPUT:
{
	"_id": "65098b67528fcb4c5698a0f4",
	"name": "Bugsight",
	"description": "Self-hosted, Node.js based issue tracker",
	"status": "Active",
	"configuration": {
		"scopes": [
			{ "title": "UI", "_id": "65098b67528fcb4c5698a0f5" },
			{ "title": "UX", "_id": "65098b67528fcb4c5698a0f6" }
		],
		"labels": [
			{ "title": "Bug", "_id": "65098b67528fcb4c5698a0f7" },
			{ "title": "Feature", "_id": "65098b67528fcb4c5698a0f8" },
			{ "title": "Discussion", "_id": 65098b67528fcb4c5698a0f9" }
		],
		"priorities": [],
		"status": []
	},
	"__v": 0
}
*/
const project = {
name: 'Bugsight',
description: 'Self-hosted, Node.js based issue tracker',
status: 'Active',
configuration: {
scopes: [{ title: 'UI' }, { title: 'UX' }],
labels: [{ title: 'Bug' }, { title: 'Feature' }, { title: 'Discussion' }]
}
};
const result = await Project.create(project);
console.log(result);
/*
// OUTPUT:
{
"_id": "65098b67528fcb4c5698a0f4",
"name": "Bugsight",
"description": "Self-hosted, Node.js based issue tracker",
"status": "Active",
"configuration": {
"scopes": [
{ "title": "UI", "_id": "65098b67528fcb4c5698a0f5" },
{ "title": "UX", "_id": "65098b67528fcb4c5698a0f6" }
],
"labels": [
{ "title": "Bug", "_id": "65098b67528fcb4c5698a0f7" },
{ "title": "Feature", "_id": "65098b67528fcb4c5698a0f8" },
{ "title": "Discussion", "_id": 65098b67528fcb4c5698a0f9" }
],
"priorities": [],
"status": []
},
"__v": 0
}
*/Visualize your data
MongoDB offers three primary methods for visualizing and interacting with your data: MongoDB Shell for command-line fans, MongoDB Compass for those who appreciate graphical interfaces, and MongoDB Atlas for users who prefer a cloud-based experience.
Mongosh, short for MongoDB Shell, provides a command-line interface (CLI) for MongoDB interactions. It's handy for hands-on tasks such as scripting and database administration. To install Mongosh, head over to MongoDB's official website or use a package manager like brew:
brew install mongoshbrew install mongoshOnce installed, you can connect to your MongoDB instance by running:
# Using a MongoDB Atlas connection string
mongosh "mongodb+srv://username:password@cluster.mongodb.net/myDB"

# OR for a local MongoDB instance
mongosh
# Using a MongoDB Atlas connection string
mongosh "mongodb+srv://username:password@cluster.mongodb.net/myDB"
# OR for a local MongoDB instance
mongoshTo switch to a specific database, run the use command:
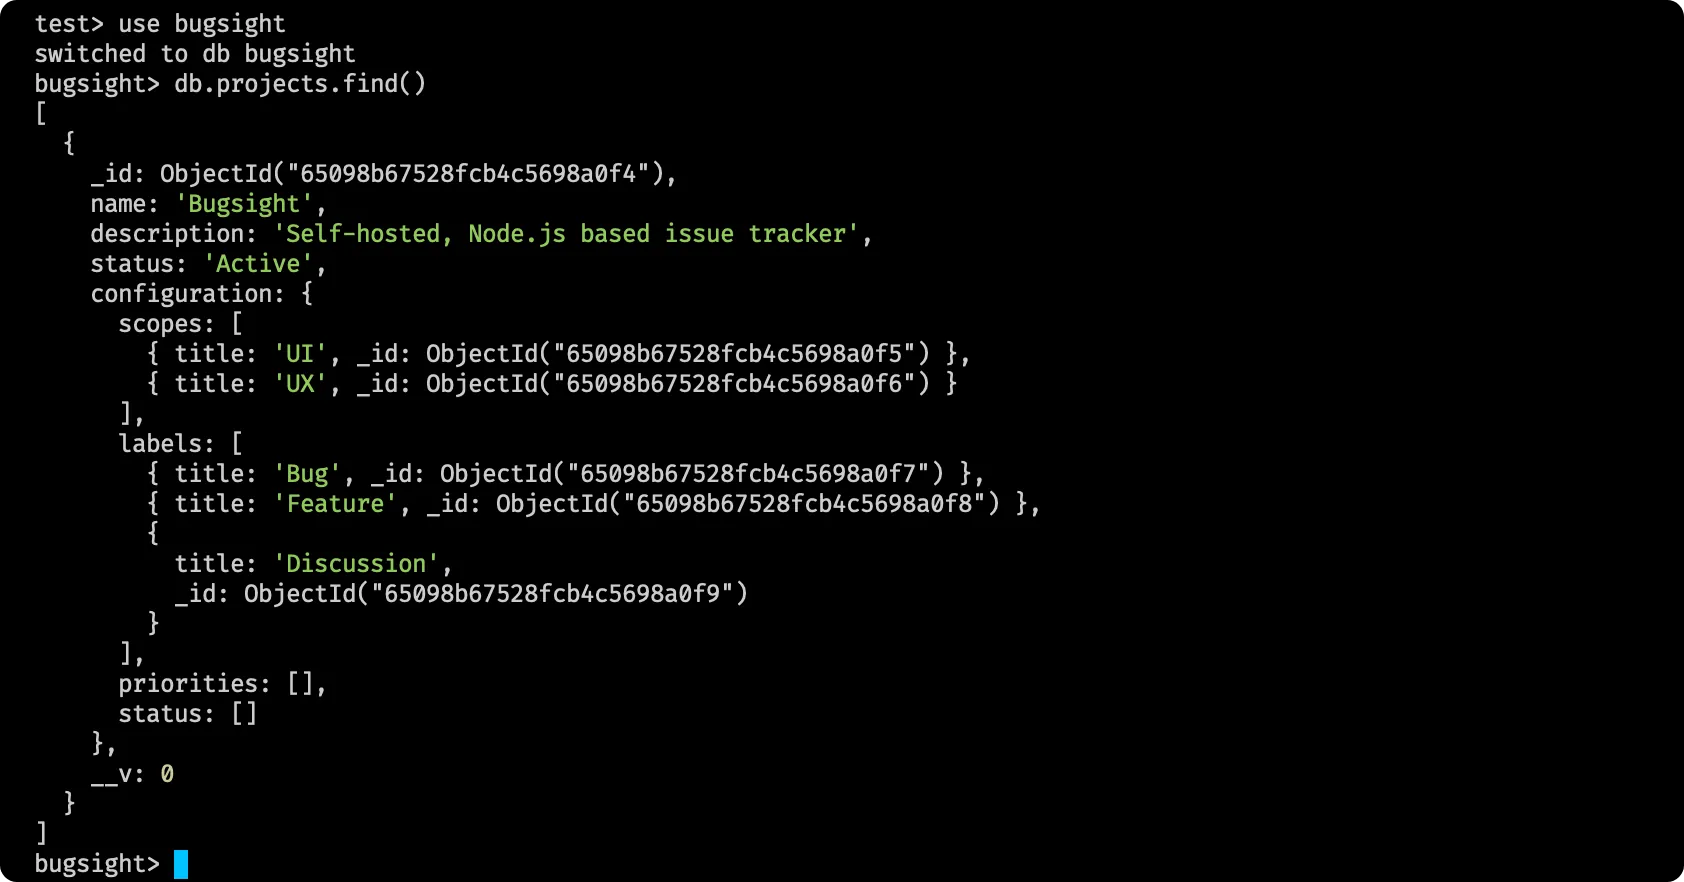
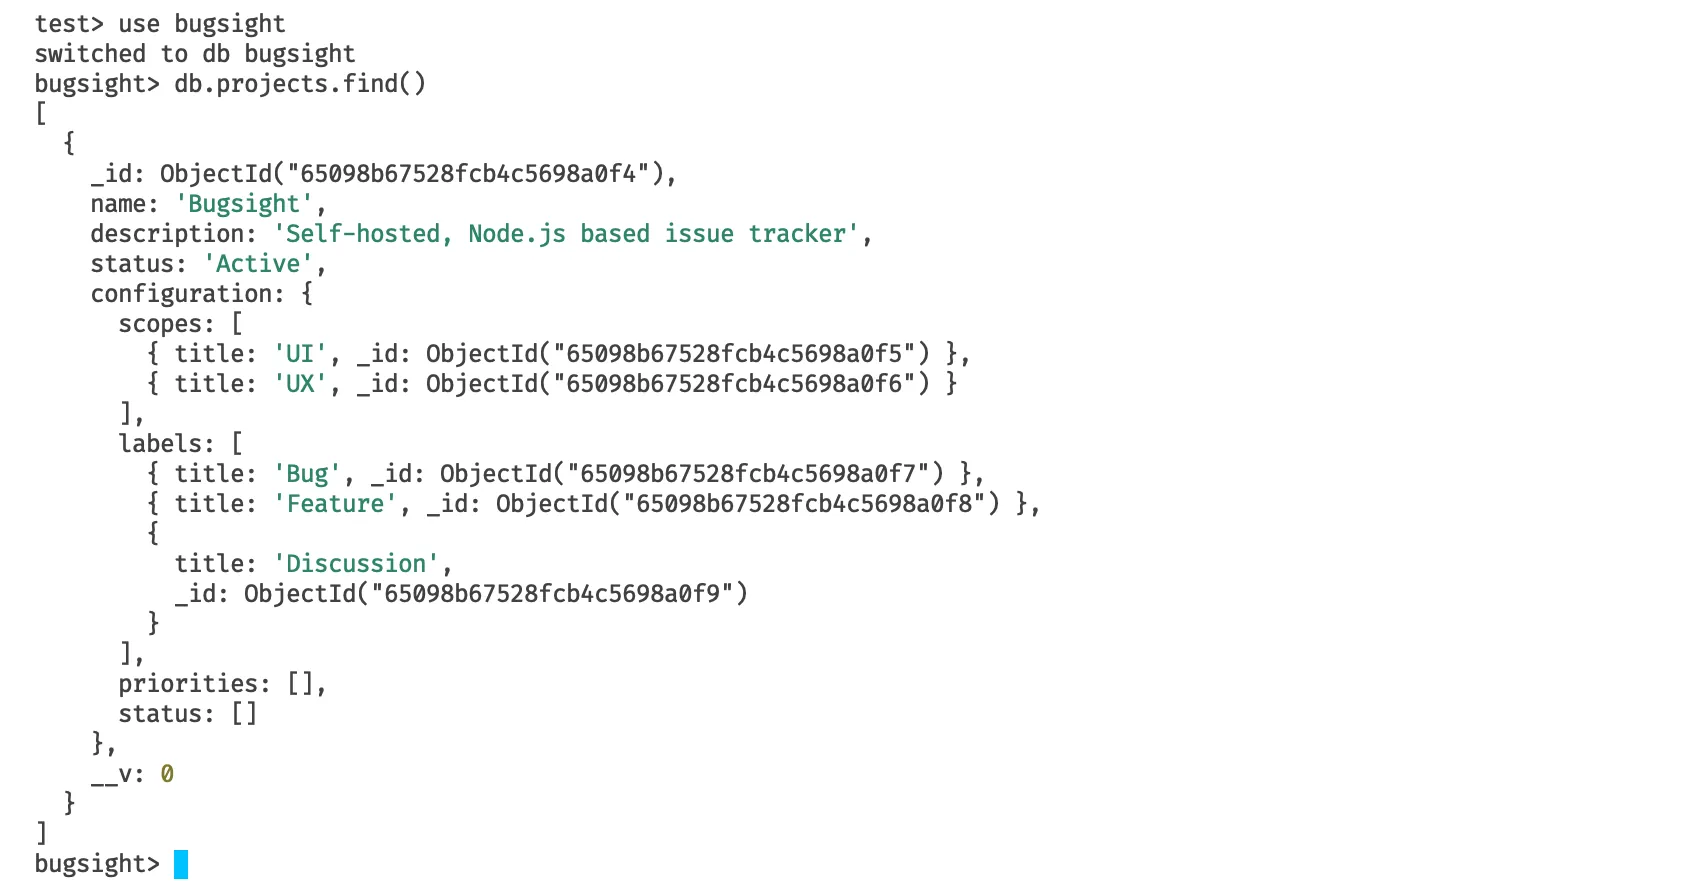
use bugsightuse bugsightOnce connected, you can execute MongoDB methods and queries. For example, run db.project.find() to list saved projects.
If you prefer a graphical interface for database management, MongoDB Compass offers an intuitive platform for visualizing data, executing queries, and managing indexes. Alternatively, if you're utilizing MongoDB Atlas's cloud solution, you can use its web-based interface, which closely resembles Compass and requires no additional installation.
TypeScript and Mongoose Integration
Starting from version 5.11.0, Mongoose has extended native support for TypeScript, effectively marrying TypeScript's strong typing capabilities with MongoDB's flexible data storage.
Defining Interfaces
TypeScript excels at providing type safety, and to capitalize on this strength, it's crucial to define interfaces that outline the expected structure of your documents. In essence, an interface acts as a strict blueprint, guaranteeing that each document you interact with adheres to a specified format.
import { Schema, model } from 'mongoose';

export interface IProject {
	name: string;
	description: string;
	status: string;
	configuration: {
		scopes: {
			title: string;
			color: string;
			icon: string;
		}[];
		// ... other fields
	};
}

const projectSchema = new Schema({ ... });

export default model('Project', projectSchema);import { Schema, model } from 'mongoose';
export interface IProject {
name: string;
description: string;
status: string;
configuration: {
scopes: {
title: string;
color: string;
icon: string;
}[];
// ... other fields
};
}
const projectSchema = new Schema({ ... });
export default model('Project', projectSchema);In this example, the IProject interface explicitly requires that each project have fields such as name, description, status, and configurations with their respective types.
Extending Document Interface
Mongoose's Document interface brings its own set of built-in methods and properties, which apply to all Mongoose documents. By extending this Document interface, you signal to TypeScript about these standard properties.
import { Document, Schema, model } from 'mongoose';

export interface IProject {...}

export interface IProjectDocument extends IProject, Document {}

const projectSchema = new Schema({ ... });

export default model('Project', projectSchema);import { Document, Schema, model } from 'mongoose';
export interface IProject {...}
export interface IProjectDocument extends IProject, Document {}
const projectSchema = new Schema({ ... });
export default model('Project', projectSchema);Here, IProjectDocument combines the custom fields of IProject and the standard methods and properties of Mongoose's Document, providing a cohesive model structure.
Strong Typed Schema & Model
TypeScript integration leads to a nuanced change in how you define Mongoose schemas. The schema is now tagged as type IProjectDocument, tightening the type constraints on your documents.
import { Document, Schema, model } from 'mongoose';

export interface IProject {...}

export interface IProjectDocument extends IProject, Document {}

const projectSchema = new Schema<IProjectDocument>({ ... });

export default model('Project', projectSchema);import { Document, Schema, model } from 'mongoose';
export interface IProject {...}
export interface IProjectDocument extends IProject, Document {}
const projectSchema = new Schema<IProjectDocument>({ ... });
export default model('Project', projectSchema);You can easily build a Mongoose typed model once your schema and extended document interface are ready.
import { Document, Schema, model } from 'mongoose';

export interface IProject {...}

export interface IProjectDocument extends IProject, Document {}

const projectSchema = new Schema<IProjectDocument>({ ... });

export default model<IProjectDocument>('Project', projectSchema);import { Document, Schema, model } from 'mongoose';
export interface IProject {...}
export interface IProjectDocument extends IProject, Document {}
const projectSchema = new Schema<IProjectDocument>({ ... });
export default model<IProjectDocument>('Project', projectSchema);This setup not only ensures type-safe operations when dealing with Mongoose models and documents but also elevates the reliability of your code and minimizes errors.
Schema validation
Ensuring data validation is crucial, especially when working with MongoDB, a database known for its flexibility. Mongoose offers robust schema validation features to maintain the integrity and reliability of your data, even in MongoDB's schema-less environment.
Data Types
Mongoose allows you to set specific data types for each field in a schema, ranging from standard JavaScript types like String, Number, Date, and Boolean to Mongoose-specific types such as
ObjectId and Mixed.
To gain a clearer understanding, let's examine the IssueSchema as it demonstrates a diverse range of field types:
//...issue's umport and interfaces

const issueSchema = new Schema<IIssueDocument>({
	number: Number,
	title: String,
	scopes: [
		{
			title: String,
			color: String,
			icon: String
		}
	],
	priority: {
		title: String,
		color: String,
		icon: String
	},
	project: Schema.Types.ObjectId,
	reporter: {
		_id: Schema.Types.ObjectId,
		name: string,
		picture: string
	},
	dueDate: Date,
	watchers: [Schema.Types.ObjectId],
	//...other fields
});

export default model<IIssueDocument>('Issue', issueSchema);//...issue's umport and interfaces
const issueSchema = new Schema<IIssueDocument>({
number: Number,
title: String,
scopes: [
{
title: String,
color: String,
icon: String
}
],
priority: {
title: String,
color: String,
icon: String
},
project: Schema.Types.ObjectId,
reporter: {
_id: Schema.Types.ObjectId,
name: string,
picture: string
},
dueDate: Date,
watchers: [Schema.Types.ObjectId],
//...other fields
});
export default model<IIssueDocument>('Issue', issueSchema);In contrast to native data types, which directly represent the values stored, Mongoose's ObjectId fulfills a specialized function. This 24-character hexadecimal string serves as a unique identifier for each document. MongoDB auto-generates these IDs whenever you create a new document.
The ObjectId is vital in establishing relationships among various documents within your MongoDB database. In terms familiar to those who work with relational databases, it functions like a 'foreign key'. For instance, IssueSchema employs ObjectId to create references to other collections, such as User and Project. This capability enables you to design a more interconnected data model on top of MongoDB's NoSQL foundation.
Mongoose automatically handles type-casting. For instance, if you provide a numeric String for a number field, Mongoose will convert it into an actual Number. But there's a limit. If you insert a String that can't be parsed as a Number into a number field, Mongoose will throw a validation error.
const issue: IIssue = { number: '1', title: 'First Issue', ... };
const createdIssue = await IssueModel.create(issue); // Succeeds, as '1' is automatically converted to the number 1.

const issue: IIssue = { number: '1a', title: 'Second Issue', ... };
const createdIssue = await IssueModel.create(issue); // Fails, resulting in a ValidationError because '1a' isn't a valid number.
const issue: IIssue = { number: '1', title: 'First Issue', ... };
const createdIssue = await IssueModel.create(issue); // Succeeds, as '1' is automatically converted to the number 1.
const issue: IIssue = { number: '1a', title: 'Second Issue', ... };
const createdIssue = await IssueModel.create(issue); // Fails, resulting in a ValidationError because '1a' isn't a valid number.Enforcing Mandatory Fields
Certain fields within a database schema are essential for a data record's integrity and meaningful representation. For instance, the name and status fields are non-negotiable in a Project schema.
Mongoose addresses this necessity through the required field option, ensuring that specific attributes are present before saving a document to the database.
The required setting in a Mongoose schema can either be a boolean or a function that returns a boolean. A built-in required validator is attached to the property when set to true, making it a mandatory field.
const projectSchema = new Schema<IProjectDocument>({
	name: {
		type: String,
		required: true // can also be a function that returns a boolean
	},
	description: String,
	status: {
		type: String,
		required: true
	},
	//...other fields
});const projectSchema = new Schema<IProjectDocument>({
name: {
type: String,
required: true // can also be a function that returns a boolean
},
description: String,
status: {
type: String,
required: true
},
//...other fields
});In the example of projectSchema, fields like name and status are marked as required and must contain string values. If a field only has its type specified, such as description, you can use shorthand notation to define it.
By default, fields that lack a required attribute are considered optional. Therefore, in the corresponding TypeScript IProject interface, the description field should be marked as optional.
export interface IProject {
	name: string;
	description?: string;
	status: string;
	// ... other fields
}export interface IProject {
name: string;
description?: string;
status: string;
// ... other fields
}Attempting to save a project that omits a required field like name or status will lead to a validation error. For example:
const project: IProject = {
	name: '',
	description: 'Self-hosted, Node.js based issue tracker',
	status: 'Active',
	//...other fields
};
await Project.create(project); // ValidationError: Project validation failed: name: Path name is required.
const project: IProject = {
name: '',
description: 'Self-hosted, Node.js based issue tracker',
status: 'Active',
//...other fields
};
await Project.create(project); // ValidationError: Project validation failed: name: Path name is required.Enum Validation
The enum attribute in Mongoose schemas adds an extra layer of data integrity. It restricts the values of a given field to a set list of acceptable options. Once you define an enum for a field, Mongoose deploys a validator that verifies if the field's value precisely aligns with one of the options listed in the array.
Take the projectSchema as an example. You can limit the status field to only accept specific values like Active, Archived, On Hold, and Completed. Doing so ensures that the status field will hold only those values in the pre-defined list.
enum ProjectStatus {
	ACTIVE = 'Active',
	ARCHIVED = 'Archived',
	ON_HOLD = 'On Hold',
	COMPLETED = 'Completed'
}

export interface IProject {
	status: ProjectStatus;
	// ..other fields
}

export interface IProjectDocument extends IProject, Document {}

const projectSchema = new Schema<IProjectDocument>({
	status: {
		type: String,
		enum: Object.values(ProjectStatus),
		required: true
	},
	// ... other fields
});enum ProjectStatus {
ACTIVE = 'Active',
ARCHIVED = 'Archived',
ON_HOLD = 'On Hold',
COMPLETED = 'Completed'
}
export interface IProject {
status: ProjectStatus;
// ..other fields
}
export interface IProjectDocument extends IProject, Document {}
const projectSchema = new Schema<IProjectDocument>({
status: {
type: String,
enum: Object.values(ProjectStatus),
required: true
},
// ... other fields
});Here, the status field in the IProject interface uses the ProjectStatus enum to define acceptable statuses. In the Mongoose schema, we use Object.values(ProjectStatus) to generate an array of valid statuses dynamically based on the enum.
In addition to the frequently used built-in validators such as the ones we discussed. Mongoose provides an array of specialized validators to manage more complex data conditions. These include min, max, minlength, and maxlength. For a comprehensive list and more details, see the official documentation.
Custom Validators
One of Mongoose's most powerful capabilities is its extensibility. Although it offers a wide array of built-in validators, there are situations where you may require custom-made validation logic for your application. Mongoose makes it straightforward to define these specialized validators.
To build a custom validator, you must include a validator function in the schema definition. This function accepts the value to be validated as its first argument and should return a boolean indicating whether the validation is successful. If the function returns false or throws an error,
the validation is considered to have failed.
For instance, you want to ensure email addresses adhere to a specific format. You can use a regular expression to validate the email structure. Here's an example within a schema:
const userSchema = new Schema<IUserDocument>({
	email: {
		type: String,
		required: true,
		validate: {
			validator(v: string): boolean {
				return /^\w+([\.-]?\w+)*@\w+([\.-]?\w+)*(\.\w{2,3})+$/.test(v);
			},
		}
	},
	//...other fields
});const userSchema = new Schema<IUserDocument>({
email: {
type: String,
required: true,
validate: {
validator(v: string): boolean {
return /^\w+([\.-]?\w+)*@\w+([\.-]?\w+)*(\.\w{2,3})+$/.test(v);
},
}
},
//...other fields
});Now, let's consider a real-world example. Imagine a user is trying to register with an improperly formatted email address:
const user = {
	name: 'Raven Phoenix',
	username: 'raven_phoenix',
	email: 'raven_phoenix@mail',
	password: '123456'
};

await User.create(user);
const user = {
name: 'Raven Phoenix',
username: 'raven_phoenix',
email: 'raven_phoenix@mail',
password: '123456'
};
await User.create(user);In this case, the email lacks a proper domain extension like ".com". When the code runs, Mongoose will flag this as a validation error.
Custom error messages
To specify a custom error message for the required validator, for example, you can pass an array to the required attribute. The first element of the array is the boolean flag indicating whether the field is required, and the second element is the custom error message.
const projectSchema = new Schema<IProjectDocument>({
	name: {
		type: String,
		required: [true, 'The project name is required'],
		maxlength: [50, 'The project name exceeded the length limit']
	},
	//...other fields
});const projectSchema = new Schema<IProjectDocument>({
name: {
type: String,
required: [true, 'The project name is required'],
maxlength: [50, 'The project name exceeded the length limit']
},
//...other fields
});This approach also works for other straightforward built-in validators like min and max. You can include a message property within the enum object to set a custom error message for the enum validator.
const projectSchema = new Schema<IProjectDocument>({
	status: {
		type: String,
		enum: {
			values: Object.values(ProjectStatus),
			message: 'Invalid project status'
		},
		required: true
	},
	//...other fields
});const projectSchema = new Schema<IProjectDocument>({
status: {
type: String,
enum: {
values: Object.values(ProjectStatus),
message: 'Invalid project status'
},
required: true
},
//...other fields
});Similarly, When using custom validation through the validate method, you can specify a custom error message by setting the message property.
const emailSchema = new Schema<IUserDocument>({
	email: {
		type: String,
		required: true,
		validate: {
			validator(v: string): boolean {
				return /^\w+([\.-]?\w+)*@\w+([\.-]?\w+)*(\.\w{2,3})+$/.test(v);
			},
			message: 'Please enter a valid email address.'
		}
	},
	//...other fields
});const emailSchema = new Schema<IUserDocument>({
email: {
type: String,
required: true,
validate: {
validator(v: string): boolean {
return /^\w+([\.-]?\w+)*@\w+([\.-]?\w+)*(\.\w{2,3})+$/.test(v);
},
message: 'Please enter a valid email address.'
}
},
//...other fields
});Mongoose offers basic templating capabilities for its error messages. Specifically, it substitutes the {VALUE} placeholder with the actual value undergoing validation.
const emailSchema = new Schema<IUserDocument>({
	email: {
		type: String,
		required: true,
		validate: {
			validator(v: string): boolean {
				return /^\w+([\.-]?\w+)*@\w+([\.-]?\w+)*(\.\w{2,3})+$/.test(v);
			},
			message: '{VALUE} is not a valid email address'
		}
	},
	//...other fields
});const emailSchema = new Schema<IUserDocument>({
email: {
type: String,
required: true,
validate: {
validator(v: string): boolean {
return /^\w+([\.-]?\w+)*@\w+([\.-]?\w+)*(\.\w{2,3})+$/.test(v);
},
message: '{VALUE} is not a valid email address'
}
},
//...other fields
});Field Options
Mongoose offers a range of settings that control how your data is saved and fetched from the database, assisting in data consistency. These options include text transformations such as lowercase, uppercase, and trim, as well as more general configurations like default and select.
Setting the lowercase option to true in your schema automatically converts all string characters to lowercase before storing them in the database. This is especially useful for fields like email addresses or usernames, where maintaining a standard format is beneficial. While we discuss lowercase here, it's worth noting that uppercase and trim work similarly for converting to uppercase and removing extra white spaces, respectively.
const emailSchema = new Schema<IUserDocument>({
	username: {
		type: String,
		required: true,
		unique: true,
		minlength: [6, 'Username must at least be 6 characters.'],
		lowercase: true
	},
	//...other fields
});const emailSchema = new Schema<IUserDocument>({
username: {
type: String,
required: true,
unique: true,
minlength: [6, 'Username must at least be 6 characters.'],
lowercase: true
},
//...other fields
});In this example, a username like "RavenPHoenix" would be automatically converted to "ravenphoenix" upon saving.
The default attribute in a Mongoose schema allows you to specify a default value for a given path. This value can be a specific data type or function whose return value will be the default.
const projectSchema = new Schema<IProjectDocument>({
	status: {
		type: String,
		enum: Object.values(ProjectStatus),
		default: ProjectStatus.ACTIVE
		required: true
	},
	//...other fields
});const projectSchema = new Schema<IProjectDocument>({
status: {
type: String,
enum: Object.values(ProjectStatus),
default: ProjectStatus.ACTIVE
required: true
},
//...other fields
});In this example, the status field is automatically set to "Active" if no value is provided during document creation.
const project: IProject = {
	name: 'Bugsight',
	description: 'Self-hosted, Node.js based issue tracker'
};
const res = await Project.create(project);
console.log(res.status); // OUTPU: 'Active'
const project: IProject = {
name: 'Bugsight',
description: 'Self-hosted, Node.js based issue tracker'
};
const res = await Project.create(project);
console.log(res.status); // OUTPU: 'Active'The select option in Mongoose is a boolean that controls the default visibility of a field in query results. By setting it to false, the field will not be included in query responses unlessexplicitly requested. This is particularly useful for sensitive data like passwords.
For instance, the password field will be stored in the database when creating a new user. A subsequent query to fetch this user would include this password field by default.
const user: IUser = {
	name: 'Raven Phoenix',
	username: 'raven_phoenix',
	email: 'raven_phoenix@mail.com',
	password: '123456'
};
await User.create(user);

const savedUser = await User.findOne();
console.log(savedUser.password); // OUTPUT: '123456'
const user: IUser = {
name: 'Raven Phoenix',
username: 'raven_phoenix',
email: 'raven_phoenix@mail.com',
password: '123456'
};
await User.create(user);
const savedUser = await User.findOne();
console.log(savedUser.password); // OUTPUT: '123456'However, you can enhance data security by setting the select attribute to false for the password field within the userSchema.
const userSchema = new Schema<IProjectDocument>({
	password: {
		type: String,
		select: false
	},
	//...other fields
});const userSchema = new Schema<IProjectDocument>({
password: {
type: String,
select: false
},
//...other fields
});After making this change, running this function will retrieve all user data except for the password field unless you specifically request to include it in the query.
Managing Relationships
While MongoDB's schema design favors embedded documents, there are situations where linking data across separate collections is necessary. Mongoose gracefully handles these relationships through its ref attribute within the SchemaType definitions. This ref attribute indicates the model that should be referenced when populating the query results later.
The ref attribute acts as a pointer, connecting one schema to another. It specifies which model the ObjectId refers to. Here's an example that illustrates this concept. In the following schema, the fields project and reporter contain ObjectIds. These ObjectIds point to documents in the Project and User collections, respectively.
export interface IIssue {
	project: Types.ObjectId;
	reporter: { _id: Types.ObjectId; name: string; picture: string };
	//...other fields
}

const issueSchema = new Schema<IIssueDocument>({
	project: {
		type: Schema.Types.ObjectId,
		ref: 'Project',
		required: true
	},
	reporter: {
		_id: {
			type: Schema.Types.ObjectId,
			ref: 'User'
		},
		name: String,
		picture: String
	},
	//...other fields
});export interface IIssue {
project: Types.ObjectId;
reporter: { _id: Types.ObjectId; name: string; picture: string };
//...other fields
}
const issueSchema = new Schema<IIssueDocument>({
project: {
type: Schema.Types.ObjectId,
ref: 'Project',
required: true
},
reporter: {
_id: {
type: Schema.Types.ObjectId,
ref: 'User'
},
name: String,
picture: String
},
//...other fields
});In their default state, when you query for issue data, the project and reporter fields will yield ObjectIds:
const issue = await findOne();
console.log(issue.project); // OUTPUT: ObjectId(64fe040ba087b015ab74c932)
console.log(issue.reporter._id); // OUTPUT: ObjectId(64fe040ba087b015ab74c933)
const issue = await findOne();
console.log(issue.project); // OUTPUT: ObjectId(64fe040ba087b015ab74c932)
console.log(issue.reporter._id); // OUTPUT: ObjectId(64fe040ba087b015ab74c933)With the ref attribute in place, you can leverage Mongoose's populate method to quickly fill in these fields when running queries:
const issue = await findOne().populate('project reporter._id');
console.log(issue.project); // OUTPUT: { _id: ObjectId(64fe040ba087b015ab74c932), name: 'Bugsight', ... }
console.log(issue.reporter._id); // OUTPUT: { _id: ObjectId(64fe040ba087b015ab74c933), username: 'johndoe', ... }
const issue = await findOne().populate('project reporter._id');
console.log(issue.project); // OUTPUT: { _id: ObjectId(64fe040ba087b015ab74c932), name: 'Bugsight', ... }
console.log(issue.reporter._id); // OUTPUT: { _id: ObjectId(64fe040ba087b015ab74c933), username: 'johndoe', ... }
Subdocuments VS. Nested Objects
Designing your MongoDB database with Mongoose offers you the choice between Subdocuments and Nested Objects for storing complex data. While both may seem similar, they serve distinct purposes and come with their own set of advantages and limitations.
Nested objects are straightforward structures that are easy to use and quick to retrieve. However, they lack the extensive functionalities available to subdocuments, such as custom validation, middleware, and schema-related features. If your use case is simple and doesn't require specialized behavior, nested objects can be a good fit.
For example, if each user has a profile picture with basic attributes like a URL and alternate text, a nested object would suffice:
const userSchema = new Schema({
    picture: {
        url: String,
        alt: String
    },
    // ... other fields
});const userSchema = new Schema({
picture: {
url: String,
alt: String
},
// ... other fields
});On the other hand, subdocuments in Mongoose are more like autonomous documents that reside within a parent document. They benefit from their dedicated schema, allowing advanced features like middleware, custom validations, and virtuals.
For instance, if an issue contains a list of comments and activities, both of which could need timestamps, custom validations, or middleware, they are better modeled as subdocuments:
const activitySchema = new Schema(
    {
        action: String,
        by: {
            type: Types.ObjectId,
            ref: 'User'
        }
    },
    { timestamps: true }
);

const commentSchema = new Schema(
    {
        content: String,
        author: {
            type: Types.ObjectId,
            ref: 'User'
        }
    },
    { timestamps: true }
);

const issueSchema = new Schema({
    //...other fields
    comments: [commentSchema],
    activities: [activitySchema]
});const activitySchema = new Schema(
{
action: String,
by: {
type: Types.ObjectId,
ref: 'User'
}
},
{ timestamps: true }
);
const commentSchema = new Schema(
{
content: String,
author: {
type: Types.ObjectId,
ref: 'User'
}
},
{ timestamps: true }
);
const issueSchema = new Schema({
//...other fields
comments: [commentSchema],
activities: [activitySchema]
});This way, the comments and activities fields are designed as subdocuments, each with specialized schema and features.
Indexing
Much like the index in a book helps you quickly locate content without scanning every page, MongoDB indexes enable quick document retrieval without scanning the entire collection. They maintain a subset of the data in an organized manner, drastically reducing the number of documents the database engine has to sift through. Mongoose allows you to define indexes through its schema settings, including properties like index and unique, to optimize database performance.
By setting the index: true property for a particular field in your Mongoose schema, you're instructing MongoDB to generate an index for that attribute. This makes query operations on that field faster and more efficient.
For instance, consider a User schema where we index the name field:
const userSchema = new Schema<IUserDocument>({
	name: {
		type: String,
		required: true,
		index: true
	},
	//...Other fields
});const userSchema = new Schema<IUserDocument>({
name: {
type: String,
required: true,
index: true
},
//...Other fields
});MongoDB quickly navigates its index tree by indexing the name field to locate the relevant documents. This feature is handy in extensive collections where a non-indexed query might have to scan every document, resulting in significant delays.
Separately, the unique: true property ensures that all data for a given field are distinct across the collection. MongoDB will return an error if a duplicate value for a unique field is attempted.
Here's how you'd define username and email as unique fields in the UserSchema:
const userSchema = new Schema<IUserDocument>({
	username: {
		type: String,
		unique: true
	},
	email: {
		type: String,
		unique: true
	},
	// ...Other fields
});const userSchema = new Schema<IUserDocument>({
username: {
type: String,
unique: true
},
email: {
type: String,
unique: true
},
// ...Other fields
});Attempting to create a new user with an existing username or email would yield a MongoDB E11000 error, indicating a duplicate key violation.
const user: IUser = {
	name: 'Max Storm',
	username: 'max_storm',
	email: 'max.storm@mail.com'
};
await User.create(user);
await User.create(user); // MongoServerError: E11000 duplicate key error collection: bugsight.users index: username_1 dup key: { username: "max_storm" }const user: IUser = {
name: 'Max Storm',
username: 'max_storm',
email: 'max.storm@mail.com'
};
await User.create(user);
await User.create(user); // MongoServerError: E11000 duplicate key error collection: bugsight.users index: username_1 dup key: { username: "max_storm" }In certain situations, you may want to ensure that a combination of fields is unique across all documents in a collection. MongoDB supports this requirement through the use of unique compound indexes.
Let's say you have a number field which should be unique only withing the scope of a particular project. You could accomplish this by creating a unique compound index on both the number and project fields.
const issueSchema = new Schema<IIssueDocument>({
	number: {
		type: Number
	},
	project: {
		type: Schema.Types.ObjectId,
		ref: 'Project',
		required: true
	},
	//...other fields
});

issueSchema.index({ number: 1, project: 1 }, { unique: true });const issueSchema = new Schema<IIssueDocument>({
number: {
type: Number
},
project: {
type: Schema.Types.ObjectId,
ref: 'Project',
required: true
},
//...other fields
});
issueSchema.index({ number: 1, project: 1 }, { unique: true });Though indexes speed up data retrieval, they come with a trade-off: they require updates whenever data changes. This could impact the performance of data insertion or modification. Therefore, it's crucial to be selective about which fields to index. Prioritize fields frequently involved in search or sort operations to maintain an efficient database without unnecessary overhead.
Schema configuration
Mongoose provides a wide range of options to customize your schema configuration. Below are some valuable options you might consider using to enhance your application: autoCreate, autoIndex, and timestamps.
autoIndex
The autoIndex option in a Mongoose schema controls the automatic creation of indexes for the associated MongoDB collection. When set to true, Mongoose will create the indexes for you. This is particularly useful for ensuring that indexes are created for you automatically without requiring manual intervention.
const projectSchema = new Schema<IProjectDocument>(
	{
		//...schema fields
	},
	{ autoIndex: true }
);const projectSchema = new Schema<IProjectDocument>(
{
//...schema fields
},
{ autoIndex: true }
);By default, autoIndex is set to true; Therefore, upon compiling this model, the Projects collection is created with the specified indexes.
While the automatic index-building feature is convenient, it's not always suitable for production databases for a couple of reasons:
- Performance Overhead: Creating indexes is an operation that can consume significant CPU and memory resources, especially on extensive collections. This may interfere with the regular operations of your production database.
- Production Concerns: Creating indexes automatically can be risky in production, especially when the database has existing data. It's often better to manage indexes manually.
For these reasons, you may choose to enable autoIndex only in the development stage and disable it in production. The choice can be driven by environment variables:
import environment from '../../../env/index';

const projectSchema = new Schema<IProjectDocument>(
	{
		//...schema fields
	},
	{ autoIndex: environment.node.env === 'development' }
);import environment from '../../../env/index';
const projectSchema = new Schema<IProjectDocument>(
{
//...schema fields
},
{ autoIndex: environment.node.env === 'development' }
);Here, autoIndex is enabled solely when the application is in development mode. In a production environment where autoIndex might be set to false, it's crucial to manage indexes manually. This can be done using MongoDB's native methods, CLI utilities, or a structured database migration strategy.
autoCreate
The autoCreate option, when set to true, ensures that the collection for the model is automatically created if it doesn't already exist.
autoCreate is set to true by default; if you wish not to create collections automatically until you save your first document, set it to false.
import environment from '../../../env/index';

const projectSchema = new Schema<IProjectDocument>(
	{
		//...schema fields
	},
	{ autoIndex: environment.node.env === 'development', autoCreate: false }
);import environment from '../../../env/index';
const projectSchema = new Schema<IProjectDocument>(
{
//...schema fields
},
{ autoIndex: environment.node.env === 'development', autoCreate: false }
);If autoIndex is enabled (true or the default setting), it takes precedence over a false value for autoCreate. This makes sense, as the very action of creating an index necessitates the existence of the collection. Thus, even if autoCreate is set to false, Mongoose will create the collection if it doesn't already exist when indexing is triggered.
collection
Mongoose automatically pluralizes the model name to derive the MongoDB collection name. While this default behavior simplifies the process for many developers, there may be instances where a custom collection name is necessary.
Mongoose offers the collection option within the schema options object in such cases. Utilizing this option allows you to explicitly define the collection name according to your needs.
const userSchema = new Schema<IUserDocument>(
	{
		//...schema fields
	},
	{ collection: 'people' }
);const userSchema = new Schema<IUserDocument>(
{
//...schema fields
},
{ collection: 'people' }
);The userSchema will correspond to a MongoDB collection named people in this configuration. This overrides the default name (users) that Mongoose would have automatically generated.
Customizing the collection name is especially beneficial in situations like:
- Working with a pre-existing database where collection names are already established.
- Get past Mongoose's default pluralization, which may not fit your specific naming rules.
- Desiring more meaningful or descriptive collection names for easier database management.
timestamps
Tracking when documents are created or modified is often an essential requirement in application development, especially in our case (bug-tracking app). Mongoose provides a straightforward way to handle this with its timestamps option. This feature automatically appends createdAt and updatedAt fields to your schema when activated. Both of these fields have a Date data type.
By default, enabling timestamps will automatically create two fields: createdAt and updatedAt.
export interface IUser {
	createdAt?: Date;
	updatedAt?: Date;
	//...other fields
}

const userSchema = new Schema<IUserDocument>(
	{
		//...schema fields
	},
	{ timestamps: true }
);export interface IUser {
createdAt?: Date;
updatedAt?: Date;
//...other fields
}
const userSchema = new Schema<IUserDocument>(
{
//...schema fields
},
{ timestamps: true }
);If the default names createdAt and updatedAt do not align with your naming conventions, Mongoose offers the flexibility to rename them.
export interface IUser {
	registeredAt?: Date;
	updatedAt?: Date;
	//...other fields
}

const userSchema = new Schema<IUserDocument>(
	{
		//...schema fields
	},
	{ timestamps: { createdAt: 'registeredAt' } }
);export interface IUser {
registeredAt?: Date;
updatedAt?: Date;
//...other fields
}
const userSchema = new Schema<IUserDocument>(
{
//...schema fields
},
{ timestamps: { createdAt: 'registeredAt' } }
);By default, Mongoose relies on JavaScript's native new Date() function to determine the current time. You can customize this by setting your own function via the timestamps.currentTime sub-option.
export interface IUser {
	registeredAt?: number;
	updatedAt?: number;
	//...other fields
}

const userSchema = new Schema<IUserDocument>(
	{
		registeredAt: Number,
		updatedAt: Number
		//...other fields
	},
	{
		timestamps: {
			createdAt: 'registeredAt',
			currentTime = () => Date.now()
		}
	}
);export interface IUser {
registeredAt?: number;
updatedAt?: number;
//...other fields
}
const userSchema = new Schema<IUserDocument>(
{
registeredAt: Number,
updatedAt: Number
//...other fields
},
{
timestamps: {
createdAt: 'registeredAt',
currentTime = () => Date.now()
}
}
);In this configuration, the Date.now() function returns the current time in milliseconds since the Unix epoch. It's important to note that while new Date() returns a Date object, Date.now() returns a number representing the milliseconds.
Conclusion
Mongoose has much more to offer besides the topics we covered, like virtuals, aliases, hooks, methods, and plugins. We will cover some of them in future articles when needed. The following article will focus on effective and performant data querying by introducing the Data Access Objects (DAO) concept.
You can find the complete code source in this repository; feel free to give it a star ⭐️.
If you want to keep up with this series, consider subscribing to my newsletter to receive updates as soon as I publish an article.